Showing posts with label Lightroom. Show all posts

Wednesday, July 13, 2016

Lightroom for Mobile July Releases

You can read the full news release  at  the Adobe Lightroom Blog website

http://blogs.adobe.com/lightroomjournal/2016/07/lightroom-mobile-july-updates.html

Two big updates for Lightroom for mobile are now available for download: Lightroom for iOS 2.4 and Lightroom for Android 2.1.

Dreams of Meteora || Greece

Photograph by Elia Locardi of the valley in Meteora, Greece. Shot in raw on a Fuji XT-2 and edited on location with an iPad Pro with Lightroom for iOS.

Lightroom for iOS 2.4

IMG_4385In version 2.4, two major improvements have been added: a raw technology preview and the addition of local adjustment tools. In addition to these major improvements, we’ve also added the ability to use keyboard shortcuts with physical keyboards connected to iPads, the ability to add your copyright to all imported photos, functionality to turn on lens profiles (if your camera and lens combination are supported), as well as the usual bug fixes and improvements.

Read more...

Wednesday, January 27, 2016

Lightroom CC 2015.4 / 6.4 now available

New Lightroom and Photoshop Camera Raw update

You can read all of the release information at Lightroom’s Blog http://blogs.adobe.com/lightroomjournal/


Lightroom CC 2015.4 and Lightroom 6.4 are now available on Adobe.com.  The goal of this release is to provide additional camera raw support, lens profile support and address bugs that were introduced in previous releases of Lightroom.  This release also includes a new Boundary Warp feature for Creative Cloud members.

Introducing Boundary Warp (New Feature)

Stitched panoramas often have non-rectangular boundaries. There are several ways to handle irregular boundaries. The most common approach is to apply a rectangular crop. This is straightforward, but important image details near the boundary may be lost due to cropping. Another approach is to use Content Aware Fill (in Photoshop) to fill in the transparent areas outside the boundary. This can be effective, but may require multiple attempts to obtain a satisfying (smooth, artifact-free) result. It can also be expensive and requires rendering out the panorama to an output-referred(non-raw) format. Boundary Warp is a feature that provides another approach to handling the irregular boundary of panoramas. The feature analyzes the boundary and warps the image so that its edges fit a rectangular frame.  Here’s a visual example of the feature:

bw_ani_1000x400


Wednesday, April 22, 2015

Lightroom 6 --What's New?

Lightroom 6 is now available via a Cloud Subscription or as a Stand alone “forever” purchase.

LR6 banner

Adobe Product Manager,  Tom Hogarty details the changes in Lightroom 6 in a blog post at photoshop.com. http://blogs.adobe.com/photoshopdotcom/2015/04/the-cc-photography-plan-keeps-getting_better.html  This post includes video highlights of the new abilities in Lightroom. 

For a more detailed list of Lightroom 6 features, The blog post at Lightroom Queen, by Victoria Bampton,  http://www.lightroomqueen.com/whats-new-lightroom-cc-6-0/ lists them all…

Note: The features in Lightroom 5 have NOT been changed, and as a result Everything you have learned about Lightroom 5 is available in Lightroom 6. Victoria Bampton has a free Adobe Photoshop Lightroom 5 – Quick Start Guide, a 76 page PDF eBook that is available here… http://www.lightroomqueen.com/free-ebook/lr5/

Craft&Vision at http://craftandvision.com/products/lightroom-6-up-to-speed?mc_cid=f0e9a9f79d&mc_eid=87d61c6f70 has an e-book  “Lightroom 6 Up to Speed Everything You Need to Know About the Adobe Lightroom 6 Upgrade by  Piet Van den Eynde
It’s $6.00 Canadian ($4.74 US)  until March 29… 

By the way Lightroom 6 now takes advantage of your computer’s graphics card, and yes, it is much faster…

Enjoy!!! I am.


Tuesday, February 10, 2015

Finding Duplicates in Lightroom


Using Lightroom's Search Filters

Use the Library Filter for just Date, and turn off all the others (set to None)

Lightroom will display the photos sequentially, using the Camera's EXIF Data for "Time Captured" by Month, day, year and hours, minutes and seconds. Any photos with the same Capture time will be displayed side by side...

It would look like this in Lightroom's Library Module...

Lib-Filter

Things to watch for are photos shot with a hi-speed "burst" shooting Mode where 3 or more photos are less than seconds apart. It would be best if you stacked photos shot in a rapid sequence, or bracket first.

You can also try a search by Filename, and use as a filter Contains = "copy", or "1" or "2" ... sometimes when files are duplicated one of those extensions are added to the filename...

FileName

Plug-ins

Before you use or try any of these plug-ins, make sure your catalogue is up to date, optimized and backed up...

Teekesselchen

A FREE fast duplicate finder plug-in for Adobe Lightroom using EXIF meta-data.

http://www.bungenstock.de/teekesselchen/

I was really impressed with how fast this plug-in worked and how it is implemented. The online documentation is excellent.

LR Duplicate Finder

A "commercial" plug-in by Jim Keier (England) Cost is £8.50 (currently about $13.50 in US Dollars

You can watch a video and purchase it on this page http://www.lightroom-plugins.com/DupesIndex.php

Laura Shoe, a Lightroom Guru also has a video with some useful insights, you can watch it right here!

Stand Alone Programs for Mac and PC

Mac
My favorite Mac duplicate finder Photo app is called PhotoSweeper

There is a Lite version http://overmacs.com/photosweeperlite.html $2.99<br >

and a "Full" Version. http://overmacs.com/photosweeperlite.html<br > $9.99<br >

The PhotoSweepers work on iPhoto, Aperture and Lightroom Libraries. At the above websites you can even download a trial version.

PC

Awesome Duplicate Photo Finder

A free Tool for finding and remove duplicate photos on your PC. http://www.duplicate-finder.com/photo.html


Thursday, January 29, 2015

Lightroom - Class Review #2


Lightroom - Class Review #2

1. Importing and exporting catalogues.

You can find details here on this blog at  http://psforphotos.blogspot.com/2014/05/importing-and-merging-catalogues-in.html

2. Control + J (PC) and Command + J (Mac)

The Library View Options, Grid View This panel lets you customize the metadata information displayed on the Library Thumbnails.

The Loupe View panel lets you customize metadata in the Library's Loupe view or on the Develop Modules display... Press the "I" (eye key) to cycle through the data being displayed. The image farther down the page is displaying Loupe View metadata.

3. The Develop Module.

For a synopsis of what each panel does in Lightroom check out the following web page. http://uofgts.com/Lightroom/input.html Click the Tab: Develop --Global Adjustments

You'll find keyboard shortcuts, and a brief description of what each panel does and links to the pages below and more...

This is a case study of the enhancing steps I took in Lightroom for the image "Rocky Creek."

The Histogram: http://uofgts.com/Lightroom/DevelopModule/index.html

Photo Analyses: http://uofgts.com/Lightroom/DevelopModule/part2.html

White Balance http://uofgts.com/Lightroom/DevelopModule/part3.html

Basic Panel http://uofgts.com/Lightroom/DevelopModule/part4.html

and the

Tone Curves http://uofgts.com/Lightroom/DevelopModule/tonecurves.html

By the way, as you work on an image, you can compare the image you are working on to the way the image originally looked by pressing the backslash key "\" (It's under the Delete key Mac, Backspace Key (PC)) Before and After
Under the Develop Module window in the Tool Bar (T Key) is a comparison tool that lets you see Before, and After images.

If you have any questions, send me an e-mail or bring them to class.

4. Making a "Watched Folder"

A "Watched Folder" is a handy method for quickly importing files into Lightroom and have presets, keywords and settings applied to the images!

You can find instructions at the following web page "Click the Import Tab" http://uofgts.com/Lightroom/input.html

Next Class... Bring some of your images, we'll work on them in class.


Sunday, November 10, 2013

Lightroom Week 4 Review

Howdy

Edit as a smart object…

In class we learned how to send a raw file to Photoshop as a smart object, and used the fact that saved snapshot settings travel with a raw file.  (They are embedded in the raw file) We used the TAT (Targeted Adjustment Tool) in The HSL panel to make 2 different global edits 

We saved the setting with makeup first and then one without makeup, saving each as a Snapshot setting…
We sent the image to Photoshop as a smart object and used layers in Photoshop… 

Before andAfter

You will find the details on how this was achieved on the web page Editing as a Smart Object in Photoshop

 The Adjustment Brush

We also looked at Editing Locally using the Adjustment Brush in the Tool Bar in the Develop Module

Tool Bar


With the Adjustment Brush you can apply Local Edits, edits that are confined to a part of the entire image… 


NewImage  You can find the details on how this is done on the web page The Adjustment Brush


Spot  Removal

We also learned how to remove Spots caused by “dust on the sensor…” 

Lightroom003

 and apply the dusting out to a series of photos…

Lightroom004

Select Only Spot Removal and click the synchronize button..

Lightroom005

The dust removal is applied to ALL SELECTED PHOTOS…

Reminder, there is NO Class November 11th

See you all on November 18th


Thursday, September 19, 2013

Limited Adobe Offer Photoshop + Lightroom

For Owners of Photoshop CS 3 and up

This news from Adobe:

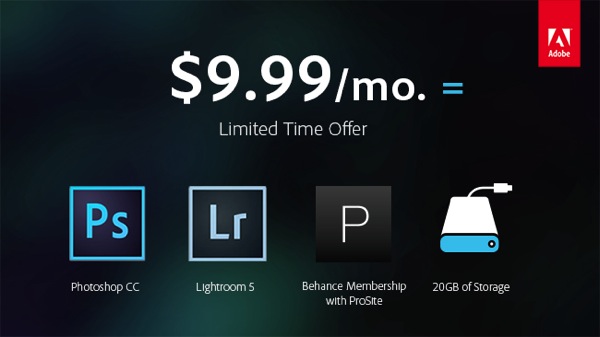
For a limited time, you can join a special Creative Cloud plan designed exclusively for Photoshop customers focused on photography. It includes access to Photoshop CC and Lightroom 5, plus feature updates and upgrades as they are available, 20GB of cloud storage for file sharing and collaboration, and a Behance ProSite. And it's just US $9.99/month when you sign up for a one-year plan. This is not an introductory price, but you need to join by December 31, 2013. To qualify, you must own Photoshop CS3 or later (Standard or Extended version). Questions? See our FAQ and terms.

Or click the Graphic…
Adobe deal equation 650px crop


Enjoy!!!

Wednesday, July 24, 2013

Lightroom part2: weekly review

I've come to the realization that I either need to write a Lightroom instructor install script the adds all my presets so that the Class Demos work as I would expect it to… Theoretically an exported catalogue should also contain MY presets.  More on that later…

Synchronizing Metadata

Lightroom makes it easy to synchronize Metadata, and Develop Edits.  Basically select the images and click the "Synchronize button"

At the end of this link are some things you should know about adding Metadata and synchronizing it…

The Adjustment Brush

Dodge and Burn on steroids…

I used Camera Raw but, it's almost the same in Lightroom

Using the Adjustment Brush

Cropping

     I Like this quote I dislike this quote

“Twelve significant photographs in any one year is a good crop.”

 Ansel Adams quotes (American Photographer1902-1984)


Lighroom

Choose the Crop Tool...Lightroom can display the Golden Ratio solutions... Golden Spirals, The Golden Ratio, diagonals, triangles, plus the rule of thirds and grids.

Press the letter O to cycle through grid overlays in the crop area.

Press Shift plus the letter O to rotate the overlay displays.

You can also find the Crop Tool settings in Lightroom using the
Menu: Tools > Crop Guide Overlays

Here's more about Cropping

The Detail Panel

It's about sharpening

Sharpening… 

Smart Objects

Up Next what to do when you need to send a Raw file as a smart object to Photoshop


Wednesday, July 17, 2013

Lightroom: Week 2 Review

Before we review the Develop Module, a few notes about Importing and the Library Module.

This article originated in a Blog article posted on my Blogger page http://psforphotos.blogspot.com
You can always read the articles I e-mail you at the above link.

In my previous Review, that I sent to you Via e-mail, an embedded video didn't survive the transition from Blog to e-mail. So, here is the link to the video. This video IS REQUIRED viewing for all new Lightroom users!  It is by George Jardine… in the video he explains how LR works with your Photographs, and how it saves your non-destructive edits in the catalogue…  

http://tv.adobe.com/watch/george-jardine-on-lightroom/the-lightroom-catalog/

A note about updating Lightroom to version 5

Mac Requirements are OSX 10.7 (Lion)

Windows Requirements are: Microsoft® Windows® 7 with Service Pack 1 or Windows 8

 Import using the "Watched Folder"

You can set up a folder on your Desktop that is "watched" by LR. If you place an Photograph in the folder LR will automatically import the photos and put it in your catalogue. This works well for the occasion(s) when you get photos via e-mail or you download from the web.

FIRST you must make the watched folder on your desktop, I call mine "LR-ingest" , then in the settings Dialogue Box

The Menu is:

File > Auto Import > Auto Import Settings…

Step 1. Tell Lightroom what folder to watch.

Step 2. Set the location for the import in Lightroom, 

Step 3. 
You can also include Metadata in the import

Then with the menu 

File > Auto Import > Enable Auto Import

Toggle Auto Import "On" by selecting "Enable Auto Import" then clicking the mouse button so you can see the √ Check Mark

or check √ Enable Auto Import in the Dialogue Box.

The Menu should now look like

File > Auto Import > √ Enable Auto Import

Lightroom 4 can import .jpg, tiff, raw and psd files

Lightroom 5 adds the import of .png files, just drop 'em in the watched folder!.


Watched

Lightroom's Develop Module

Lightroom's Develop module is a non-destructive image editor. There is no save button. As you make "edits" Lightroom automatically writes the edits to the database, and will apply the edits either on Export and/or, if you have 
1.  Turned on "Automatically write changes into XMP in the catalogue Settings Dialogue > Metadata…

Catalog Settings

Lightroom never changes your "original files"

Lightroom can also recover data in "clipped" highlights or "shadows" if there is data in one or more of the three RGB Channels.

Over the next few days I'll post a "Case Study" of the workings of The Develop Module.  The case study is based on material I wrote about using Photoshop's, Camera Raw Basic Dialogue Box in my Photoshop for Photographers Class.

We'll begin with a basic over view of the Develop Module.

 Got a question? 'Holler!


Tuesday, May 21, 2013

Importing your iPhotos into Lightroom

Finding your iPhoto Photographs

iPhoto imports your pictures into a folder named "Originals".  When you edit an Original picture in iPhoto it makes a copy of the edited photo and saves it with the changes in a folder called "Modified". So, you make have 2 copies of a photo, it you made changes to it in iPhoto!
 
(Note): 
Apple changed the behaviour of the iPhoto Library folder after iPhoto version 6? or so…  just clicking on the iPhoto Library folder won't open it. You NOW have to right click on the folder and choose "Show Package Contents"
 
On your Mac the path to the Originals and Modified Folder should be 
/Users/Username/Pictures/iPhoto Library/Originals
 

Easy Access to the "Originals and Modified Folders

Navigate in the finder to the iPhoto Library

path is .../Users/Username/Pictures/iPhoto Library

Right click on the "iPhoto Library" folder and choose 
"Show Package Contents"
You should now see the Originals and Modified folders
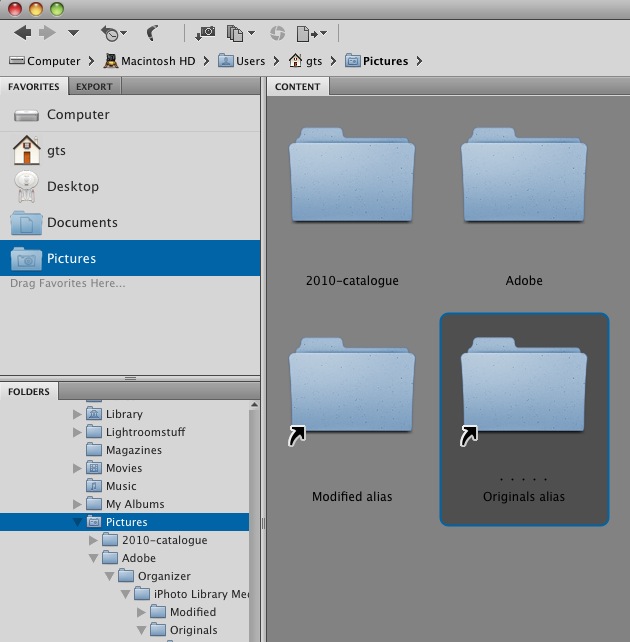
Right Click on the Originals Folder and choose the menu item "Make Alias"

Now drag the aliased folder to your Pictures Folder (Or where ever you want them)
Do the same for the "Modified" folder
Now you can use  Lightroom  or any other program to"see" your Photographs! 
 

Moving Your iPhoto Photographs.

 
If you have Lightroom 3 or 4 accessing your iPhotos is really easy.
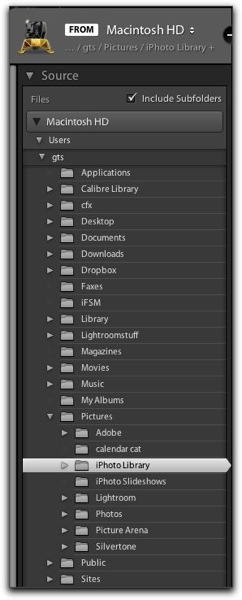
Just choose the iPhoto library in the import module in Lightroom 3 or 4 and check the Include Subfolder button! If you don't see the Include Subfolders check box. Click on the the IPhoto Library folder to open it…
Lightroom iphoto imp
 
(For Ralph)
When you open Lightroom, hold down the "alt"/option" key. 
 
make a new catalogue and save it to a folder on your New Hard Drive at the root, then open the Import Module in Lightroom.
(see above for step 1)
 
Choose the Move Option, 
Layout004


Set your Destination
Layout005


Set your file structure and Click Import!
 
 
The "Root" Of your New "Photo" Hard drive should look something like this
 
 
Layout006


Now go back to your Finder and look in the "Originals" and "Modified" folders…
 
Enjoy using Lightroom!


Tuesday, May 22, 2012

Partial Eclipse Photography

Howdy

I kinda anticipated that there would NOT be to much of a photo opportunity around here in dreary, cloudy Vancouver, WA

So when a bright patch actually appeared in the cloudy sky, just after mid-eclipse I switched lenses...

Sigmas 300mm , 1/500th of a second, f/ 22, ISO 100

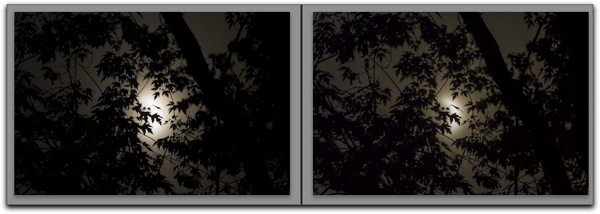
Lightroom 4 teased out enough information to make out that the sun was actually being covered by the moon. Highlight and shadow recovery really helped!

Before and after

I also shot a sequence starting at first contact and ending at mid-eclipse, yep, it got dark.

You can see the video on my Facebook page

Next astronomical Photo opportunity?

Venus transits the Sun on June 5th! 

Thursday, October 13, 2011

Adobe Releases Camera Raw 6.5

Howdy

Adobe has released a Camera Raw up Date V 6.5

You can down load here for Windows

http://www.adobe.com/support/downloads/detail.jsp?ftpID=5260

for Mac

http://www.adobe.com/support/downloads/detail.jsp?ftpID=5259


or in Photoshop CS5 and Photoshop Elements 9 & 10 use the menu item:

Help > Check for Updates

or

Help > Updates...

To "auto" install the update(s)


If you have Lightroom, it has been updated to V3.5 along with Camera Raw 6.5

Use Menu

Help > Check for Updates

To "auto" install the update(s)

Details about all the updates are here on Tom Hogarty's blog

http://blogs.adobe.com/lightroomjournal/


Enjoy!!!

Sunday, October 9, 2011

PS4P I -- Importing iPhotos (Mac) using the Bridge (and Lightroom)

Settings
1. Color Management
This is an excellent article written with a bit of humor... about Color Management Settings in Photoshop by Ben Willmore
http://www.digitalmastery.com/downloads/pdf/Color_Management.pdf

2. Calibrate your Monitor
This is the link... http://uofgts.com/PS-P2Site/Calibration.html

3. Using the "Bridge"
If you want to always have jpg's and or tiffs photos to load into Camera Raw Do This...
hold down the following key board keys and then double click the selected photos.
PC Control R
MAC Command R

In Camera Raw preferences you can check the following boxes

4. For iPhoto Mac users
How do I get Bridge to access my iPhoto's?

If you are using Photoshop Elements 9/10 ORGANIZER it's real easy... there is an "iPhoto" Import Button!
Organizerimport
 
If you have Lightroom 3/4 accessing your iPhotos is really easy too.
Just choose the iPhoto library in the import module in Lightroom 3/4 and check the Include Subfolder button!
Lightroom iphoto imp
 
If you are Using Bridge or Lightroom (1 or 2) There are a several ways to get Bridge to see your iPhoto's.

Method 1 (preferred): Copy your iPhoto Pics to a new location
1. Start iPhoto.
2. On the left side of iPhoto Under "LIBRARY"  select "Photos"
If you have thousands you might want to instead select Under "ALBUMS"  and export one Album at a time...

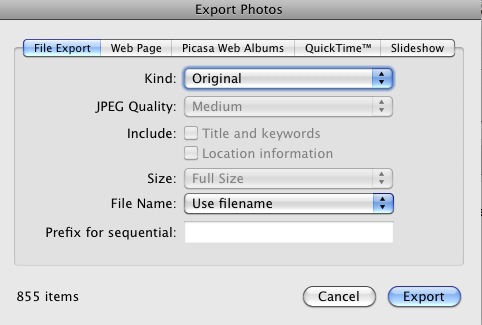
3. Choose the menu item
File > Export...


4. When you click on the export button, choose your destination (external Drive and a Folder?)
If you have been using iBuddy for iPhoto, do this for ALL your iBuddy iPhoto Libraries.

Method 2: Make an aliased folder.
(leaves your iPhotos in their current location, the folder "Originals" and "Modified.")

(Note):
On my Mac  I was able to use Spotlight to search for the  folders labeled "Originals" and "Modified"
Apparently Apple changed the behaviour of the iPhoto Library folder after iPhoto version 6? or so that just clicking on the folder won't open it. You have to right click on the folder and choose "Show Package Contents"
(Note:)
On my Mac the path to the "Originals" folder is located as shown below because I used Photoshop Elements 9 to import the iPhoto Pics into the PSE 9 Organizer!
/Users/gts/Pictures/Adobe/Organizer/iPhoto Library Media/Originals

B. On Your Mac the path to the Originals and Modified Folder should be
/Users/Username/Pictures/iPhoto Library/Originals

1. If using Spotlight works for you and can find your "Originals" folder... Click on Show ALL to get the full listing... Look for the "Originals" Folder, you might find more than one if you backed up your iPhoto Library or use the iPhoto aid iPhoto iBuddy.

2.  Right Click on the "Originals" folder in Spotlight
3. . Choose "Open Enclosing Folder"
4 . Right Click on the "Originals" Folder and choose "Make Alias"

If you have a newer Mac/iPhoto right click on the "iPhoto Library" folder and choose
"Show Package Contents"

Right Click on the Originals Folder and choose the menu item "Make Alias"
Now drag the aliased folder to your Pictures Folder (Or where ever you want them)
Do the same for the "Modified" folder
Now you can use Use Bridge or Lightroom to navigate to the location of the Originals aliased folder in your pictures folder and you can then access your iPhoto pics via Bridge!


You might want to repeat for all "Originals" and "Modified" Folders. if you used iBuddy