Monday, February 27, 2012

Week 5 --The Pen is Mightier Than the Sword


Objectives

Differentiate between bitmap and vector graphics. Draw straight and curved paths using the Pen tool. Stroke a path. Convert a path to a selection. Convert a selection to a path. Save paths.

Make a Mask and refine the edges to allow detail in the background

Place the masked object on a new background.

Homework

Post Pics at Zang  Zing

http://www.zangzing.com/galacticgarry

Wednesday, February 15, 2012

Photoshop Sneak Peek - Image Deblurring

Enjoy the video, as they say in the video, it might not make it into Photoshop CS 6


Sneak Peak at Photoshop CS 6!

Here's the latest tantalizer from Adobe
Enhanced Content Aware Fill

Yes there are 3 other sneak peaks

You'll find them here...

Enjoy!


Sunday, February 12, 2012

Photoshop Photographers --Week 4 Review

Objectives

Things you need to do before you print

Sharpening Your Image

Soft Proofing: How to save time and money (ink and paper) setting up the best print possible...

Homework

Have fun working with Photoshop and Post a random "Photoshopped photo" or two to the Class photosharing web site Zangzing.


Wednesday, February 8, 2012

Non-Destructive Editing - The Spot Healing Brush and Smart Objects

The Spot Healing Brush

With the addition of Content Aware Fill for the spot healing brush… Touchup got a lot easier!
Learn how in either Photoshop CS5 or Photoshop Elements 9 and 10

Checkout this quick tutorial The Healing Spot and Brush with Content Aware Fill

Photoshop Layers

Photoshop CS 5 has the following different kinds of layers

  1. Normal
  2. Text
  3. Fill
  4. Shapes
  5. Adjustments
  6. 3D
  7. Video
  8. Smart Objects.

Smart Objects Layers

Originally Smart Object layers was introduced for just importing data created outside of Photoshop like Raw photographs, 3d objects, and file formats native to other programs like Adobe Illustrator, e.g. illustrator vector drawings.

Now, you can now convert any layer into a smart object, and you can turn all layers into a single smart object layer for export to other programs like Dreamweaver and Illustrator.

Why make an ordinary layer a smart layer? If you need to scale down a layer for it to fit with the other layers, and then perhaps later up rez (scale up the layer) you can do so with out causing pixelation from the loss of data when the layer was first first down sized. The smart object retains the original image data that normally would have been thrown away when the normal layer was scaled down…

If a Dreamweaver web designer uses smart objects on a web page that was created in Photoshop, the graphic on the web will be automatically updated when the edited object is simply saved again from Photoshop as a smart object.  Dreamweaver automatically detects that the graphic was changed, and it will replace the object displayed on the web automatically!

Nice!

Use Smart Objects for elements you are merging in a photo
especially if you are using
Menu item: Edit > Transform > Scale (etc).

Transform  Edits "throws away pixels" especially when the graphic is scaled down in size… By transforming your layer contents to a smart object, the original data is retained and available for a re-size. The new upscale graphic will not pixilate… If there was no smart object you'd have to delete the layer and start over again.

In this example both Logos were scaled smaller, then resized upwards… The Logo on the right was converted to a Smart Object before scaling down and up. You can see that the normal layer is "fuzzy" and Pixillated.

Smartlayertransformed


Normal layer                                         Smart Object layer

4. Use smart Objects To apply Filters

In the Filter menu Choose 
Filter > Convert for Smart Filter...
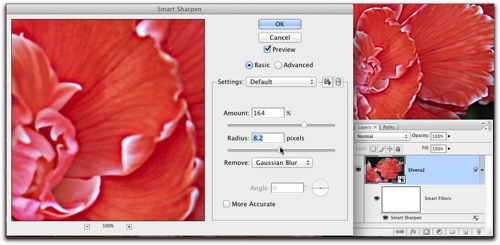

SmartfiltertransformedUsing "Smart Filters" let's you adjust the effects of the filter at any time


Here's a Photoshop Killer Tip from Matt Kloskowski on Kelby/TV on how to duplicate 2 different kinds of smart objects andy how to use them in Photoshop.

http://kelbytv.com/photoshopkillertips/2010/07/13/duplicating-smart-objects/

Editing Raw Images in Photoshop

When you have a single photo where global edits in Camera Raw cannot process detail in highlights (sky) and shadows (landscape) or other similar situations without blowing away details in one or the other... Use smart objects to merge a blending of 2 copies of the same image, one processed for highlight recovery and the other(s) for mid-tones and shadows.


Using Raw Smart Objects in Photoshop

Your homework!  Share with us in/on the class blog images that you have edited using layers in Photoshop!

Tuesday, February 7, 2012

Non-Destructive Editing in Photoshop

The Goal:

Edit an image in Photoshop, to enhance, to improve it... and be able to easily "tweak" or undo/redo the "fixes" at a later date.

In Photoshop you are editing pixels, as a result you should always work on a "copy" of the image, not the original.

1. In Photoshop after loading an image, use the File > Save As menu
and save the files as a copy, or rename the file as... I usually just use a numbering system like imagename-001.psd.
This ensures you have an "original" RGB copy, even if you have the original raw image.


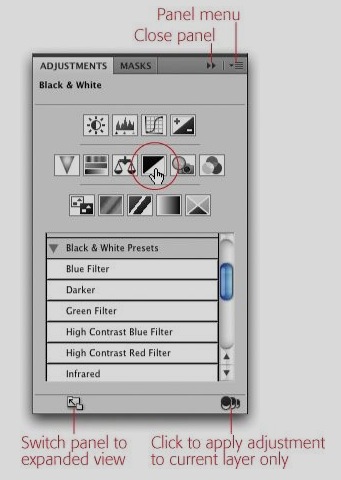
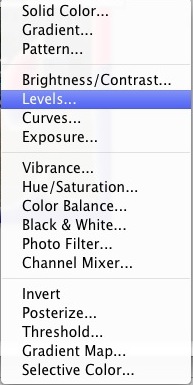
2. In your editing process you always want to use the Adjustment panel and the Adjustment layer tools.

Adjustment Panel

list of adjustment layers… from the layers menu

NewImage


ChooseAdj


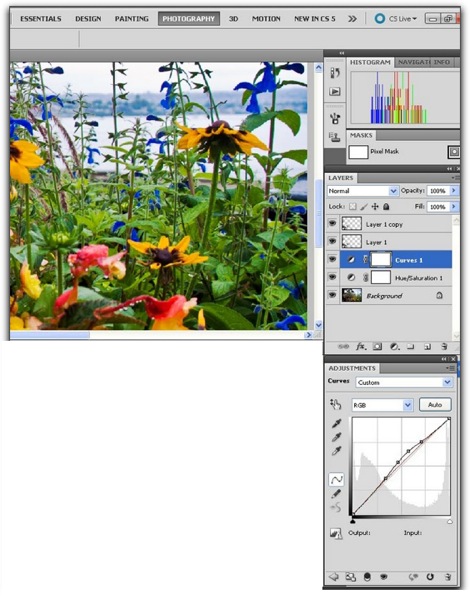
An Example of using Adjustment layers...

Adjlayers


3. Create a Blank Layer

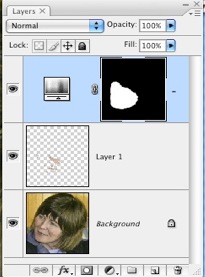
When using any of the tools like the Clone or Healing Brush or Spot Healing Brush to edit pixels, create a Blank Layer and use the Tool Bar to toggle on "Edit layers below"

PS Layers


Here's a short tutorial that uses "Edit Layers Below"


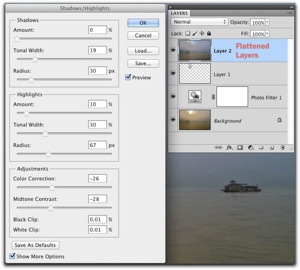
4. Make a Flattened copy of the visible layers , If you can only directly edit pixels.

This is useful if you want to use the Menu
Image > Adjustments > Shadow/Highlight…or any other "Adjustment" that does not have an "Adjustment layer".

Except...

(Note Well) The adjustment HDR Toning…
Menu: Image > Adjustments > HDR Toning…
Automatically flattens all layers. So, if you want to preserve layers before you use this adjustment, save the file first as a .PSD and then do the HDR Toning…as it flattens all layers to make a "single" image!


To Flatten Selected layers Keyboard Short cut

Mac (Command + Option + Shift + E)

PC (Control + Alt + Shift + E)

and apply the Adjustment to the flattened copy of the all the layers...

Flatten layers

To re-edit the Shadow/Highlights… you'll need to delete the layer and repeat the process...

Enjoy! As Always 'holler if you have a question or comment

Next up: Using Smart Layers

Monday, February 6, 2012

Week 3 Main Links ---Photoshop for Photographers

Objectives

Setting up Photoshop for best performance

Learning the Work Environment, The canvas, tools, tool bar options and the dialogue panels.

The "power" in Photoshop is: Adjustment Layers, Selections and Masks

Homework

Besides Practice, practice, practice it's time to share your before and after photos….  post a sample of your work to the class photo share site. You'll be getting an e-mail shortly


Next up:  Layer Tips and non-destructive editing...

Thursday, February 2, 2012

White Balance --Setting the white point

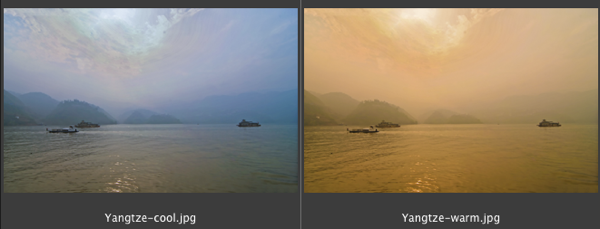
Consider the following images.

I will argue that both renderings, cool on the left and Warm on the right are equally acceptable. For the "cool" bluer image, I just moved the temperature slider in camera raw to the left. For the ""warm" yellower image, I moved the temperature slider to the right.

I stopped when I liked what I saw.

Yangtze


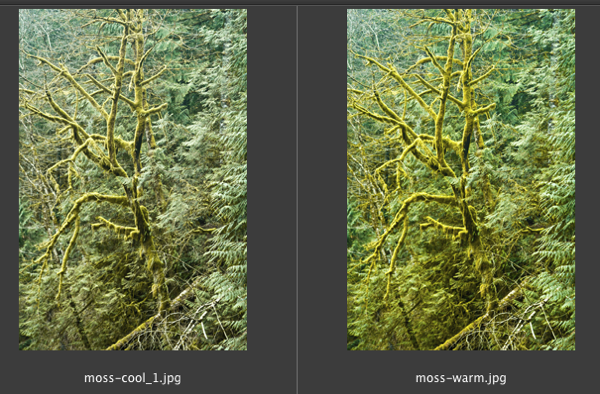
In the mossy picture, there is no obvious white point to select. What do you do if you want to set an "accurate" white point?

Moss


Solution: Set the white balance in the camera!

Most higher end cameras will let you set White Balance (WB) manually. The procedure is to photograph a "Spectrally pure white card".

After you photograph the white "card" --- in the Camera's settings for White Balance (WB) choose "Manual" or "Custom Preset". You'll then be asked to select the image of the "white card" that you just photographed.

I use a ColorRight White balance lens cap/filter. When you shoot the white card turn off the autofocus, especially if you are shooting the card up close...

Where to find a spectrally pure white card?

Visit your local cameras store, or search Google.

But, remember the choice of what white balance you set is up to you, if you shoot in Raw format, the choices are enormous. Photography after all is an art!

Photograph, photograph, photograph!


Wednesday, February 1, 2012

Ooops... Links went weird Here's the fix

This never happens to the other guy...
Here's the fixed links

Week 2 Outline Photoshop for Photographers

Objectives

Photoshop's Camera Raw.
"Photoshop is a great plugin for Camera Raw," Photographer and Camera Raw Guru, Jeff Schewe
It is easier and quicker than using Photoshop Elements or Photoshop to enhance your photo's. The Camera Raw plugin not only loads digital raw files, it'll also load "jpg" and "tiff" photos.
You will always prepare your photos in Camera Raw before you send them to Photoshop.
Got a question, send the e-mail...
Practice, practice, Practice
Next up…  Question in Class… What if there are no white pixels in your photograph?