Monday, July 29, 2013

Using Smart Objects and Layers in Photoshop with Lightroom.

To "Finish" or "Polish" an image, it is sometimes necessary to use layers that allow you to edit locally, rather than globally. This happens in Lightroom because some of the global edits can only have one setting and there isn't an equivalent edit using the adjustment brush.

For example the edits might include, Tone Curves,  HSL, Color or B&W, or even split toning, or using a different image to replace the sky. 

In order for this to work properly Lightroom and Photoshop's Camera Raw needs to be in sync, that is both need to use the same version of the raw editing engine.  Inotherwords, your software needs to be up to date.

These are the steps (to be illustrated later)

1. Make your first global edit (EG) HSL skin Tones.

Save this step as a snapshot, right click the HSL steps in the history panel… Rename it… as "Skin Tone"

2. Make your second edit HSL Makeup removal and make a snapshot of that step… Rename it as Makeup removal.

3. Lightroom automatically recognizes you have Photoshop… So when you right click the image in the Develop Module or in Library Module chose the menu item

Edit in > Open as Smart Object in Photoshop

4. In Photoshop click on the Blue part of the Layer and choose menu item New Smart Object via Copy

5. Double click the icon (image) in the top layer… This will send the layer image to Camera Raw

6. In Camera Raw choose the far right panel "Snapshots"  Any and All snapshots you make travels with your Camera Raw file. So in the Snapshot panel choose HSL-Skin Tones.

7. At the bottom right of the Camera Raw editor choose okay… this will send the skin tone version back to Photoshop's Layers

8. In Photoshop choose the top Layer and choose Make Mask and with a soft black brush paint on the areas where you want to remove the makeup.

9. Once you have sent an image to Photoshop, it's a one way street. Even if you have sent a smart object to photoshop, going back to Lightroom the file will be saved as a .tiff file or a PSD file… The best way to remember which photos have layers is to save layered files as .psd and flattened files as .tiff

Before andAfter


If you don't have Photoshop, you need to setup the Edit in requester to send the files to the editor of your choice, Paint Shop Pro, Corel Painter, or Photoshop Elements… You may only be able to use 8 bit images with your editor. Lightroom will transfer and convert the images for you.


Thursday, July 25, 2013

Lightroom, The Develop Module, a Case study

Howdy

I've completed the review of the Develop module up to the end of the Basic Panel… 

You can find an overview of the Develop module and the editing panels on the Class Website

The First 4 parts of the Case study can be found here at The Develop Module a Case Study

Process 2010 and Process 2012 are compared…

Next… Working with Smart Objects in Photoshop

Got a question? 'holler

Don't forget to bring to class your "last chance" questions and problematic photos…


Wednesday, July 24, 2013

Lightroom part2: weekly review

I've come to the realization that I either need to write a Lightroom instructor install script the adds all my presets so that the Class Demos work as I would expect it to… Theoretically an exported catalogue should also contain MY presets.  More on that later…

Synchronizing Metadata

Lightroom makes it easy to synchronize Metadata, and Develop Edits.  Basically select the images and click the "Synchronize button"

At the end of this link are some things you should know about adding Metadata and synchronizing it…

The Adjustment Brush

Dodge and Burn on steroids…

I used Camera Raw but, it's almost the same in Lightroom

Using the Adjustment Brush

Cropping

     I Like this quote I dislike this quote

“Twelve significant photographs in any one year is a good crop.”

 Ansel Adams quotes (American Photographer1902-1984)


Lighroom

Choose the Crop Tool...Lightroom can display the Golden Ratio solutions... Golden Spirals, The Golden Ratio, diagonals, triangles, plus the rule of thirds and grids.

Press the letter O to cycle through grid overlays in the crop area.

Press Shift plus the letter O to rotate the overlay displays.

You can also find the Crop Tool settings in Lightroom using the
Menu: Tools > Crop Guide Overlays

Here's more about Cropping

The Detail Panel

It's about sharpening

Sharpening… 

Smart Objects

Up Next what to do when you need to send a Raw file as a smart object to Photoshop


Friday, July 19, 2013

Lightroom Develop Module and References...

I have updated the Develop Module overview.

It details keyboard short cuts with notes about the Develop Panels.

The Develop Module Overview

I have also begun updating a case study of the Develop Module

Part 1 and 2 are now ready.

Lightroom Case Study, Part 1 and 2


Martin Evening's Lightroom 5 book is now available…

Adobe Photoshop Lightroom 5 Book, The: The Complete Guide for Photographers

  • By Martin Evening
  • Published Jun 30, 2013 by Adobe Press.
  • It's quite spendy, so I strongly urge you to read the Sample Chapter provided by the Publisher and the Extras (Related Articles)

4 Develop module image editing

A definitive guide to working with the image- processing controls in the Develop module 

Martin book is thorough and very detailed.

Right Click here and you can download the sample chapter


Craft & Vision Web site has some excellent $5.00 - $10.00 e-books on using Lightroom.

Check out

Lightroom5 up to speed

Essential Development


Bring you problemattic images to class

See you on Monday! have a great weekend

Wednesday, July 17, 2013

Lightroom: Week 2 Review

Before we review the Develop Module, a few notes about Importing and the Library Module.

This article originated in a Blog article posted on my Blogger page http://psforphotos.blogspot.com
You can always read the articles I e-mail you at the above link.

In my previous Review, that I sent to you Via e-mail, an embedded video didn't survive the transition from Blog to e-mail. So, here is the link to the video. This video IS REQUIRED viewing for all new Lightroom users!  It is by George Jardine… in the video he explains how LR works with your Photographs, and how it saves your non-destructive edits in the catalogue…  

http://tv.adobe.com/watch/george-jardine-on-lightroom/the-lightroom-catalog/

A note about updating Lightroom to version 5

Mac Requirements are OSX 10.7 (Lion)

Windows Requirements are: Microsoft® Windows® 7 with Service Pack 1 or Windows 8

 Import using the "Watched Folder"

You can set up a folder on your Desktop that is "watched" by LR. If you place an Photograph in the folder LR will automatically import the photos and put it in your catalogue. This works well for the occasion(s) when you get photos via e-mail or you download from the web.

FIRST you must make the watched folder on your desktop, I call mine "LR-ingest" , then in the settings Dialogue Box

The Menu is:

File > Auto Import > Auto Import Settings…

Step 1. Tell Lightroom what folder to watch.

Step 2. Set the location for the import in Lightroom, 

Step 3. 
You can also include Metadata in the import

Then with the menu 

File > Auto Import > Enable Auto Import

Toggle Auto Import "On" by selecting "Enable Auto Import" then clicking the mouse button so you can see the √ Check Mark

or check √ Enable Auto Import in the Dialogue Box.

The Menu should now look like

File > Auto Import > √ Enable Auto Import

Lightroom 4 can import .jpg, tiff, raw and psd files

Lightroom 5 adds the import of .png files, just drop 'em in the watched folder!.


Watched

Lightroom's Develop Module

Lightroom's Develop module is a non-destructive image editor. There is no save button. As you make "edits" Lightroom automatically writes the edits to the database, and will apply the edits either on Export and/or, if you have 
1.  Turned on "Automatically write changes into XMP in the catalogue Settings Dialogue > Metadata…

Catalog Settings

Lightroom never changes your "original files"

Lightroom can also recover data in "clipped" highlights or "shadows" if there is data in one or more of the three RGB Channels.

Over the next few days I'll post a "Case Study" of the workings of The Develop Module.  The case study is based on material I wrote about using Photoshop's, Camera Raw Basic Dialogue Box in my Photoshop for Photographers Class.

We'll begin with a basic over view of the Develop Module.

 Got a question? 'Holler!


Tuesday, July 9, 2013

Lightroom Class#1 Review


Howdy

Welcome to the Clark College Lightroom Class.

This is a review of the class discussion with web links.

Generally the Lightroom Primer website has detailed notes covering class material and discussions. If details need to be added you will find them in these class review notes, or I will update the website.  

To contact me reply to this e-mail or add my email address to your contacts from this e-mail.

The Lightroom Primer website is http://uofgts.com/Lightroom/index.html

Before You begin using Lightroom

1. Calibrate your Monitor


At the bare minimum you should make sure that you set the Brightness and Contrast of your monitor.

For details go to this web page Calibrating Your Monitor


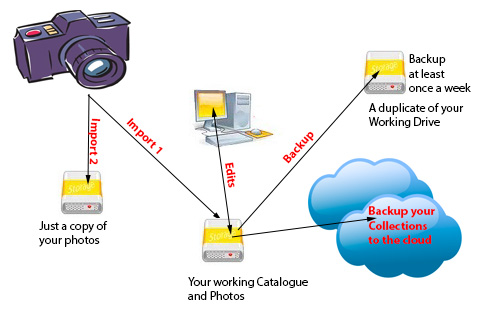
2. Establish a plan to backup your Photographs

Backup Scheme

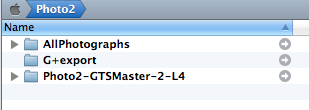
The Structure of your Main Photo hard drive and the backup hard drive should look like this, Your backup drive would have a different name

Layout001

The folders are at the "root" of the Hard drives

3. Fill out and save your IPTC Metadata Preset

In Lightroom

(In Photoshop, you would fill out the IPTC Metatdata form available in the program "Bridge")

Menu item:
Metadata > Edit Metadata Presets…

If you want to learn more about IPTC (International Press Communications Council) Metadata check out their website

Here are two excellent videos 

How Lightroom works… A video by George Jardine (This should be required viewing for ALL Lightroom users. )


And here is a video on how to use the Filter bar  http://mulita.com/training/sample-lib4/, A Free sample Movie by George Jardine

It's a really REALLY good tutorial on how to use the Filter Bar.


That should do it for now… If you have a question… 'holler