Tuesday, June 26, 2012

Where to from here? Week 8 and Beyond...

Here's a quick link to the week 8 Portal

The class web site will always be available, and is always evolving...

I'll be adding a Lightroom site shortly, the first Lightroom article is Softproofing in Lightroom...

Softproofing in Lightroom

 So, Now what... 

I'm often asked… now that the classes are over, what do we do now?

Here are some suggestions...

Garry's Favorite web sites

  1. The Luminous Landscape
    1. http://luminous-landscape.com/whatsnew/
  2. http://www.dpreview.com/
  3. http://www.imaging-resource.com/news
  4. http://www.photographyblog.com/
  5. http://theonlinephotographer.typepad.com/the_online_photographer
  1. Join a forum and lurk!

    http://www.photoshopforums.com/

    http://forums.adobe.com/community/photoshop

    At some point someone will post a question… And you'll be able to provide them the answer!

There are lots of videos on the Adobe TV web site

http://tv.adobe.com/

LUMINOUS LANDSCAPE  has a bunch of video tutorials that they sell. Get them and their video Journal...

http://luminous-landscape.com/videos/download-videos.shtml

George Jardine has a terrrifics web site a a series of videos

http://mulita.com/blog/

One more thing
Don't be shy, Stay in touch and share your photographs!

and

Photograph, Photograph, Photograph!

Then in Lightroom & Photoshop

Practice! Practice! Practice!


Best  Wishes

Garry Stasiuk


Tuesday, June 19, 2012

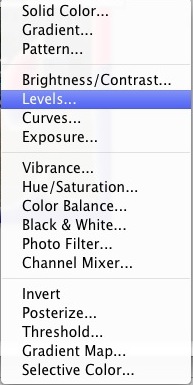
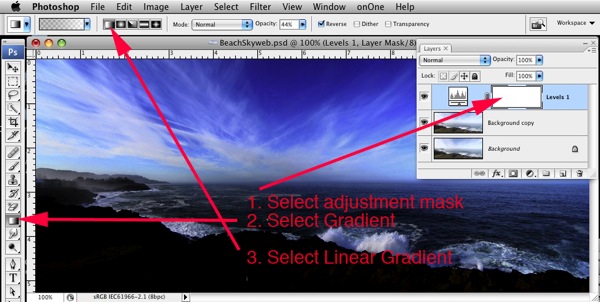
Gradients in Photoshop, PS Elements, Camera Raw and Lightroom.

How to apply gradients using any flavor of Photoshop...

Select

Week 7 - Smart Objects, Softproofing and Focus using Photo stacking...

Howdy

Here's a short step by step set of instructions how to edit smart objects sent to Photoshop from Camera Raw.

Before you print,  soft proof!
Here's what to do using Photoshop… Softproofing in Photoshop

Later this week I'll add information on how to do Softproofing in Lightroom 4 

Here's a technique for boosting the color in a faded or overexposed photograph in Photoshop, works really well for .jpgs. Also, a similar technique can work on under exposed images.

Fixing Overexposed or Underexposed .jpgs

Class member Ken Eklund  sent us the following information about Photo Stacking for Focus 

Last week I mentioned focus stacking or blending, which is like HDR for focus rather than exposure.  Here is a link to some software.  It is also a feature in Photoshop.

www.heliconsoft.com/heliconfocus.html


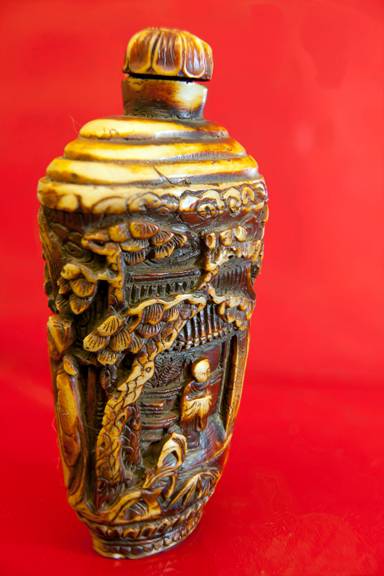
Ken also sent us a series of photos he took and merged using PhotoStacking in Photoshop+

Image001

This is a carved Chinese bottle that I tried it out on.  I used macro extension tubes to take 8 shallow dof photos with the Photoshop blending technique. 


Ken also sent us a link to a Youtube video demoing the Photo Stacking Focus technique in Photoshop 

http://youtu.be/intzev1gsbI


Thank you for sharing Ken!
 

Monday, June 18, 2012

Review - Non Destructive editing in Photoshop/Camera Raw

The Goal:

Edit an image in Photoshop, to enhance, to improve it... and to be able to easily "tweak" or undo/redo the "fixes" at a later date without having to start over again.

In Photoshop you are editing pixels, as a result you should always work with a "copy" of the image, not the original.
1. In Photoshop after loading an image, use the File > Save As menu and save the files as a copy, or rename the file as... I usually just use a numbering system like imagename-001.psd.
This ensures you have an "original" RGB copy, even if you have the original raw image.

2. In your editing process you always want to use the Adjustment panel and the Adjustment layer tools. (If you can)

Images using Photoshop CS5
The Adjustment layer panel 
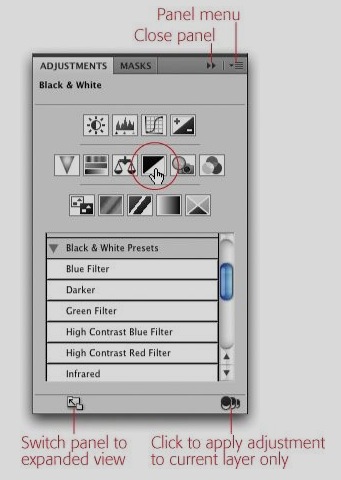
Adjustment Panel
below is a list of adjustment layers… from the layers menu
NewImage


ChooseAdj

     Example below uses Adjustment layers...
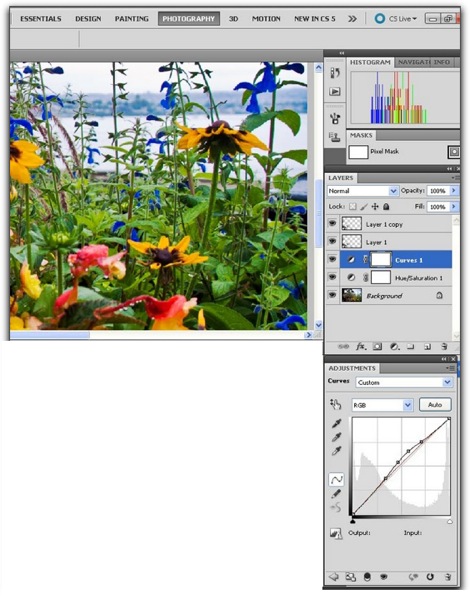
Adjlayers


3. Use Smart Objects for each layer of graphics or images that you are merging.

Any time you use the Menu item: Edit > Transform > Scale (etc). First convert the layer to be transformed into a 'smart object'

There are at least 3 ways to do this, select the layer in the layers pallet (so it is highlighted in blue)
then choose Menu:

Layers > Smart Objects > Convert to Smart Object
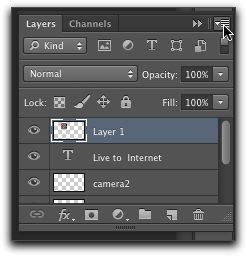
Layermenu

Or use the Layer drop down menu and choose
Convert to Smart Object

Or right click on the Blue Highlighted Layer and choose 
Convert to Smart Object. 

Transform Edits changes and "throws away pixels" especially if there is a scaling down in the size of the image...

When you select the transform tool a box surrounds the object and you can see selector squares that let you "transform the object… If you hold down the shift key while dragging with the mouse the transform will retain the original aspect ratio.


Tranform

By transforming your layer contents to a smart object, the original data is available to re-size the new element without pixilation or having to start over again.  In this example both Logos were scaled smaller, then resized upwards… The Logo on the right was converted to a smart Object.


You can see the little "Samart object indicator" square in the bottom right of the thumbnail in the layers pallet
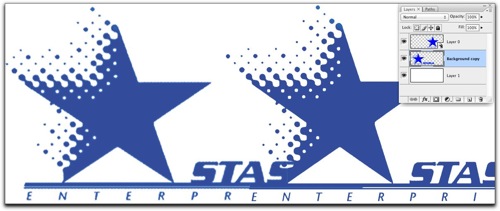
Smartlayertransformed


4. Use smart Objects to apply Filters

Use the Filter Menu:

Filter > Convert for Smart Filters

This adds the Smart Object indicator to the layer, and when you choose a filter like "Smart Sharpen" you'll see additional layers added beneath the smart object layer that will allow you to change the values in the filter requester any time you want.
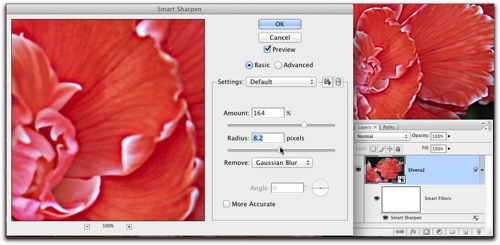
SmartfiltertransformedUsing "Smart Filters" let's you
re-adjust the effects of the filter
later…


5. Create a Blank Layer
When using any of the tools like the Clone or Healing Tools  to edit pixels, create a Blank Layer and use the Tool Bar to toggle on "Edit layers below"
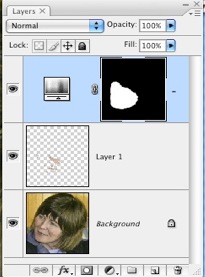

PS Layers

Here's a short tutorial that uses "Edit Layers Below"


6.  What if Combined layersIf you can only directly edit pixels?
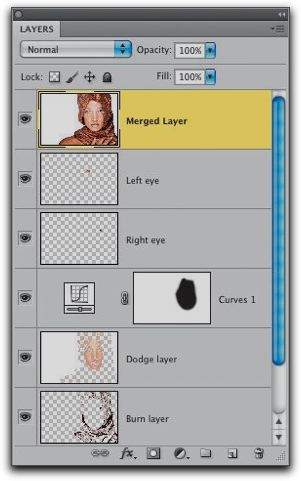
Sometimes a task has NO smart features or no built in adjustment layers… a good example is the Adjustment
Shadow/Highlights 

The menu is Images > Adjustments > Shadow/Highlights

Here's what to do to make a Flattened copy of the visible layers 

Select the layers where you want to apply the changes

If the layers are contiguous select the first layer, press and hold down the shift key, then select the last layer…

If the layers are not contiguous hold down the control key (PC)

The Command key (Mac)

and click on each layer you want to select...

Then press all at one time
Mac (Command + Option + Shift + E)

PC (Control + Alt + Shift + E)


Then  apply the Adjustment to the flattened copy of the all the layers...

To re-edit the Shadow/Highlights… you'll need to delete the layer and repeat the process...


Enjoy! As Always 'holler if you have a question or comment

Editing smart objects from Camera Raw in Photoshop is next.

Tuesday, June 12, 2012

Cropping, Smart Layers/Objects and Stacking Layers…And Fix-it Day!

Howdy

I finally finished an article about Cropping Your Photographs… 

You'll find it here… Cropping

Here's a an article I wrote about Saving and Stacking Photoshop Layers… 

And, About using Smart Layers or layers with Smart Objects

 Keep those questions coming!


And Just a reminder for you to

Bring your own broken or just plain difficult to "enhance" photos to class...


Fix it


We'll put our collective resources together and figure out how to make 'em better!


Saturday, June 9, 2012

PS4P Part 2 -- Review

Howdy

Scanning
Here's the link to the article On the Luminous Landscape Website
I
n the article you can download the first 4 chapters of...

Scanning workflow with SilverFast8 with Mark Segal

Here's the link for  Vue Scan

For links and notes on some of the material covered in class you'll find 'em here...

 I posted some photos of my trip to Depot Bay...


And, Nasa's Venus Transit shots

http://youtu.be/4Z9rM8ChTjY


Enjoy!!


Monday, June 4, 2012

PS4P 2 - Review --The Pen is Mightier than the Sword…

This weeks Objectives

  • Draw straight and curved open and closed paths using the Pen tool.
  • Stroke the path "edit" a photograph
  • Convert a path to a selection
  • Convert the selection to a Mask
  • Place selected, masked object on a new background.
  • Use Refine edge enhance or clean up the edges of the mask

Homework

Let's see some examples of your work!  Either post the pics on the blog, or send 'em to me...

Saturday, June 2, 2012

Transit of Venus

One more Astronomical Event Next one will NOT occur until 2117

Transit of Venus, June 5th, 
This will be the last transit of Venus to occur in your lifetime!
(When it rains, it pours... but, not figuratively...)
You can get transit times for your location here...
Fun Web Site!
http://transitofvenus.nl/wp/where-when/local-transit-times/


Transit times
2012

4909 NE 47th Ave, Vancouver, WA 98661, USA
76%
ingress exterior
Jun 5
14:06:07
ingress interior
Jun 5
14:23:33
transit center
Jun 5
17:27:05
egress interior
Jun 5
20:30:13
egress exterior
Jun 5
20:48:02
Slider thumb shadowSlider thumb
Times in GMT -8
Latitude45°.65775 N (45°39′27″.9 N)
Longitude122°.62345 W (122°37′24″.4 W)
Clouds76%
ContactTimeh / AP / d
ingress exteriorJun 5
14:06:07
57°.1
55°.5
41°.2
974″.7
ingress interiorJun 5
14:23:33
54°.5
61°.0
38°.7
916″.9
closest approachJun 5
17:25:54
23°.5
98°.0
343°.5
545″.3
egress interiorJun 5
20:30:13
-5°.4
130°.7
291°.6
916″.0
egress exteriorJun 5
20:48:02
-7°.7
134°.1
289°.1
974″.7
Sunrise04:27:26
Sunset19:53:41


and you can get

Get iPad, iphone, android apps here

http://www.transitofvenus.org/
This is one terrific web site! by the way


Remember, Never look directly at the sun!  Don't aim your camera at the sun, you can burn out sensor cells.


Look at an projected image of the sun, use a camera obscura (Pin hole) projectivon.


For Photo tips go here

http://transitofvenus.nl/wp/observing/photographing-the-transit/

It's going to be clear, right!?


Photo Opportunity -- Setting Partially Eclipsed Moon


Partial Lunar Eclipse
In the wee hours of June 4th 

Moon Sets partially eclipsed

Times from The US Naval Observatory
for Vancouver, WA  Longitude W 122 38, Latitude N 45 38
Pacific Daylight Time
                                                                        Azimuth Altitude (Height above) Horizon)
                                                          h m                 o           o
Moonrises                   2012 Jun 03       20:26        121.8          ----
Moon enters penumbra 2012 Jun 04       01:46.5     190.9          21.1
Moon enters umbra      2012 Jun 04       02:59.3      207.6         17.1
Middle of eclipse          2012  Jun 04       04:03.2      220.9         11.0
Moon leaves umbra      2012  Jun 04       05:07.1      232.9           3.3
Moonset                      201   Jun 04        05:36         237.9          ----

Enjoy!

Photo Opportunity -- Setting Partial Lunar Eclipse


Partial Lunar Eclipse
In the wee hours of June 4th
Times from The US Naval Observatory
Vancouver, WA W122 38, N45 38
Pacific Daylight Time
Azimuth Altitude
h m o o
Moonrise 2012 Jun 03 20:26 121.8 ----
Moon enters penumbra 2012 Jun 04 01:46.5 190.9 21.1
Moon enters umbra 2012 Jun 04 02:59.3 207.6 17.1
Middle of eclipse 2012 Jun 04 04:03.2 220.9 11.0
Moon leaves umbra 2012 Jun 04 05:07.1 232.9 3.3
Moonset 2012 Jun 04 05:36 237.9 ----