Wednesday, April 27, 2011

Review Class 3 --And your Homework!

"Photoshop is a great plugin for Camera Raw," Photographer and Camera Raw Guru, Jeff Schewe.

As you have seen in class, It is by far easier and quicker to enhance your photos in Camera Raw than using Photoshop Elements or Photoshop.

Photoshop is good for complex composites, merging photos, removing or adding objects in a photo... where you need to use layers, masks and selections.

Here's the page I put together, with notes from Class 2 --Using Camera Raw, you'll also find keyboard shortcuts, and other resources for Camera Raw, Including where to get Adobe's Lens profiler, How to 
calibrate your camera, and get presets for Camera Raw 

Here are the other photo enhancing tips for Photoshop/PSE some of them I covered in class 3.


In class 4 I will show you how to use Smart Objects to edit your photos in Photoshop.


I will also discuss in class 4
Cropping your photos for composition

1. Crop to simplify the photo by eliminating distractions at the edge of the photo.
2. Crop Rules
There is a reason why a photograph looks good, or looks compelling...
Hidden in the photo is a mathematical progression that occurs naturally in nature.  We call it the Golden Mean.   It is based on the progression of numbers known as the Fibonacci sequence:


0,\;1,\;1,\;2,\;3,\;5,\;8,\;13,\;21,\;34,\;55,\;89,\;144,\; \ldots.
For Photoshop there is a free "open Source" Javascript that you can run, that will aid you in deciding how to crop your photos
The Script is in the CD I gave you in class, it's in the folder called Actions.  Golden Crop.jsx
For those of you that are Using Adobe's Lightroom you can toggle the grids on and off only when the crop tool is running in the develop module! It's the O key, that's the "letter" o
You can double click the script and it will launch and run in Photoshop.  Or you can load the script from the Menu: File > Scripts
If you don't have the disk, you can find the script here...
SHARE YOUR PHOTOS
Share your "before" and "after" photos!
Now that you are an expert at Camera Raw, I'd like to see your work! And, I'm sure other is the class would too!
E-mail me your photos Labeled with your name and with before and after... 
Re-size your photos for the web
Landscape orientation at  1024 pixels x 768 px 
Portrait orientation at 768 px x 512 px
I will post'em side by side here...
Bring your problem photos to class, we'll work on them there!
Of course there is always more!

Adobe Releases Camera Raw 6.4 and Light Room 3.4

Howdy
If you have a new Camera, you have been waiting for this Upgrade for Photoshop CS5


April 27, 2011

Lightroom 3.4 and Camera Raw 6.4 are now available as final releases on Adobe.com and through the update mechanisms available in Photoshop CS5 and Lightroom 3.  These updates include bug fixes, new camera support and new lens profiles.
For details on the Upgrade you can read about it here from the "Lightroom Journal"

Saturday, April 23, 2011

Review Class 3

Here's some "step-by-step" tutorials that go over some of what we did in class.


Fixing Wrinkles
Here's the technique for removing wrinkles using Gaussian Blur


Fixing Skin tones and Wrinkles
Using Hue and Saturation and the clone tool


Using the Healing Brush
There are also instructions for Photoshop Elements ... The Healing Brush
Do Watch the Russell Brown Video


4 Video from Martin Evenings -Photoshop for Photographers 
A really good reference to add to your library

Got a question? 'holler

(The car started after 4 hours of charging, will it start tomorrow with out charge??


More soon

Tuesday, April 19, 2011

Week 2 Review -- Setting Mid-Gray

The Art of Photography Part 4

So what's the difference between Exposure and Brightness?

The Exposure settings either brightens or darkens the entire image with the largest affect on the highlights. We used Exposure to reduce highlight clipping.
Recovery, by the way, attempts to pull data out of the clipped highlights.
Black
The Black slider does the same thing for the blacks that are clipped (It gives the overall effect of increasing contrast in the shadows and mid-tones.)
Brightness
The Brightness setting brightens or darkens the image around the mid-gray values without forcing clipping in the blacks and highlights (however, large changes might re-introduce Clipping...) If you move the slider to the right highlights will compress and shadows will expand. The opposite occurs when you move the slider to the left.

Contrast
Contrast increases or decreases image contrast, mainly affecting midtones. When you increase contrast, the middle-to-dark image areas become darker, and the middle-to-light image areas become lighter. Generally, you use the Contrast property to adjust the contrast of the midtones after setting the Exposure, Blacks, and Brightness values.

Tone Curves
The Parametric and Point Tone Curves fine tune the Brightness/Contrast settings...
This is the Parametric Tone Curve Panel...


This is the "Point" Tone Curve


Getting closer

Next, using the target select tool to fine tune Hue, Saturation and Luminence of specific regions

Week 2 Review -- Setting White Balance

THe Art of Photography --Part 3

Before we move onto Mid-gray we'll set the White Balance First
Setting The White Balance

There are two ways to do this. one is more "Technical" -Objective the other is more "Personal", or subjective

Objective method...
Look for a white value as close as possible to R=245 G=245 B=245
You can use the Color Sample Tool (keyboard shortcut (S)) to find the area of the image that contains that value...


In the Rock Creek Example the closest values are in the foam in water... And, because the photo is over exposed the values aren't very close... It might take you a while to find the point you are looking for.
When you find an RGB value, just click with the White Balance Tool (Keyboard Short Cut = I (the letter i )) inside the Color Sample circle, and as soon as you do that the white balance will change.


Also at the same time Camera Raw will write the information to the "change file" So that every time you make a change you don't have to "save" the file... Camera Raw does that automatically for you. When you are done with the image in Camera Raw, you "Save" or make the changes "Official" by selecting and clicking on the "Done" button. That action will also take you back to the Bridge or the screen where you sent the image into Camera Raw.
"Open Image" will send the file into Photoshop. The Save Image button at the left is for exporting or saving your raw image to a different file format.

The subjective method is to use the Temperature slider...


In our Class example RockyCreek-7.CR2, the image is over exposed, As a result I did Recovery and Exposure first. And then slid the slider to the Temperature setting of 6500 K (Full Sunlight)

Here's the result

Your mileage may vary

Now! Mid-Gray!

Week 2 Review THe Histogram

THe Art of Photography --Part 2

From 2011-02-02
This is a movie of the Histogram in Lightroom. (It displays the same information as Photoshop and PS Elements...Except that it is interactive). Placing the cursor in the histogram shows you what area Recovery, Exposure, Fill Liight and Blacks are affected by the sliders, or in the case of Lightroom holding down the mouse and moving the cursor left or right inside the histogram changes the data!

Recovery = Highlights
Exposure = the full histogram
Fill Light = Shadows
Blacks = Blacks

In Lightroom the Clipping indicators change when you move the slider in one of the "areas" and the data shifts across a threshold.

In the case of a photo that is so overexposed or underexposed you set the exposure/recovery first, then you set your White Balance.

For Photos that are more accurately exposed, the first step is to set the White balance.

Remember in order to display the correct colors we need to know what's white, what's mid-gray and what's black

Next... Mid-gray

Week 2 Review -- Camera Raw Work Flow Part 1

Howdy

We covered a lot of ground in class on April 16...

Here are the major points to consider with this working sample (case study) on the class CD in the folder
DemoPics > Rocky-Creek-7.CR2

There is no one correct way to "render" how a photograph looks. It's up to you. Just ask yourself... is it Art, or is it just a photograph? 

The Art of Photography
Part 1

Histogram Analysis


The first step is to check for clipping (areas of the photo that may be over or under exposed and then set the white point.  I have chosen an extreme example here so that the choices are obvious.

The highlight clipping indicator (on the right) when turned on shows that there is a lot of clipping in the highlights
#1 points out that the clipping indicators are turned on (the white outline surrounding the up arrows). You could just turn them on and leave them on... There is no clipping in the shadows or blacks otherwise we'd see a bright blue areas in the "Preview" window of the photo.

Our first goal here is to remove the clipping if we can..

#2 arrow is pointing out the highlight clipping on the left and the oval area on the histogram that shows the pixels that generates the highlights.

clipping
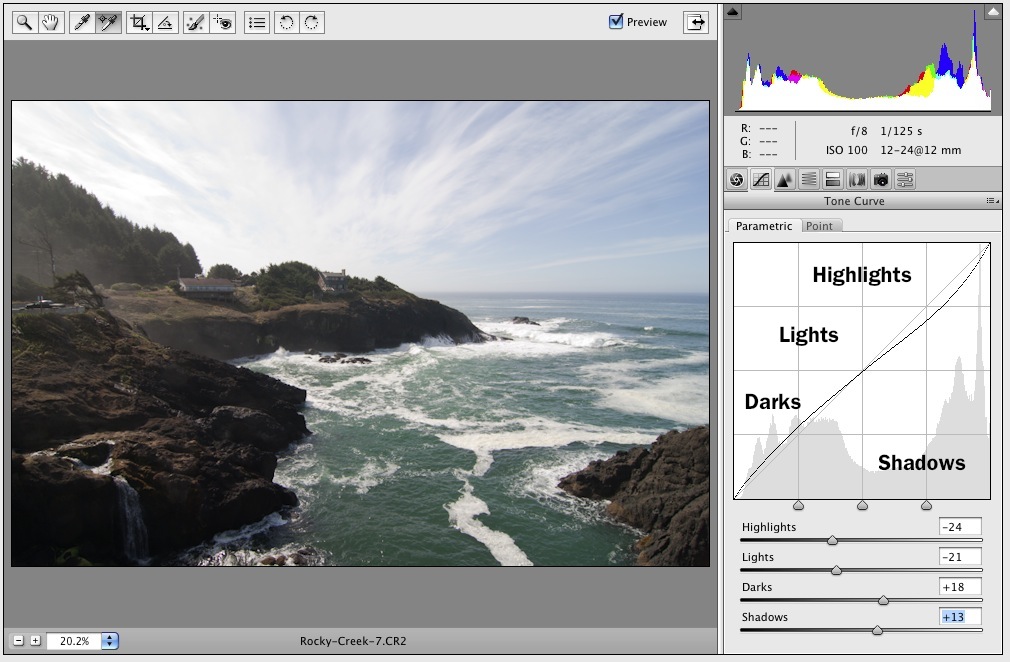
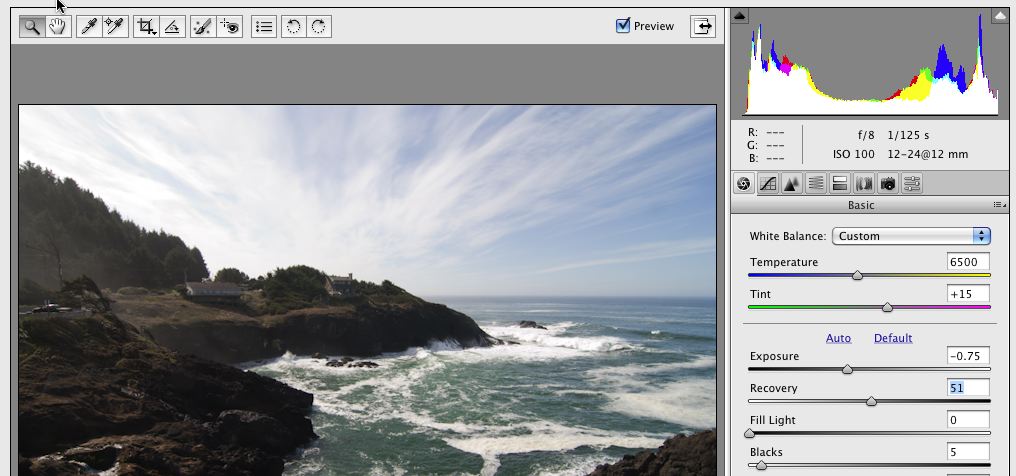
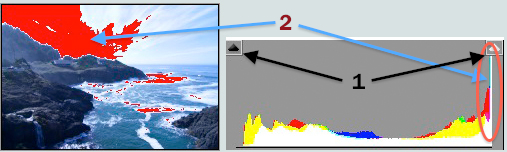
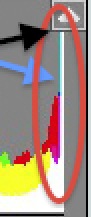
In general here's what we need to do if there are Highlight Clipping Warnings in the histogram

If it's white on the very right: All three channels (R G and B) are clipping
If there is a color, one or two channels are clipping and that implies there is usable information, picture data  that contains detail in one or two channels and that we should be able to successfully recover.

As far as I know, Camera Raw is the only image processing software that can recover and display information from any one of the Red, Green or Blue channels.

To recoup the overexposed data use the "Recovery" slider


The #2 in the following image is showing how the histogram has changed after using the Recovery Slider
AfterNote: If you hold down the alt Key (PC) or the Option Key Mac while moving the slider a mask will be generated that will show you just the clipped data... as you move the slider to the right the clipped information will decrease in size. Stop when it's
smallest.

Second, Set the white point.
To set the white point you can use the White Balance Selector... and choose as close as you can to R = 245, B=245, G = 245.

Then Set the Exposure... When using the Exposure slider, hold down the Alt/Option key, you'll just see the pixels affected when moving the Exposure slider...  Stop when they have disappeared or you like what you see!

You'll note that the image has changed dramatically using only these 3 sliders...

In a well exposed photo you would set the color temperature first then the exposure and recovery sliders if needed... 

Next... Set mid Gray.