Sunday, October 30, 2011

Week 4 Review --Class schedule for November-December

Objectives

  1. Color Management -Two PDF's (right Click Downloads)
  2. The Adjustment Panel
  3. Levels And Curves
  4. Non destructive editing in Photoshop

Class Schedule PS4P Part 2

Just a reminder for you to mark your calendar...

  • 2 weeks off ---classes resume on...
    • 11/19/2011
    • 11/26/2011 No Class Thanksgiving weekend
    • 12/03/2011
    • 12/10/2011
    • 12/17/2011

Homework

Practice, practice, practice and post a sample of your work to the class photo share site.

Monday, October 24, 2011

Puppet Warp and Animation in Photoshop

Howdy

For those of you that are interested in the Puppet Warp and Animation features in Photoshop I have completed the tutorials for those subjects.


You'll find them here

Puppet Warp

Animation


Enjoy!!!

jumping-jack


Sunday, October 23, 2011

Week 3 -- Notes Content Aware Fill and Layer Masks

Objectives

Setting up Photoshop for best performance

Learning the Work Environment, The canvas, tools, tool bar options and the dialogue panels.

The "power" in Photoshop is: Adjustment Layers, Selections and Masks

Homework

Practice, practice, practice and post a sample of your work to the class photo share site. Ask questions if you get stumped.

Sunday, October 16, 2011

Wrong link -Week 2 Review

Howdy The week 2 link should be

Camera Raw

The link to the ZangZing sharing site is..

Before-After

If you didn't get an invite, it's only because I don't have your e-mail address ... e-mail me directly if you want to share your photos

Thanks

Garry


Week 2 Review - The Program Camera Raw

Howdy

You'll find the  "overview" handout and links to a step by step discussion of the "Toning Techniques" using the Basic Panel in Camera Raw at this link:  Using Camera Raw a Case Study in 4 parts

I'd love to see your before and after photos... If you post links or upload them to the Blog please keep the :size" down to 1024 x 768 pixels (jpg) or png format for the web.

I have set up a free account at "ZingZang" That is supposed to make this sharing process easy... You should be getting an e-mail from ZingZang inviting you to participate.

If have a question 'holler or post a comment


More soon...


Thursday, October 13, 2011

Adobe Releases Camera Raw 6.5

Howdy

Adobe has released a Camera Raw up Date V 6.5

You can down load here for Windows

http://www.adobe.com/support/downloads/detail.jsp?ftpID=5260

for Mac

http://www.adobe.com/support/downloads/detail.jsp?ftpID=5259


or in Photoshop CS5 and Photoshop Elements 9 & 10 use the menu item:

Help > Check for Updates

or

Help > Updates...

To "auto" install the update(s)


If you have Lightroom, it has been updated to V3.5 along with Camera Raw 6.5

Use Menu

Help > Check for Updates

To "auto" install the update(s)

Details about all the updates are here on Tom Hogarty's blog

http://blogs.adobe.com/lightroomjournal/


Enjoy!!!

Monday, October 10, 2011

Batch converting .jpgs to tiffs

Why Convert?

If you are working in PSE or PS with a .jpg file every time you save the file as a .jpg you will re-compress the image. and loose detail and more Jpg artifacts will appear in the image.

Batching in PSE

Menu:
File > Process Multiple Files
You get this requester in PSE 8


YOU NEED to select the source and destination for the files and Set up your own renaming scheme
Choose file type… .tif


you can also do some "quick" processing, water marking the images or add a caption.


Batching in PS with The Bridge and Camera Raw!
Here's how to load more than one file into Camera Raw.

Highlight them in the Bridge, you can do this several ways.
 
1. If the thumbnails are side by side Hold down the shift key and click on the first thumbnail (Left Mouse Button) and then Click on the last file…. Then Click on one of the thumbnail files with the RIGHT mouse button... In the pop-up menu select "Send to Camera Raw"


2.Contol select If the files are not side by side
Hold down the Control Key (PC)
or the Command Key (Mac)
 
Click on each picture you want to send to Camera Raw
 

Then right click on one of the highlighted thumbnails, from the pop-up menu choose "Send to Camera Raw"


in Camera Raw (illustrated below)  

Top left choose Select All (1) then Save Images(2)


You'll get a robust conversion dialogue box that will allow destination, renaming and several file types...


What's neat about this process is 1. It's really fast and 2. you can start multiple conversion sets one right after the other...
Gota a question 'holler

Sunday, October 9, 2011

PS4P I -- Importing iPhotos (Mac) using the Bridge (and Lightroom)

Settings
1. Color Management
This is an excellent article written with a bit of humor... about Color Management Settings in Photoshop by Ben Willmore
http://www.digitalmastery.com/downloads/pdf/Color_Management.pdf

2. Calibrate your Monitor
This is the link... http://uofgts.com/PS-P2Site/Calibration.html

3. Using the "Bridge"
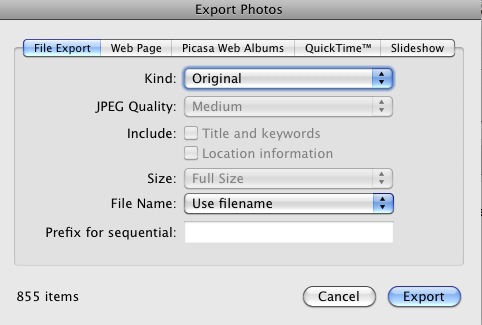
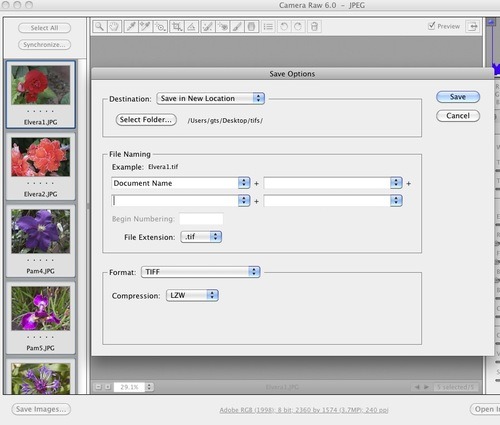
If you want to always have jpg's and or tiffs photos to load into Camera Raw Do This...
hold down the following key board keys and then double click the selected photos.
PC Control R
MAC Command R

In Camera Raw preferences you can check the following boxes

4. For iPhoto Mac users
How do I get Bridge to access my iPhoto's?

If you are using Photoshop Elements 9/10 ORGANIZER it's real easy... there is an "iPhoto" Import Button!
Organizerimport
 
If you have Lightroom 3/4 accessing your iPhotos is really easy too.
Just choose the iPhoto library in the import module in Lightroom 3/4 and check the Include Subfolder button!
Lightroom iphoto imp
 
If you are Using Bridge or Lightroom (1 or 2) There are a several ways to get Bridge to see your iPhoto's.

Method 1 (preferred): Copy your iPhoto Pics to a new location
1. Start iPhoto.
2. On the left side of iPhoto Under "LIBRARY"  select "Photos"
If you have thousands you might want to instead select Under "ALBUMS"  and export one Album at a time...

3. Choose the menu item
File > Export...


4. When you click on the export button, choose your destination (external Drive and a Folder?)
If you have been using iBuddy for iPhoto, do this for ALL your iBuddy iPhoto Libraries.

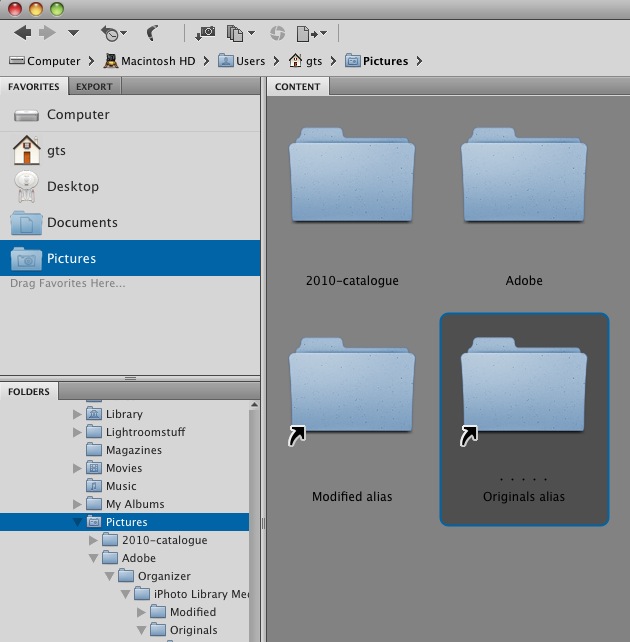
Method 2: Make an aliased folder.
(leaves your iPhotos in their current location, the folder "Originals" and "Modified.")

(Note):
On my Mac  I was able to use Spotlight to search for the  folders labeled "Originals" and "Modified"
Apparently Apple changed the behaviour of the iPhoto Library folder after iPhoto version 6? or so that just clicking on the folder won't open it. You have to right click on the folder and choose "Show Package Contents"
(Note:)
On my Mac the path to the "Originals" folder is located as shown below because I used Photoshop Elements 9 to import the iPhoto Pics into the PSE 9 Organizer!
/Users/gts/Pictures/Adobe/Organizer/iPhoto Library Media/Originals

B. On Your Mac the path to the Originals and Modified Folder should be
/Users/Username/Pictures/iPhoto Library/Originals

1. If using Spotlight works for you and can find your "Originals" folder... Click on Show ALL to get the full listing... Look for the "Originals" Folder, you might find more than one if you backed up your iPhoto Library or use the iPhoto aid iPhoto iBuddy.

2.  Right Click on the "Originals" folder in Spotlight
3. . Choose "Open Enclosing Folder"
4 . Right Click on the "Originals" Folder and choose "Make Alias"

If you have a newer Mac/iPhoto right click on the "iPhoto Library" folder and choose
"Show Package Contents"

Right Click on the Originals Folder and choose the menu item "Make Alias"
Now drag the aliased folder to your Pictures Folder (Or where ever you want them)
Do the same for the "Modified" folder
Now you can use Use Bridge or Lightroom to navigate to the location of the Originals aliased folder in your pictures folder and you can then access your iPhoto pics via Bridge!


You might want to repeat for all "Originals" and "Modified" Folders. if you used iBuddy
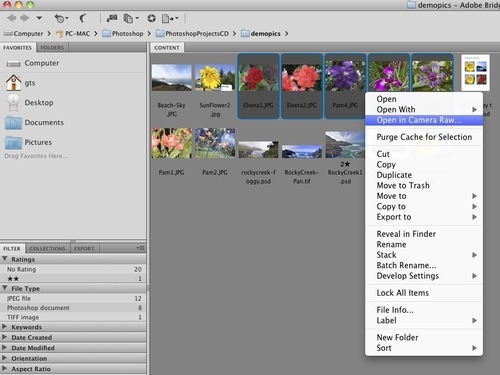


Saturday, October 8, 2011

Photoshop4Photographers --Week 1 Links

Week 1 Outline

Settings

Subjects

  1. Bridge/Organizer
  2. Photoshop Layout and Settings
  3. Camera Raw Settings
  4. Content Aware Fill


Contact -- Use the comment button below!

The links below will take you to the class web site and material covering most of what was covered in class!

Objectives

  • The Monitor
  • Install the latest updates
  • Learn The layout
    • Bridge
      • Make a Meta Data file
      • Set Camera Raw Prefs
    • Camera Raw Settings
      • Space, size, depth and resolution
    • Photoshop Settings
      • Preferences, Scratch Disk, Undo's, etc.
      • Color Management
      • Sampling
  • Something New

Materials

The PS4P I CD

Homework

Apply the "settings" for Bridge/Photoshop and Camera Raw on your personal computer