Sunday, November 10, 2013

Lightroom Week 4 Review

Howdy

Edit as a smart object…

In class we learned how to send a raw file to Photoshop as a smart object, and used the fact that saved snapshot settings travel with a raw file.  (They are embedded in the raw file) We used the TAT (Targeted Adjustment Tool) in The HSL panel to make 2 different global edits 

We saved the setting with makeup first and then one without makeup, saving each as a Snapshot setting…
We sent the image to Photoshop as a smart object and used layers in Photoshop… 

Before andAfter

You will find the details on how this was achieved on the web page Editing as a Smart Object in Photoshop

 The Adjustment Brush

We also looked at Editing Locally using the Adjustment Brush in the Tool Bar in the Develop Module

Tool Bar


With the Adjustment Brush you can apply Local Edits, edits that are confined to a part of the entire image… 


NewImage  You can find the details on how this is done on the web page The Adjustment Brush


Spot  Removal

We also learned how to remove Spots caused by “dust on the sensor…” 

Lightroom003

 and apply the dusting out to a series of photos…

Lightroom004

Select Only Spot Removal and click the synchronize button..

Lightroom005

The dust removal is applied to ALL SELECTED PHOTOS…

Reminder, there is NO Class November 11th

See you all on November 18th


Friday, November 8, 2013

Catching up.

Reminder, There is No class on Monday, November 11th  Veteran’s Day. (Remembrance Day in Canada)

I have revised the class Lightroom website to make it easier to find the following:

  • Notes about each Module in Lightroom is divided into “Input” and “Output”
    • The Module tabs under Input and Output contains keyboard shortcuts and a brief synopsis (notes) about that module…
  • The Button Link Top 10 TYNTK are things that you NEED to know about Lightroom
  • The Button Link  Step x Step Case Studies takes you to a portal with all the material, or Case Studies (Tutorials) covered in class… 

Safari001


Week 3 Catchup… The Tone Curve Panel

The key in the Tone Curve panel in either the Point Curve or the Parametric Curve panel is “TAT” The Targeted Adjustment Tool…

The Tone Curves “Fine Tune” Contrast settings and can “sharpen” an image

Do NOT just use the Tone Curve panel to “tone” your photographs, use the Basic Panel First!

Contrast increases or decreases image contrast, mainly affecting mid-tones. When you increase contrast, the middle-to-dark image areas become darker, and the middle-to-light image areas become lighter. Generally, you use the Contrast property to adjust the contrast of the mid tones after setting the Exposure, HighlIghts, White and Black values.

The Tone Curve Panels 

ToneCurevwpng

In the Point Curves Panel you can add points by directly clicking on the curve

  • you can also modify (Brighten darken colors in each color channel (R,G,B)
  • RGB Curves are very effective for removing color casts
  • Point curves do not affect the Parametric curves

 There are two really good videos about using the Tone Curves…

One is at the Adobe Web Site http://tv.adobe.com/watch/learn-lightroom-5/adjustments-with-tone-curve/

The other is by George Jardine…

Tone Curves http://topdownvideos.com/training/sample-dev4/


Enjoy!!!


Saturday, November 2, 2013

Need an External Drive?, Black Friday is coming!

I use the kind of internal drives that are used in workstation desk tops, except that I use them externally!

My recommendation as to the kind of drives are:

  • Seagate Barracuda ST2000DM001 
  • You can get them in 1, 2 or 3 terabytes sizes
  • Or 
  • Western Digital WD Black, Red or Green and they
  • also comes in 1, 2 or 3 terabyte sizes


You’ll need some kind of an enclosure or case for the hard drive:

  • I use a Rosewill RX-DU300 2.5" & 3.5" USB 3.0 Hard Drive Docking Bay
  • Or  you can get a 
  • Thermaltake BlacX ST0005U 

But, there is a wide variety of enclosures available.  I like the docking variety as there is no assembly required and it is easy to swap drives!  They connect via USB, Get one that uses USB 3.0

Just make sure the enclosure can hold a 3.5 inch esata drive and can handle the terabyte capacity of the drive … most enclosures can handle up to 2 terabytes… 

Here is a bunch of enclosures listed as available at newegg.com
http://www.newegg.com/External-Enclosures/SubCategory/ID-92

The next step up is to get and use a “RAID” 

  • RAID
    •  (Redundant Array of Independent Disks), a system of multiple hard drives for sharing or replicating data

Search for these on Google or the search engine of your choice…Black Friday is coming… prices should drop in the next few weeks…


Enjoy!!!

Monday, October 28, 2013

Syncing & Importing From Another Catalogue

The Menu item is:

File  > Import From Another Catalogue…

How you Import and Sync Images and Metadata in different catalogues will depend  on your “setup”.

A:  Merging catalogues on your system or external drive(s)

B: Importing from another computer, either a laptop or desktop (Shooting in the field)

Here are the main steps  to do an import from another catalogue…

Step 1:  

Determine the location of the catalogues on the COMPUTER(s).  

PC default Location        c:\users\my pictures\Lightroom\

Mac Default Location:      //Users/[user name]/Pictures/Lightroom/

This will just help you find them in the next step…

Step 2.

Start Lightroom loading your Master or Main Catalogue.    

(Hold down the alt/option key when you startup Lightroom) Note that, Lightroom defaults to loading the last loaded catalogue…

LR CatLoadpng

Step 3: 

The Menu item is:

File  > Importing From Another Catalogue.Use

Use the Mac’s Finder or the PC’s Windows Explorer to locate the “Other” catalogue.

Lightroom002

A double click on the .lrcat file will open the dialogue box below…

Step 4:

Check √ the Show Preview box lower left to see the thumbnails in the Import Catalogue.

Layout002png

Number 1 in image above…  

The 3 bars and the exclamation point indicates that there is “new” data

Number 2 in image above…  

If you want, you may choose to preserve “Old” setting in your CURRENT catalogue, LR will make a virtual copy for you.

Lightroom002png

Number 3 in image above…  

Add New Photos to Catalogue without moving…

Use this option if you are happy with where the files are located, and you just want to tell LR where they are…

Copy new photos to a new location and import… 

Your photos are on a Laptop or another computer, or you are adding or consolidating your photos into a single catalogue…

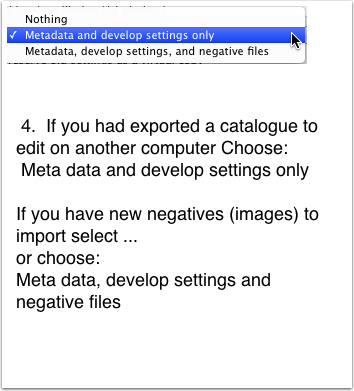
Don’t Import new photos 

You just want the metadata

Number 4 Above…
LR 02png


Step 5  Click Import…

Other Hints… (Working in the field)

If you are using a second copy of LR on a Laptop and you are using LR’s default location to store the photos, when you get back to your desktop you will have to do the following.

1. Using your laptop, plug-in an external drive.

2.  Export your Shoot as a Catalogue to the external Drive.  

Menu:

File > Export as Catalogue…  To the External Drive.

3.  Eject the External drive from the laptop and plug it into your desktop

4. Load your master Catalogue in LR and  use the Menu

File > Import from another Catalogue

Follow the above import steps…


Monday, October 21, 2013

Week2 --Outline and Procedures

Do Step 1 and 2 first

Step 1

On the Class Networked drive CELab$ (Ogre)(see class procedural handout ),  

Layout002 3 07 08 PM

COPY LR-week2 the highlighted folder (Right Click -- Control Key + Mouse click, choose Copy from the contextual menu…)Paste the LR-Week2 folder into your (Flash) Thumb Drive.

Step 2

Open The Folder LR-CatDemo and double click the LR-CatDemo.lrcat icon

Layout001 3 07 08 PM

This will open Lightroom with demo photos similar to last week when we IMPORTED some sample images into Lightroom.

To see how to EXPORT a catalogue like the one we just Imported into Lightroom read the previous blog How to export a catalogue

You can use this method to bring to class photos you are working on in Lightroom.


Another Import Method:  Auto Import

Auto Import Settings

Layout003png

 Make a folder on the desktop that you will use for Import You can use the finder to make a folder.

  1. This is your destination for the pictures on the hard drive,  choose it using the Finder… If you know which folder you want the images imported to, select that. Or make a Misc or a temp folder and move the images inside LIghtroom.
  2. Choose however you want the file renamed
  3. Apply a preset if you wish
  4. Add Metadata
  5. And Key Words
  6. Choose how previews are handled.

This is a handy import method to use if you want to do a quick import, like in the classroom…

Adding & Syncing Metadata

See details here on the web page

Adding and syncing metadata in Lightroom

The Develop Module

  • Preliminary viewing and selection

    • Rough Editing (did that shot work?)
    • Quick Edits, no need to be precise, yet!
    • Select images Round 1
      • Put the rated images in a collection
      • Use Star * Ratings
      • Just use the #1 - #5 keys
      • In the first round, just fuse the #1 key.
      • Add additional Key words
      • Add IPTC Data
    • Rate images again in a second Round of viewing

    Enhance The Keeper Photos

    Only enhance photos that are in a collection!!

 Enhancing Photos in Lightroom 5: A Case Study

See the details on the following web pages…

 Exporting Photographs to your Mail client (program)

Exporting Photos Via to your  Mac or PC mail client (Mac Mail or Outlook, Outlook Express, etc… )

Since there is a detailed "how to on line" excerpt from Scott Kelby's Lightroom Book

http://www.peachpit.com/articles/article.aspx?p=717555&seqNum=13


Friday, October 18, 2013

Question: How do I move my Lightroom Photos to an external hard drive?

Thanks to Jim Livingston for the question…
 

( I ); question can I drag and drop all the pictures in the folder “My Lightroom Photos”  located now on my C: drive to my external hard drive ( I ) “My Book”?

 
You don't want to drag and drop, You want to "export as a catalogue," that way you'll have all your edits, metadata and the "originals" or negatives in the export.
 
 
Here's the steps…
 
In Lightroom's Library Module on the left side, locate the folder you want to Export, AND click it to highlight it…

Layout001

 Choose the Menu item

File > Export as Catalogue 
OR
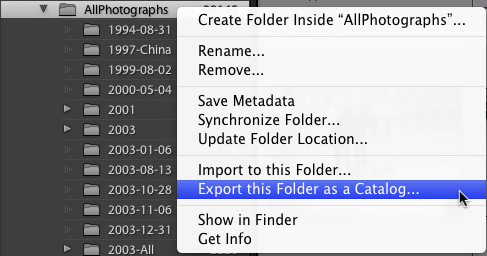
Right Click the highlighted Folder

  You will get this requester first…
Layout002
 
Choose Export this Folder as a Catalogue
Then you get the Export as Catalogue Dialogue…
Here's what to do… 
 

Exportrequesterpng


1. Choose the drive or location where you want to export the Photographs and catalogue…
2. Save as… use the exact name of the folder you are exporting, in this case  "AllPhotographs"
3. Do you REALLY want Lightroom to build previews for ALL your Photos ….. might take a while so, leave Build / include Smart Previews UNCHECKED
4 Click export
 
Icons
 
In the sample shown above  I unchecked Export Negative Files… and exported just the database, I can use this exported database to edit my metadata and later Synchronize the added data to my originals… 
 
 Note that the export preserves your original file structure…
If I had exported the negative files  (Original Photographs) They would be Inside the main folder "Photos2" The result would be a stand alone or duplicate Catalogue… with, file structure, photos, settings and database…
 
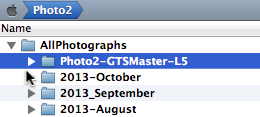
In the example below I exported JUST a folder named  "2008-06-13"     with one photograph!   


Folderexport

 As you can see the original  file structure was preserved

Monday, October 14, 2013

Lightroom Week 1 Notes

Howdy!

Welcome to the Clark College Lightroom Class.

This is an outline of Week one's class discussion with web links.

Generally the Lightroom Primer website has detailed notes covering class material and discussions. If details need to be added you will find them in these class blog notes, or I will update the website.  

If you have questions contact me via e-mail, garry@uofgts.com or leave a comment

The Lightroom Primer website is http://uofgts.com/Lightroom/index.html

Things you Need to Do Before You begin using Lightroom

1. Calibrate your Monitor


At the bare minimum you should make sure that you set the Brightness and Contrast of your monitor.

On the Mac go through these steps …

In System Preferences choose

Hardware > Displays > Color > Calibrate

and Follow the steps…Layout001

On the PC 

If you have Windows 7 or 8, You'll find calibration software in the Control Panel

To start Display Color Calibration

  1. Open Display Color Calibration by clicking the Start button Picture of the Start button, and then clickingControl Panel. In the search box, type calibrate display, and then clickCalibrate display color.‌ Administrator permission required If you're prompted for an administrator password or confirmation, type the password or provide confirmation.

  2. In Display Color Calibration, click Next to continue.

For more details go to this web page Calibrating Your Monitor


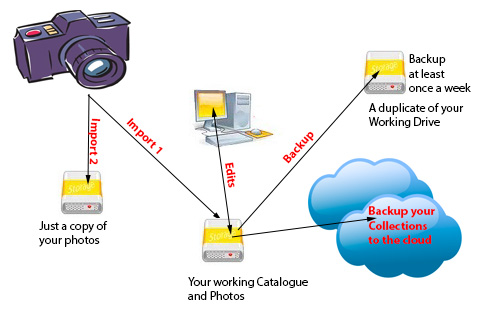
2. Establish a plan to ingest AND backup your Photographs

Backup Scheme

BakupDrive

The Structure of your Main Photo hard drive and the backup hard drive should look like this, Your backup drive would have a different name

The folders are at the "root" of the Hard drive. 

If the Drive with the Working Catalogue fails… You just need to disconnect the failed drive, rename the backup drive with the name of the working drive… In this case Photo2, when you startup Lightroom, it will immediately find your catalogue and photos!!!

This method also allows the easy transport of All your photos and the Lightroom Catalogue!

3. Fill out and save your IPTC Metadata Preset

In Lightroom

Menu item:

Metadata > Edit Metadata Presets…

If you want to learn more about IPTC (International Press Communications Council) Metadata check out their website

4. Extra:  Here are two excellent videos 

How Lightroom works… A video by George Jardine (This should be required viewing for ALL Lightroom users. )


And here is a video on how to use the Filter bar  http://mulita.com/training/sample-lib4/, A Free sample Movie by George Jardine

It's a really REALLY good tutorial on how to use the Filter Bar.


That should do it for now… If you have a question… 'holler