THe Art of Photography --Part 3
Before we move onto Mid-gray we'll set the White Balance First
Setting The White Balance
There are two ways to do this. one is more "Technical" -Objective the other is more "Personal", or subjective
Objective method...
Look for a white value as close as possible to R=245 G=245 B=245
You can use the Color Sample Tool (keyboard shortcut (S)) to find the area of the image that contains that value...
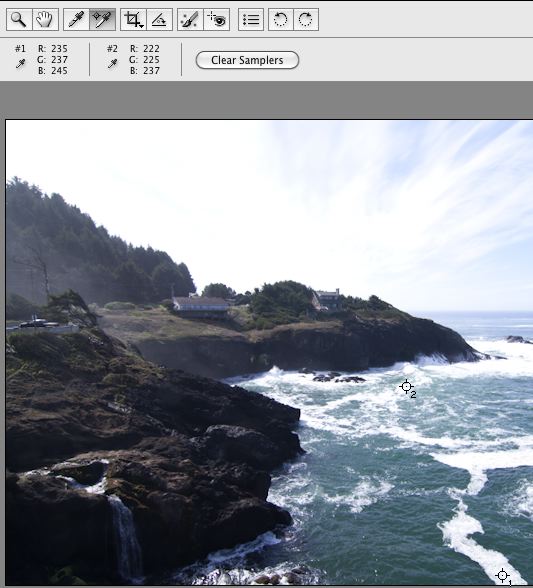
In the Rock Creek Example the closest values are in the foam in water... And, because the photo is over exposed the values aren't very close... It might take you a while to find the point you are looking for.
When you find an RGB value, just click with the White Balance Tool (Keyboard Short Cut = I (the letter i )) inside the Color Sample circle, and as soon as you do that the white balance will change.
Also at the same time Camera Raw will write the information to the "change file" So that every time you make a change you don't have to "save" the file... Camera Raw does that automatically for you. When you are done with the image in Camera Raw, you "Save" or make the changes "Official" by selecting and clicking on the "Done" button. That action will also take you back to the Bridge or the screen where you sent the image into Camera Raw.
"Open Image" will send the file into Photoshop. The Save Image button at the left is for exporting or saving your raw image to a different file format.
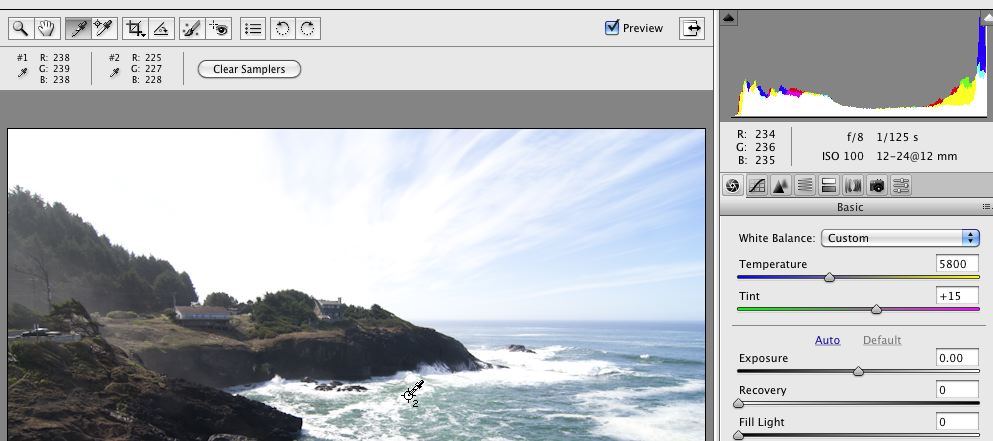
The subjective method is to use the Temperature slider...

In our Class example RockyCreek-7.CR2, the image is over exposed, As a result I did Recovery and Exposure first. And then slid the slider to the Temperature setting of 6500 K (Full Sunlight)
Here's the result
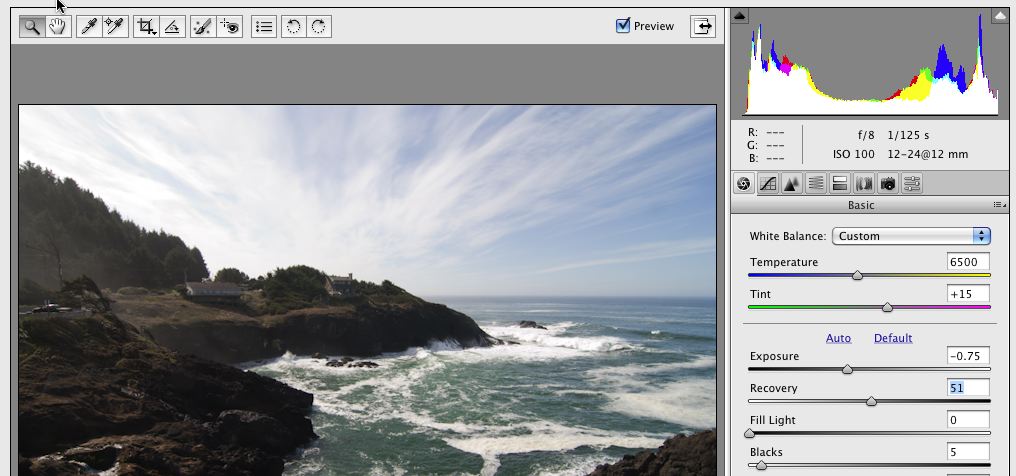
Your mileage may vary
Now! Mid-Gray!
Before we move onto Mid-gray we'll set the White Balance First
Setting The White Balance
There are two ways to do this. one is more "Technical" -Objective the other is more "Personal", or subjective
Objective method...
Look for a white value as close as possible to R=245 G=245 B=245
You can use the Color Sample Tool (keyboard shortcut (S)) to find the area of the image that contains that value...
In the Rock Creek Example the closest values are in the foam in water... And, because the photo is over exposed the values aren't very close... It might take you a while to find the point you are looking for.
When you find an RGB value, just click with the White Balance Tool (Keyboard Short Cut = I (the letter i )) inside the Color Sample circle, and as soon as you do that the white balance will change.
Also at the same time Camera Raw will write the information to the "change file" So that every time you make a change you don't have to "save" the file... Camera Raw does that automatically for you. When you are done with the image in Camera Raw, you "Save" or make the changes "Official" by selecting and clicking on the "Done" button. That action will also take you back to the Bridge or the screen where you sent the image into Camera Raw.
"Open Image" will send the file into Photoshop. The Save Image button at the left is for exporting or saving your raw image to a different file format.
The subjective method is to use the Temperature slider...
In our Class example RockyCreek-7.CR2, the image is over exposed, As a result I did Recovery and Exposure first. And then slid the slider to the Temperature setting of 6500 K (Full Sunlight)
Here's the result
Your mileage may vary
Now! Mid-Gray!
No comments:
Post a Comment