1. Scanning Software.
If you have an older scanner (or a new one) consider Ed Hamrick's Vuescan (over 10 million users can't be wrong). Even if the scanner is no longer supported when you upgraded to Win 7 or OSX LionEd's software will also add new features to your scanner. For my Epson scanner, I can now do multiple pass scans. The scanner software uses the multiple passes to average out the "final" pixels that will appear in the saved image, and I can save the file in a "Raw" Tiff file format.
2. Non destructive editing.
In Photoshop: CS5 and PSE 9 The Spot Healing Brush and the Patch Tool
With the addition of Content Aware Fill for the spot healing brush… Touchup got a lot easier!Checkout this quick tutorial The Healing Spot and Brush with Content Aware Fill
RULE: When editing Always Create a Blank Layer and do the edits in the blank layer.
When using any of the tools like the Clone or Healing Brush or Spot Healing Brush to edit pixels, First create a Blank Layer and then in the use the Tools "Option Bar" to toggle on "Edit layers below"

Here's a short tutorial that uses "Edit Layers Below"
How to make a "layer" when using The "patch" Tool

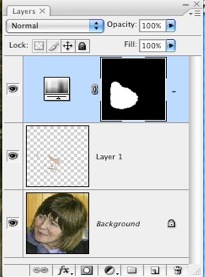
has no option for "editing layers below" The solution here is to draw your selection and use the keyboard combination: "Command + j" (Mac) or "Control + j" (PC). This puts your patch selection on a new transparent layer. Typically you'd use the patch to to cover a large patch of skin, or to make eyebrows symmetrical, or to smooth out edges on the hairline or banks.

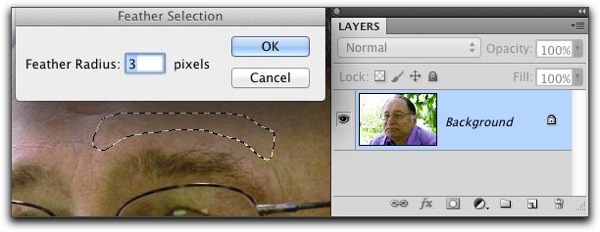
 When you make a selection with the patch tool, draw a contour that follows the upper shape of the eyebrow.
Next
Use the Menu item:
Select > Modify > Feather...
Or Keyboard short cut Shift + F6 (PC and Mac)
Then Choose 3 - 5 pixels
This will make a soft edge around your selection.

Now you can press the "Command + j" (Mac) or "Control + j" (PC).
Notice that you now have a blank layer with your selection… Now select the Move tool
Tool Bar keyboard shortcut The letter v
Move the selection with the mouse down to cover the "rough" edges at the top of the eye brow…
You might have to use the eraser or other tool to clean up the selection… and you might need to lower the transparency of the layer. You milage will vary. Experiment
I turned on the transform controls for the move tool so you sorta can see the "selection"...


Remember: Symmetry Rules! Even in "Particle Physics and the Big Bang Theory"
If you need to make more edits! Like work on the "other" eyebrow You'll need to make a flattened copy of the visible layers...
RULE: Make a Flattened copy of the visible layers , If you can only directly edit pixels.
Mac (Command + Option + Shift + E)
PC (Control + Alt + Shift + E)
This is also useful if you want to use the MenuPC (Control + Alt + Shift + E)
Image > Adjustments > Shadow/Highlight…or any other "Adjustment" that do not have an "Adjustment layer".
Except...
(Note Well) The adjustment HDR Toning…
Menu: Image > Adjustments > HDR Toning…
Automatically flattens all layers. So, if you want to preserve layers before you use this adjustment, save the file first as a .PSD and then do the HDR Toning…as it flattens all layers to make a "single" image!
Menu: Image > Adjustments > HDR Toning…
Automatically flattens all layers. So, if you want to preserve layers before you use this adjustment, save the file first as a .PSD and then do the HDR Toning…as it flattens all layers to make a "single" image!
To Flatten Selected layers Keyboard Short cut
Mac (Command + Option + Shift + E)
PC (Control + Alt + Shift + E)
and apply the Adjustment to the flattened copy of the all the layers...
To re-edit the Shadow/Highlights… you'll need to delete the layer and repeat the process...
Enjoy! As Always 'holler if you have a question or comment.
No comments:
Post a Comment