Tuesday, December 18, 2012

Fixing the Obvious, Skin Tones, and Smoothing Skin and where to from here

Week 8 Outline

Fixing the Obvious, Skin Tones, and Smoothing Skin 

I'm re-doing the Black & White resource page, adding a little bit about the history of the Black and White Photography and the different Dark Room Chemical processes and their results.

http://www.uofgts.com/PS-P2Site/bw.html  It'll change over the next few weeks…

I'm also re-building the following web page so, it'll be changing over the next few weeks… It's a list of tools in Camera Raw and Photoshop… 

 Remember, The class web site will always be available, and is always evolving…

Take another class… http://www.campusce.net/clark/course/course.aspx?catId=172


 So, Now what... 

I'm often asked… now that the classes are over, what do we do now?

Here are some suggestions...

Garry's Favorite web sites

  1. The Luminous Landscape
    1. http://luminous-landscape.com/whatsnew/
  2. http://www.dpreview.com/
  3. http://www.imaging-resource.com/news
  4. http://www.photographyblog.com/
  5. http://theonlinephotographer.typepad.com/the_online_photographer
  1. Join a forum and lurk!

    http://www.photoshopforums.com/

    http://forums.adobe.com/community/photoshop

    At some point someone will post a question… And you'll be able to provide them the answer!

There are lots of videos on the Adobe TV web site

http://tv.adobe.com/

LUMINOUS LANDSCAPE  has a bunch of video tutorials that they sell. Get them and their video Journal...

http://luminous-landscape.com/videos/download-videos.shtml

George Jardine has a terrrifics web site a a series of videos

http://mulita.com/blog/

One more thing
Don't be shy, Stay in touch and share your photographs!

and

Photograph, Photograph, Photograph!

Then in Lightroom & Photoshop

Practice! Practice! Practice!


Best  Wishes

Garry Stasiuk


Thursday, December 13, 2012

Black and White… and Prepping for Printing...

I'm working on a web page about the history of Black and White prints and the different processes

BlackandWhite

Stay Tuned

Before you Print or Publish to the web Soft Proof

Printing from CS6

Printing  setup in Photoshop  CS6 has changed… but, the procedure to get a print ready to print  hasn't.

The Basic rule here is:  You want Photoshop to manage the color NOT THE PRINTER!  You after all have done all of "that" photo enhancing and you want to see the colors you selected in the print!!

Read the following pdf file by Martin Evening…
Color management 

Ben Wilmore's Colormanagement Simplified is no longer available

To save you ink, paper and time you NEED to soft proof your images…

You'll need color profiles for YOUR  paper and printer.

Here's the steps 

If you have Lightroom 4.x Do your soft proofing in Lightroom, It's quicker and easier in Lightroom

Softproofing in Lightroom 4

Once you have made your "tweaks" to soft proof and image for a particular paper and printer, or output for the web as sRGB, you can apply those same adjustments to ALL the photos before they are printed.
 
Got a question?


Tuesday, December 4, 2012

The Pen Is Mightier than the Sword…

Last Class Review

NewImage
Just a reminder that there is a web page with complete step by step instructions on how to use the pen tool to create a selection and convert the selection to a mask.

You'll find details about the Pen Tool here…
http://uofgts.com/PS-P2Site/Pentool.html

The instructions go on and detail what you need to to do to "refine" the mask using the Refine Edge dialogue.
Click here to go to the Selection and Masking Tutorial


You can also make a selection based on color and convert that to a mask to edit with the Refine Edge Technology. http://uofgts.com/PS-P2Site/selectionbycolor.html


TIP

If you have a mask, you can always convert it to a selection, and back to a vector path.

How? If you have a mask, in a layer, right click the mask and choose "add mask to selection" or since Masks are stored in the Channels panel at the bottom of the panel there is a button named "Load Channel as a selection"

You can go one step further and convert the selection to a path, but, you MIGHT loose some data… In the Paths palette (panel) choose at the button at the bottom of the panel "Make work path from selection". The best strategy is to always save your Path with a unique name, you can always load that in the Paths Panel at any time.


 The Next Two Classes

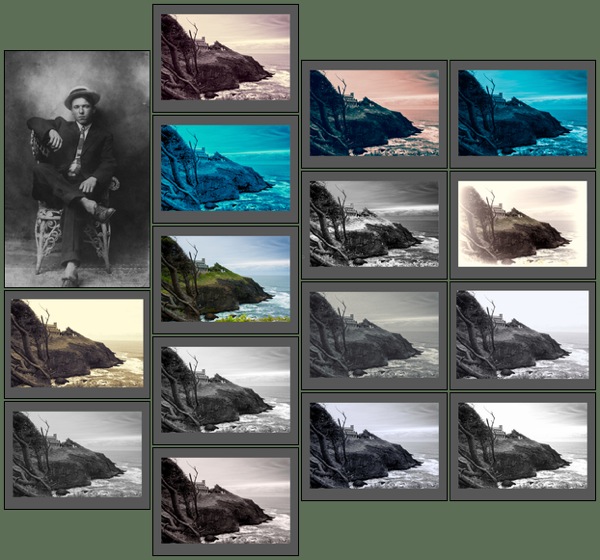
Bring to class images that you would like to convert to Black & White, or split Tone. The class is partially about how to convert your images into Black and White. We'll also look at how to split tone images.
We will also be looking at techniques that used to belong to the realm of Photoshop, but can now be accomplished in Camera Raw.
In this class we will also begin to look at how to deal with "retouching" portraits, but concentrate on that during week 8's class. Bring to class a portrait that you'd like to work on...

It's Your Topic!

Bring a photo that is giving you grief and we'll collectively try to solve your problem… 

Fix it

Is there a technique or subject that hasn't been covered in class?  Send me an e-mail!

Is their a technique YOU developed that you'd like to share with the class?


Either leave a comment on the blog, or send me an e-mail. garry@uofgts.com
See you in class!

Homework!

Post some pics to the blog and share them with your class mates!

Tuesday, November 27, 2012

The Adjustment Brush in Camera Raw

Finally, as promised for those in the Part 1 Class. Some notes about using the adjustment brush in Camera Raw.

NewImage


You'll find the web page here!

Enjoy!!

Saturday, November 24, 2012

'Tis the Season --Making Greeting Cards

Greeting Cards

card2 The layout is probably the hardest part of making a greeting card, especially if you are printing an "inside" message. This link is a simple layout for a one-sided (Right Click to Download) (1/2) x 7" x 10" Greeting Card For our demo, here's the (Right Click to Download) lily painting

There are many "paper" companies, one that I like is "Red River Paper." They also have some video tutorials for Photoshop Elements and Photoshop on how to set up printing guides for Canon, Epson and HP printers. You'll find that web page here.

About.com has an excellent step-by-step tutorial on how to set up and make a 4 sided card.

Wednesday, November 21, 2012

Week 2 Review --Composition and Cropping

Cropping

What makes a photograph compelling? The subject and its composition in the photograph.
Rule? Trust your instincts! We are all a part of the universe and the basic principals underlying its construction.  One of those rules is a simple number sequence called the Fibonacci Sequence.
Images need to be cropped to straighten horizons, remove distractions, and zoom (enlarge) the subject. If you are printing an image at an aspect ratio of 5:7 and your photograph has an aspect ratio of 3:2, you'll need to do some creative  cropping.
A cropped image can be cropped to ANY aspect ratio!
Here's more about cropping in Photoshop and Lightroom:
http://www.uofgts.com/PS-P2Site/crop.html

Recover your Edges

Adobe has released for Lightroom an dng edge recovery program. Most digital cameras crop the image to fit the aspect ratio you have chosen in the camera's settings.  The data is still available in the raw file (except for Nikon and Panasonic Cameras as they "throw away that information when they save the raw file.) You can download the plug-in for free from Adobe Labs
http://labs.adobe.com/technologies/lightroomplugins/
Download the pdf doc file to see how to use the plug-in in Lightroom's Library Module. The module only works on DNG files, so you'll need to convert the file from your raw format to dng first.
For some cameras the image recovery is quite noticeable… not so much with my aging Canon.
Canon File Size Pre:  3453 x 2302
Canon File size Post: 3471 x 2314
LightroomScreenSnapz001
The difference is barely noticeable. Give it a try, you might be surprised!
Enjoy your thanksgiving and we'll see you next week!
Turkey

Monday, November 19, 2012

File Formats, tif or psd?

A question in class was raised on why they could NOT get a tif file to load into Camera Raw after it had been saved after editing in Photoshop… What ever I said in class was not right and the more I thought about this question the more I realized I should research the subject of file types and usage more thoroughly.

Here's what I found… 

The references that I had used stated:

32-bit .PSD "Photoshop Document file."
A PSD file stores an image with support for most imaging options available in Photoshop. These include layers with masks, color spaces, ICC profiles, CMYK Mode (used for commercial printing), transparency, text, alpha channels and spot colors, clipping paths, and duotone settings. Photoshops version of the .tiff format! Recommend use of the .psd file format rather than .tif

But, Camera Raw is designed to use .jpg, tif and of course raw files. The Photoshop CS6 for Photographers author, Martin Evening uses .psd to preserve files with layer edits, but also saves a flattened version as a .tif file because Camera Raw flattens layered files!  

Camera Raw can load .tif files directly, but you have to setup Camera Raw to directly load a tif file…

It's a Preference setting in Bridge,  The menu is:

(Mac) Adobe Bridge CS6 > Camera Raw Preferences… (Command k)
(PC) Edit > Camera Raw Preferences… (Control k)

Adobe Bridge CS6ScreenSnapz001

You need change the above preference because when you save a file from Photoshop, it adds a link in the file so that it will automatically re-open in Photoshop! 

Again note that if you load a tif file that has layers, in to Camera Raw. Camera Raw will automatically flatten the layers.

N.B. (Nota Bene) 

However, You can load a .psd file into Camera Raw, but, it's a round about process… as you can't do it from the Bridge!

You have to start Photoshop, and go to the File > Open Menu…

and choose the following

PhotoshopScreenSnapz001

BUT, when you send the file back to Photoshop you will discover the layers have been flattened!

That's a good reason to have a layered .psd file and a separate flattened .tif file for the same image!

 When you are working with Bridge, Camera Raw and Photoshop, here's what happens to the files.

The other Camera Raw file preference I set have in Bridge is:

"Save image settings in: Sidecar ".xmp" files"…(You need to do this if you use Lightroom. Lightroom uses this method to save all your edits. )

Adobe Bridge CS6ScreenSnapz002

File Behavior

Camera Raw will always flatten a layered file.

Adobe Bridge CS6ScreenSnapz003

PagesScreenSnapz002

 Link: How to work with Smart Objects in PS

That ought to do it for now… 


Monday, November 12, 2012

Photoshop 4 Photos --Week 4 Review

Howdy

Those of you that are continuing on to the next 4 classes… The first class is next Saturday, Nov 17
There is no class Thanksgiving week end on November 24

The Adjustment Brush (Camera Raw)

Befor after

We started class #4, by learning how to do local (selected) editing in Camera Raw.  I need to write up some notes about that, so stay tuned, sometime in the next week I'll post some notes about using the Adjustment Brush… If you have specific questions about the adjustment brush, now would be a good time to send an e-mail.

Gradients

Here's a link to a page with a brief overview on using gradients in Photoshop and (Elements), and Camera Raw and Lightroom. About Gradients

Panoramas and Content Aware Fill

To stitch a panorama you send the selected images to Photoshop via the Bridge. The menu is…
Tools > Photoshop > Photomerge…

This sends the selected photos (don't worry about order, as Photoshop will sort that out for you… )

In the Photomerge dialogue box… if your horizon is flat, check the Cylindrical Button… then click okay. If Photoshop can't figure out where the pieces fit it'll let you do the assembly manually.

Instead of cropping your panorama you can use Content Aware Fill to let the computer "paint in the holes…"

ContenAwareFill in a pan


With content aware fill the basic steps are, select the area to be filled. Expand the selection by 10 pixels… choose the menu item  
Edit > Fill  select Content Aware, click okay…

This tutorial shows you how to select an object, and remove it from the photo and use the same selection later…
Content Aware Fill 

Printing from CS6

Printing  setup in Photoshop  CS6 has changed… but, the procedure to get a print ready to print  hasn't.

The Basic rule here is:  You want Photoshop to manage the color NOT THE PRINTER!  You after all have done all of "that" photo enhancing and you want to see the colors you selected in the print!!

Read the following pdf file by Martin Evening…
Color management 

Ben Wilmore's Colormanagement Simplified is no longer available

To save you ink, paper and time you NEED to soft proof your images…

You'll need color profiles for YOUR  paper and printer.

Here's the steps 

Softproofing in Photoshop

Softproofing in Lightroom 4


Whew, that ought to keep you busy for a while… Got a question? Send that e-mail!


Monday, November 5, 2012

Week 3 Review Sharpening and an Introduction to Photoshop

Howdy

I managed to give you a link to a really "old" web page on "sharpening" in the week3.html file you copied from the class server.

"Sharpening Techniques in Camera Raw." The Detail Panel is the same in Photoshop Elements, Lightroom and Photoshop's Camera Raw.

This is a "teaser" I wrote about sharpening…
http://uofgts.com/PS/p4p.html 

 Sharpening using Camera Raw

http://uofgts.com/PS-P2Site/cr-sharpening.html 

Sharpening in Photoshop
http://uofgts.com/PS-P2Site/sharpening.html 

Setting up Photoshop
It seems that all software needs to have their preferences tweaked… Here's a page about setting up Photoshop
http://uofgts.com/PS-P2Site/settingsPS.html 

I will detail color management in class this Saturday

I introduced you to the Power of Photoshop using layers and a simple gray scale mask… Here's the same techniques used in class with a different subject, but I also show PS Element users what alternatives they have for the same technique…

http://uofgts.com/PS-P2Site/Mergewithmasks.html

And, Finally here's a link to how to use the "Healing Brush" Tool

http://uofgts.com/PS-P2Site/healing/index.html


If you haven't signed up for the next 4 weeks, I urge you to do so!

If there is ONE thing you'd like to learn, send me an e-mail and I'll work it into the next class!


Wednesday, October 31, 2012

White Balance -- Setting the Color Temperature

Consider the following images.

I will argue that both renderings, cool on the left and Warm on the right are equally acceptable. For the "cool" bluer image, I just moved the temperature slider in camera raw to the left. For the ""warm" yellower image, I moved the temperature slider to the right.

I stopped when I liked what I saw. I LIKE both!

Yangtze


In the mossy picture, there is no obvious white point to select. What do you do if you want to set an "accurate" white point?

Moss


Solution #1: Set the white balance MANUALLY in the camera!

Most higher end cameras will let you set White Balance (WB) manually. The procedure is to photograph a "Spectrally pure white card".

After you photograph the white "card" --- in the Camera's settings for White Balance (WB) choose "Manual" or "Custom Preset". You'll then be asked to select the image of the "white card" that you just photographed.

I use a ColorRight White balance lens cap/filter. When you shoot the white card turn off the autofocus, especially if you are shooting the card up close...

Where to find a spectrally pure white card?

Visit your local cameras store, or search Google.


Solution #2: Trust your instincts!

Always edit the tones (Color) in the image that matches what YOU saw when you took the picture!!

But, remember the choice of what white balance you set is up to you, if you shoot in Raw format, the choices are enormous. Photography after all is an art!

Photograph, photograph, photograph!

Sunday, October 21, 2012

Week 1 Setting up Everything...

Week 1 October 21, 2012 ---Setting Everything Up

Links to Web pages with details.

I will be updating "Acquiring Photos" to the New versions Of Bridge, Photoshop Elements Album and LightRoom Later this week

Homework

At the very least, just Calibrate your monitor. and Bring a Flash drive to class with some photos you want to "enhance" next Saturday

Got Lots of JPG Files?

If you have .Jpg images in your library of photographs, you might want to convert them to a "Non-Lossy" Format like .tif

Here's how to do that using either The Bridge --> Camera Raw or just in Photoshop Elements.

Batch Converting your Photographs

Here's a detailed article on how to get Photoshop Elements Organizer or the Bridge to see the photos captured by Apple's iPhoto

(Apple hides the photographs on your hard drive)

iPhoto to Adobe Organizer

If you have a question reply to this e-mail or leave a comment on the blog.


Wednesday, September 26, 2012

Photoshop CS6 Installed in PS4P Classroom!

Photoshopcs6

Yes! It's official, Photoshop CS 6 and Camera Raw have been installed in the Photoshop for Photographers classroom.

This fall we will be in a PC Windows Lab in Room WCB 210   Sign up Now!

See you in class!

Tuesday, September 25, 2012

Adobe Releases Photoshop Elements 11

For immediate release

Revamped User Interfaces and Innovative Features Make Photo

and Video Editing, Organizing and Sharing Easier

SAN JOSE, Calif. — Sept. 25, 2012  Adobe Systems Incorporated (Nasdaq:ADBE) today announced Adobe® Photoshop® Elements 11 and Adobe® Premiere® Elements 11, newly designed versions of its No. 1 selling consumer photo- and video-editing software*.

PSE11 boxshot

*  A completely refreshed, user-friendly       interface featuring the same engine as Adobe Photoshop - the industry standard for digital imaging - includes easily-navigated Quick, Guided and Expert editing modes; one-click options; a helpful Action bar; and big, bold icons to help users get the most from their shots…

more…

Saturday, July 28, 2012

Some Tips... and things for you to try

Howdy

Don't EVER be afraid to try, experiment, play with Photoshop...  You just might come up with a masterpiece!

Red  Green I-5 Bridge from Don


This what I did

1. Made just a selection of the bridge using the Polygon lasso tool.
2. Made a new layer from the selection
Command J Mac or Control J PC
3. Used the selection by color tool
but, first,  sample some green from the i-5  bridge, because the color selection tool will key on the selected foreground color in the tool bar.
Then Menu: 
Select > Color Range...
4. Made the selection 
and for detailed instructions on using selection by color go here
5. Then, choose the Hue/Saturation adjustment layer and
Clip it to the selected bridge layer
6. In the HSL dialogue, Check colorize… and adjust the color to what you want
7.Then use a black brush on the H&S mask to tweak the mask…
and that's it...
Laying out images on a page for a flyer or a scrapbook page...
Multiple photos on a page
This is one area that Photoshop Elements has the advantage... It has a bunch of built in Layout Templates...
Photshop has a few in the OUTPUT Module
Lightroom has more...
But, in layout PSE Rules!
In Photoshop you get to make them on your own...
Here's how to do it the Hard Way
Here's how to do it quick and easy...
Up to Photshop CS3 there was a menu item in Photoshop called Contact Sheet.
Adobe took it out of CS4 and CS5, but put it back into CS6.
(However, you can download and install the Contact Sheet plug-in from Adobe's web site for CS 4 and CS 5)
IN CS6
1. Start in Bridge.
2. Select Your photos  (Control Click) How many You select will determine how large they are on the page (Experiment)
3. Select the Bridge Menu:  Tools > Photoshop > Contact Sheet II
Contact
The above is for 6 images... Play around with more or less images...
Each image will be placed on a layer, and they will be masked, ready for you to add a background and add
"fx" (Border, etc... ) to each image... or text
Experiment!
Email your questions, or bring them to class...
Have a fun weekend playing with Photoshop!

Sunday, July 22, 2012

Adjustment Layers and Masks

Photoshop has the following different kinds of layers

  1. Normal
  2. Text
  3. Fill
  4. Shapes
  5. Adjustments
  6. 3D
  7. Video
  8. Smart Objects.

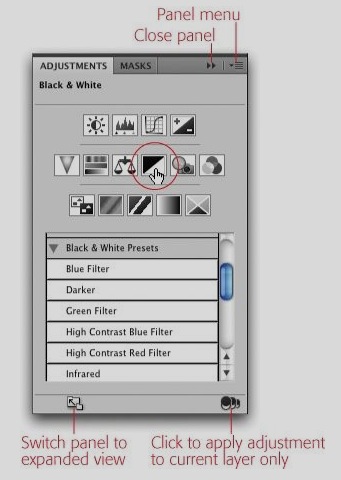
One of the most versitile is the Adjustment Layer and there are 15 of them

Adjustment Panel

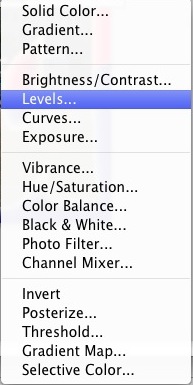
Adjustment Layer Menu


Adjustment List


Each adjustment layer is associated with a "Gadget-icon" and a Mask

Adjustment layer with mask

Clicking on the "Gadget-icon" pops up a dialogue box that allows you to make adjustments to the layer(s) below...

In the example I have selected the Black & White Adjustment Layer using Photoshop CS 6

The Black and white adjustment layer ands panel

What I want to do is to "paint" some color back into the image of just the vending machine.  That way your attention will be really drawn towards the color in an otherwise black and white image.  

Here's how to do that.

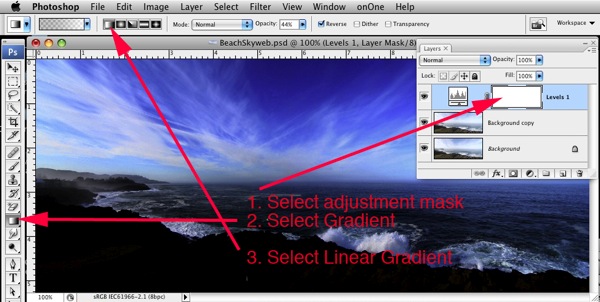
Step 1:

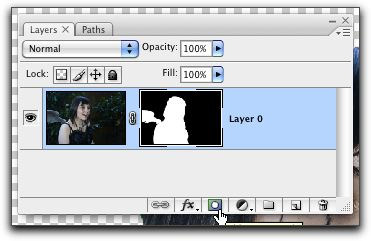
Click once inside the White Mask to "activate" it... You'll see the double lines around the mask.

Step 2: 

Press the "x" key on the keyboard, to cycle the foreground color with the background color at the bottom of the Tool Bar... We want the forground coplor to be BLACK

Step 3:

Press the"B" key to select a brush.  You can make the brush bigger or smaller by pressing the Left or Right Square breket key.

Left square bracket makes the brush smaller, Right square bracket key makes the brush larger...

Step 4.  

Paint over the Pepsi Machine on the Canvas, untill all the colors are Visible...

Painting the mask

Painting Black on the Mask, blocks the black and white effect of the B & W adjustment panel, showing the colors from the layer below...


Here's the result

Before and after applying the B & W adjustment and making a mask

Tuesday, July 17, 2012

Saving files in Photoshop

Saving files in Photoshop and file formats.

The file format you use to save your work in Photoshop will depend on how the image will be used.

Preserving Layers

If you want to perserve layer information so you can re-edit the image or apply the same techiques to another image, then save the image as a .psd file a PhotoShop Document.

The Menu item is

File > Save As

Keyboard short cut

Shift + Control + S (PC)

Shift + Command + S (Mac)

Save as Photshop Document


In the Save As Dialogue box

Give the file a unique name (Photoshop will add the extension, in this case .psd)

You can also check

 Save:  √ As A Copy and photoshop will add the word copy to the file name in this case it would be "Beach copy.psd"

TIP: In Photoshop, if there is a button or icon that you don't know what it does, put your "pointer" over the item and don't move it... in a few seconds a yellow box will popup and tell you what it does!

If you want to perserve layers in the PSD document Make sure the Layers box is checked and always perserve your color profile..

Saving for the Internet

The .jpg file format is "lossey" the more the file is compressed, the more data is thrown away. Too much compression and the image/photo looses detail...

The menu is 

File > Save for Web...

What's important here is to choose how much compression, and the file size you want to actually display on the web or in an e-mail

If the file is going to be displayed on a web page Check Convert to sRGB 


Save for WEb Dialogue


When you make all your choices click the Save... button at the bottom of the page...


Tuesday, June 26, 2012

Where to from here? Week 8 and Beyond...

Here's a quick link to the week 8 Portal

The class web site will always be available, and is always evolving...

I'll be adding a Lightroom site shortly, the first Lightroom article is Softproofing in Lightroom...

Softproofing in Lightroom

 So, Now what... 

I'm often asked… now that the classes are over, what do we do now?

Here are some suggestions...

Garry's Favorite web sites

  1. The Luminous Landscape
    1. http://luminous-landscape.com/whatsnew/
  2. http://www.dpreview.com/
  3. http://www.imaging-resource.com/news
  4. http://www.photographyblog.com/
  5. http://theonlinephotographer.typepad.com/the_online_photographer
  1. Join a forum and lurk!

    http://www.photoshopforums.com/

    http://forums.adobe.com/community/photoshop

    At some point someone will post a question… And you'll be able to provide them the answer!

There are lots of videos on the Adobe TV web site

http://tv.adobe.com/

LUMINOUS LANDSCAPE  has a bunch of video tutorials that they sell. Get them and their video Journal...

http://luminous-landscape.com/videos/download-videos.shtml

George Jardine has a terrrifics web site a a series of videos

http://mulita.com/blog/

One more thing
Don't be shy, Stay in touch and share your photographs!

and

Photograph, Photograph, Photograph!

Then in Lightroom & Photoshop

Practice! Practice! Practice!


Best  Wishes

Garry Stasiuk


Tuesday, June 19, 2012

Gradients in Photoshop, PS Elements, Camera Raw and Lightroom.

How to apply gradients using any flavor of Photoshop...

Select

Week 7 - Smart Objects, Softproofing and Focus using Photo stacking...

Howdy

Here's a short step by step set of instructions how to edit smart objects sent to Photoshop from Camera Raw.

Before you print,  soft proof!
Here's what to do using Photoshop… Softproofing in Photoshop

Later this week I'll add information on how to do Softproofing in Lightroom 4 

Here's a technique for boosting the color in a faded or overexposed photograph in Photoshop, works really well for .jpgs. Also, a similar technique can work on under exposed images.

Fixing Overexposed or Underexposed .jpgs

Class member Ken Eklund  sent us the following information about Photo Stacking for Focus 

Last week I mentioned focus stacking or blending, which is like HDR for focus rather than exposure.  Here is a link to some software.  It is also a feature in Photoshop.

www.heliconsoft.com/heliconfocus.html


Ken also sent us a series of photos he took and merged using PhotoStacking in Photoshop+

Image001

This is a carved Chinese bottle that I tried it out on.  I used macro extension tubes to take 8 shallow dof photos with the Photoshop blending technique. 


Ken also sent us a link to a Youtube video demoing the Photo Stacking Focus technique in Photoshop 

http://youtu.be/intzev1gsbI


Thank you for sharing Ken!
 

Monday, June 18, 2012

Review - Non Destructive editing in Photoshop/Camera Raw

The Goal:

Edit an image in Photoshop, to enhance, to improve it... and to be able to easily "tweak" or undo/redo the "fixes" at a later date without having to start over again.

In Photoshop you are editing pixels, as a result you should always work with a "copy" of the image, not the original.
1. In Photoshop after loading an image, use the File > Save As menu and save the files as a copy, or rename the file as... I usually just use a numbering system like imagename-001.psd.
This ensures you have an "original" RGB copy, even if you have the original raw image.

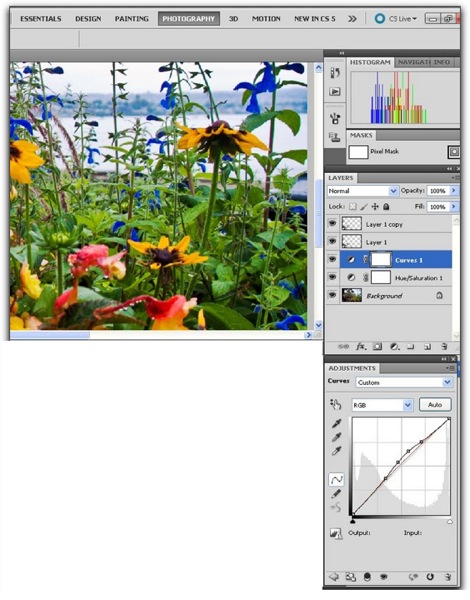
2. In your editing process you always want to use the Adjustment panel and the Adjustment layer tools. (If you can)

Images using Photoshop CS5
The Adjustment layer panel 

Adjustment Panel
below is a list of adjustment layers… from the layers menu
NewImage


ChooseAdj

     Example below uses Adjustment layers...
Adjlayers


3. Use Smart Objects for each layer of graphics or images that you are merging.

Any time you use the Menu item: Edit > Transform > Scale (etc). First convert the layer to be transformed into a 'smart object'

There are at least 3 ways to do this, select the layer in the layers pallet (so it is highlighted in blue)
then choose Menu:

Layers > Smart Objects > Convert to Smart Object

Layermenu

Or use the Layer drop down menu and choose
Convert to Smart Object

Or right click on the Blue Highlighted Layer and choose 
Convert to Smart Object. 

Transform Edits changes and "throws away pixels" especially if there is a scaling down in the size of the image...

When you select the transform tool a box surrounds the object and you can see selector squares that let you "transform the object… If you hold down the shift key while dragging with the mouse the transform will retain the original aspect ratio.


Tranform

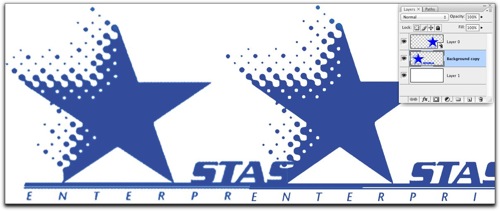
By transforming your layer contents to a smart object, the original data is available to re-size the new element without pixilation or having to start over again.  In this example both Logos were scaled smaller, then resized upwards… The Logo on the right was converted to a smart Object.


You can see the little "Samart object indicator" square in the bottom right of the thumbnail in the layers pallet

Smartlayertransformed


4. Use smart Objects to apply Filters

Use the Filter Menu:

Filter > Convert for Smart Filters

This adds the Smart Object indicator to the layer, and when you choose a filter like "Smart Sharpen" you'll see additional layers added beneath the smart object layer that will allow you to change the values in the filter requester any time you want.

SmartfiltertransformedUsing "Smart Filters" let's you
re-adjust the effects of the filter
later…


5. Create a Blank Layer
When using any of the tools like the Clone or Healing Tools  to edit pixels, create a Blank Layer and use the Tool Bar to toggle on "Edit layers below"


PS Layers

Here's a short tutorial that uses "Edit Layers Below"


6.  What if Combined layersIf you can only directly edit pixels?

Sometimes a task has NO smart features or no built in adjustment layers… a good example is the Adjustment
Shadow/Highlights 

The menu is Images > Adjustments > Shadow/Highlights

Here's what to do to make a Flattened copy of the visible layers 

Select the layers where you want to apply the changes

If the layers are contiguous select the first layer, press and hold down the shift key, then select the last layer…

If the layers are not contiguous hold down the control key (PC)

The Command key (Mac)

and click on each layer you want to select...

Then press all at one time
Mac (Command + Option + Shift + E)

PC (Control + Alt + Shift + E)


Then  apply the Adjustment to the flattened copy of the all the layers...

To re-edit the Shadow/Highlights… you'll need to delete the layer and repeat the process...


Enjoy! As Always 'holler if you have a question or comment

Editing smart objects from Camera Raw in Photoshop is next.

Tuesday, June 12, 2012

Cropping, Smart Layers/Objects and Stacking Layers…And Fix-it Day!

Howdy

I finally finished an article about Cropping Your Photographs… 

You'll find it here… Cropping

Here's a an article I wrote about Saving and Stacking Photoshop Layers… 

And, About using Smart Layers or layers with Smart Objects

 Keep those questions coming!


And Just a reminder for you to

Bring your own broken or just plain difficult to "enhance" photos to class...


Fix it


We'll put our collective resources together and figure out how to make 'em better!


Saturday, June 9, 2012

PS4P Part 2 -- Review

Howdy

Scanning
Here's the link to the article On the Luminous Landscape Website
I
n the article you can download the first 4 chapters of...

Scanning workflow with SilverFast8 with Mark Segal

Here's the link for  Vue Scan

For links and notes on some of the material covered in class you'll find 'em here...

 I posted some photos of my trip to Depot Bay...


And, Nasa's Venus Transit shots

http://youtu.be/4Z9rM8ChTjY


Enjoy!!


Monday, June 4, 2012

PS4P 2 - Review --The Pen is Mightier than the Sword…

This weeks Objectives

  • Draw straight and curved open and closed paths using the Pen tool.
  • Stroke the path "edit" a photograph
  • Convert a path to a selection
  • Convert the selection to a Mask
  • Place selected, masked object on a new background.
  • Use Refine edge enhance or clean up the edges of the mask

Homework

Let's see some examples of your work!  Either post the pics on the blog, or send 'em to me...

Saturday, June 2, 2012

Transit of Venus

One more Astronomical Event Next one will NOT occur until 2117

Transit of Venus, June 5th, 
This will be the last transit of Venus to occur in your lifetime!
(When it rains, it pours... but, not figuratively...)
You can get transit times for your location here...
Fun Web Site!
http://transitofvenus.nl/wp/where-when/local-transit-times/


Transit times
2012

4909 NE 47th Ave, Vancouver, WA 98661, USA
76%
ingress exterior
Jun 5
14:06:07
ingress interior
Jun 5
14:23:33
transit center
Jun 5
17:27:05
egress interior
Jun 5
20:30:13
egress exterior
Jun 5
20:48:02
Slider thumb shadowSlider thumb
Times in GMT -8
Latitude45°.65775 N (45°39′27″.9 N)
Longitude122°.62345 W (122°37′24″.4 W)
Clouds76%
ContactTimeh / AP / d
ingress exteriorJun 5
14:06:07
57°.1
55°.5
41°.2
974″.7
ingress interiorJun 5
14:23:33
54°.5
61°.0
38°.7
916″.9
closest approachJun 5
17:25:54
23°.5
98°.0
343°.5
545″.3
egress interiorJun 5
20:30:13
-5°.4
130°.7
291°.6
916″.0
egress exteriorJun 5
20:48:02
-7°.7
134°.1
289°.1
974″.7
Sunrise04:27:26
Sunset19:53:41


and you can get

Get iPad, iphone, android apps here

http://www.transitofvenus.org/
This is one terrific web site! by the way


Remember, Never look directly at the sun!  Don't aim your camera at the sun, you can burn out sensor cells.


Look at an projected image of the sun, use a camera obscura (Pin hole) projectivon.


For Photo tips go here

http://transitofvenus.nl/wp/observing/photographing-the-transit/

It's going to be clear, right!?


Photo Opportunity -- Setting Partially Eclipsed Moon


Partial Lunar Eclipse
In the wee hours of June 4th 

Moon Sets partially eclipsed

Times from The US Naval Observatory
for Vancouver, WA  Longitude W 122 38, Latitude N 45 38
Pacific Daylight Time
                                                                        Azimuth Altitude (Height above) Horizon)
                                                          h m                 o           o
Moonrises                   2012 Jun 03       20:26        121.8          ----
Moon enters penumbra 2012 Jun 04       01:46.5     190.9          21.1
Moon enters umbra      2012 Jun 04       02:59.3      207.6         17.1
Middle of eclipse          2012  Jun 04       04:03.2      220.9         11.0
Moon leaves umbra      2012  Jun 04       05:07.1      232.9           3.3
Moonset                      201   Jun 04        05:36         237.9          ----

Enjoy!

Photo Opportunity -- Setting Partial Lunar Eclipse


Partial Lunar Eclipse
In the wee hours of June 4th
Times from The US Naval Observatory
Vancouver, WA W122 38, N45 38
Pacific Daylight Time
Azimuth Altitude
h m o o
Moonrise 2012 Jun 03 20:26 121.8 ----
Moon enters penumbra 2012 Jun 04 01:46.5 190.9 21.1
Moon enters umbra 2012 Jun 04 02:59.3 207.6 17.1
Middle of eclipse 2012 Jun 04 04:03.2 220.9 11.0
Moon leaves umbra 2012 Jun 04 05:07.1 232.9 3.3
Moonset 2012 Jun 04 05:36 237.9 ----

Tuesday, May 22, 2012

Partial Eclipse Photography

Howdy

I kinda anticipated that there would NOT be to much of a photo opportunity around here in dreary, cloudy Vancouver, WA

So when a bright patch actually appeared in the cloudy sky, just after mid-eclipse I switched lenses...

Sigmas 300mm , 1/500th of a second, f/ 22, ISO 100

Lightroom 4 teased out enough information to make out that the sun was actually being covered by the moon. Highlight and shadow recovery really helped!

Before and after

I also shot a sequence starting at first contact and ending at mid-eclipse, yep, it got dark.

You can see the video on my Facebook page

Next astronomical Photo opportunity?

Venus transits the Sun on June 5th! 

Week 4 Review


Reminder

There is no class on Saturday, May 26 (memorial Day week end)

Class resumes on Saturday, June 2, same place same time.

Have a great long week end!

Here's one of my eclipse photos… Yes, it was very cloudy...

Partial Eclipse  30 of 42