Monday, June 9, 2014

It's Your Turn

The Oil Trains

This is my rendition of the “Oil Train” 

The Challenge: Use Lightroom to “Develop” your version of the image.

\NewImage

You can download the image by clicking or right clicking and save as… Oil Train

The Link is a 36 megapixel NEF File.  Have Fun!

Friday, May 30, 2014

Slideshows, Movies, Music and Books

Homework

In the June 9th class we’ll focus on making a Book/Slideshow ( a requested topic) 

If you actually want to work along in class with your own images, You’ll need to do some prep work! Homework!

OUTPUT Prep:  Things you need to do First

    1. In the Library Module
      1. Put all your book/slideshow etc image files into a collection.
    2. At a bare Minimum, fill in he Metadata  information for each image with: Title, Caption, and Headline.
    3. This is the IPTC definitions for:
  • IPTC Core Content section

    Headline

    A headline is a brief publishable synopsis or summary of the contents of the photograph. Like a news story, the Headline should grab attention, and telegraph the content of the image to the audience. Headlines need to be succinct. Leave the supporting narrative for the Description field. Do not, however, confuse the Headline term with the Title term.

    IPTC Core Status section

    Title

    This field can be used as a shorthand reference for the image or “photograph” — primarily for identification. The title of an image should be a short, human-readable name — text and/or numeric reference —and may take several forms; for photographers this might be the filename of their original scan or digital camera file, for news organizations it might be the name of the story for which it’s to be used. (Note that there are new terms in the IPTC Extension which can also be used as image ID’s, if you are concerned about this field being overwritten later in the workflow). The Title term should not be confused with the Headline term, which is a short synopsis of the content of the photograph. There is a button in the panel which can be used to add the current file name to the Title field; however this will not work with a selection of images.

    Description

    The Description field, often referred to as a “caption” is used to describe the who, what (and possibly where and when) and why of what is happening in the photograph. If there is a person or people in the image, this caption might include their names, and/or their role in the action that is taking place. If the image is of a location, then it should give information regarding the location. Don’t forget to also include this same “geographical” information in the Image panel (location, city, state/province, country) of the IPTC Core. The amount of detail you include will depend on the image and whether the image is documentary or conceptual. Typically, editorial images come with complete caption text, while advertising images may not.


  1. In the Library module Sort (drag and drop) the images in your collection in the order you want them to appear in the book or slideshow
    1. You can sort image order in the Film Strip, but it is MUCH easier to do In the Library.
When you have done the above
If just want to bring the “collection” to class, “Right (Control) click the Collection in the collection panel and choose “Export this Collection as a Catalog…” and save it to a flash drive.
NewImage

If you want to try and follow my notes go a head and  Open your collection in the Book Module, click the Book Module Button 

If you have been working on any of the “output” Modules, you can bring the work from that module as a collection.  When you click Create Saved Slideshow  or Book, Print or Web Collection, Lightroom will save your work as a  special collection: 

Bring your exported specialty module to class!
 
I’ve written out some additional notes on using the Slide show and Book Module.

The Book Module Notes

Click on the Book Tab Book Module Notes


The Slideshow Module Notes

Click on the Slideshow Tab Slideshow Module Tab

Here’s a sample slideshow saved as a video.


USE of Music in your Productions.

“Royalty Free” Music
Just do a Google search for Video production music… Most of the “Pay For” companies offer some “free” samples for your use… However, Average price for an unlimited license for a single tune is generally $9.00 or less… 

Music with “Creative Commons” Licensing
It’s music that is “Royalty Free” and at no cost, because the Artist wants to share their music with you, it’s a way for them to get some “exposure” with a wider audience. The music is protected with a  “Creative Commons” License or a similar type of agreement, which spells out how you can use the composition.

Free Music Archive
Music ranges from Classical to just plain weird.

http://freemusicarchive.org

The music in video/slideshow in this article is from the website MP3 2000
http://www.mp3-2000.net/song/canton-136-71-1-schvisen-633988


See you in class! 

Wednesday, May 28, 2014

Importing and Merging catalogues in Lightroom

Importing and Merging catalogues in Lightroom

The Menu item is:

File  > Import From Another Catalogue…

How you Import and Sync Images and Metadata from different catalogues will depend on your “setup”.

  • A:  Merging catalogues on your system or external drive(s)
  • B: Importing from another computer, either a laptop or desktop (e.g.: when shooting in the field)

Here are the main steps to do an import from another catalogue…

Step A:  

Determine the location of the catalogues on the COMPUTER(s).  

PC default Location        c:\users\my pictures\Lightroom\

Mac Default Location:      //Users/[user name]/Pictures/Lightroom/

This just helps you find them for the next step…

Step 1.

Start Lightroom loading your Master or Main Catalogue.    

(Hold down the alt/option key when you startup Lightroom) Note that, Lightroom defaults to loading the last loaded catalogue…

LR CatLoadpng

Step 2: 

The Menu item is:

File  > Importing From Another Catalogue.Use

Use the Mac’s Finder or the PC’s Windows Explorer to locate the “Other” catalogue.

Lightroom002

A double click on the .lrcat file will open the dialogue box below…

Step 3:

Check √ the Show Preview box lower left to see the thumbnails in the Import Catalogue.

Layout002png

Number 1 in image above…  

The 3 bars and the exclamation point indicates that there is “new” data

Number 2 in image above…  

If you want, you may choose to preserve “Old” setting in your CURRENT catalogue, LR will make a virtual copy for you.

Lightroom002png

Number 3 in image above…  

Choice #1:
Add New Photos to Catalogue without moving…

Use this option if you are happy with where the files are located, and you just want to tell LR where they are…


Choice #2:
Copy new photos to a new location and import… 

Your photos are on a Laptop or another computer, or you are adding or consolidating your photos into a single catalogue…

Choice #3:
Don’t Import new photos, You just want the metadata

Number 4 in Image Above… Replace:
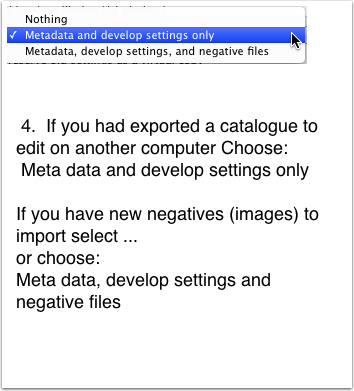
LR 02png


Step 4  Click Import…

Other Hints… (Working in the field)

If you are using a second copy of LR on a Laptop and you are using LR’s default location to store the photos, when you get back to your desktop you will have to do the following.

1. Using your laptop, plug-in an external drive.

2.  Export your “Shoot" as a Catalogue to the external Drive.  

Menu:

File > Export as Catalogue…  To the External Drive.

3.  Eject the External drive from the laptop and plug it into your desktop

4. Load your master Catalogue in LR and use the Menu:

File > Import from another Catalogue

Follow the above import steps…


Wednesday, May 21, 2014

Tuesday, May 20, 2014

Keyboard Shortcut on-line app for Lightroom

Learning Aid 

by Waldo  Bronchart
http://www.waldobronchart.be

He only asks for a "donation" via GitHub

For Lightroom, Photoshop and Blender… available for Windows, Apple and Linux keyboards

It’ s interactive and online keyboard shortcut app! Try it out at 

http://waldobronchart.github.io/ShortcutMapper/

Application Shortcut Mapper

A visual shortcuts explorer for popular applications. This is a work in progress. More applications can be added by contributing on GitHub.


Lr keyboard

Wednesday, May 7, 2014

Perfect Effects 8 Offer – onOne Software

Perfect Effects 8 Offer – onOne Software: For FREE! Offer Ends May 12th

Perfect Effects 8 is a plug-in for Lightroom, and other Image editing Software.

Catch? There are seven other modules that they want you to purchase. OnOne Software is located in Portland.

The other plug-in that I’d want is Perfect Resize…


Friday, April 11, 2014

Total Lunar Eclipse April 14-15

A Photographic Opportunity 

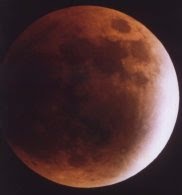
LeclipseThe photo at the left is a Total Lunar Eclipse I took with a Celestron 8, with a focal length of 2032 mm.

That eclipse was on September 6, 1979 The photo was taken Somewhere near Bull Run off of Larch Mountain Road in Oregon. Sky and Telescope editors thought the dark splotch on the left was “unusual”.

The up coming Total Lunar Eclipse on April 14-15, 2014 is well placed for a photographic opportunity in the Pacific Northwest

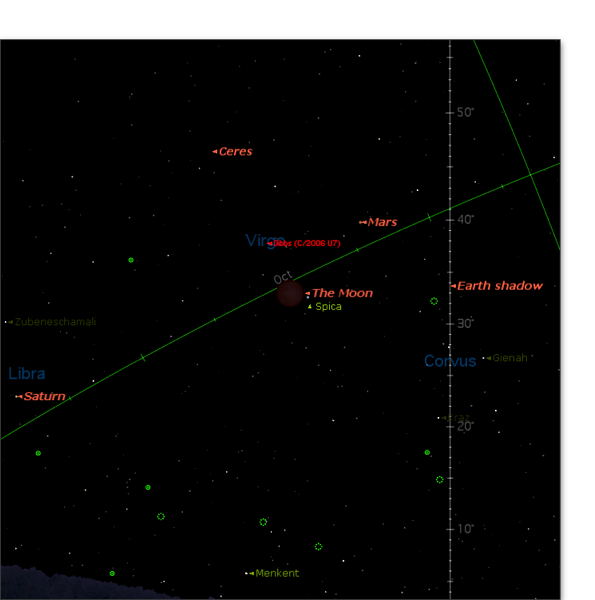
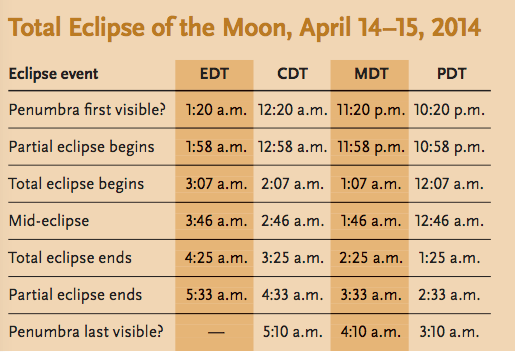
The Moon will be Almost Due South at the start of totality at 12:07am PDT.  The Moon will be 38 degrees above the Southern Horizon. Totality will end at 1:35 am PDT


This image is from “Starry Night” and shows the position of the moon at the beginning of totality as seen from Vancouver, WA…

Totality begins at 12:07 AM
Mars is just a little up and to the right of the Moon, quite bright at a magnitude of -1.5 Actually, Mars is at its closest approach to the Earth during the eclipse, the closest since 2007.  Will any one see green flashes?

Spica is very, very near, about 2 degrees from the lower limb of the moon.  Saturn is lower in the South Eastern sky.

Eclipse2014


The following table of eclipse times is from The April 2014 issue of Sky and Telescope


NewImage


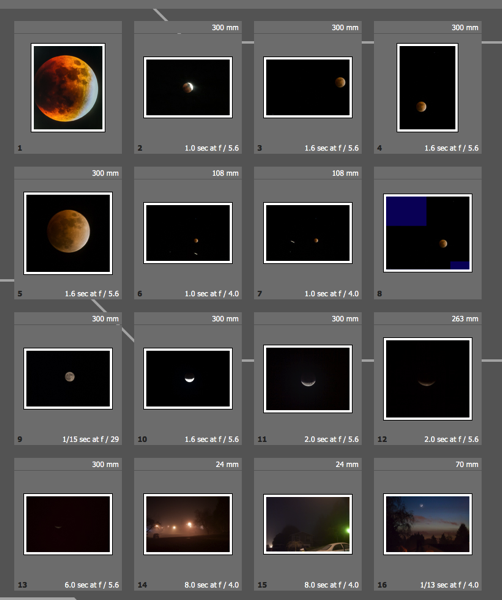
Lunar Eclipse, February 20, 2008

Eclipse

This image was taken with a Canon DSLR and a Sigma 70 - 300 mm zoom lens.

Exposure data
f/5.6 1.6 of a second, ISO 400 f.l. 300 mm

The image is well cropped…

Nice thing about a digital camera… you can see your results as you shoot…

You can see some of the 2008 and other eclipse photos  on my website with a few surprises…

Gts eclipses


The Lunar Eclipse gallery was updated on March 19  

http://www.uofgts.com/Lunareclipses/index.html

What you Need to Photograph the Eclipse!

Tripod

A digital camera capable of  a “Timed Exposure” or a Manual shooting Mode.

Set the Aperture of the lens fully open… (Smallest number… if thou has a f/2.8 to f/11 lens… use f/2.8)

Length of exposure?  You are going to have to experiment here… Time will depend on the f/stop, haze in the sky, and what ISO you are using.  For an eclipse use IS0 100.

Zoom up so the moon is a large as possible, or zoom to include part of a building or tree in the image!

If you have different lenses try them all out! You can experiment here as the eclipse lasts approximately 1 hour and 20 minutes 

Set Focus to infinity… If there is a bright street light in the distance, use that to set focus… If your camera has a “live” view, use it! In Live view mode magnify the image in the display screen to check focus… If it is slightly hazy out, you ‘ll have a Dicken’s of a time trying to focus… remember it’s not you or the equipment, it’s the Pacific NW sky!

Once you  have done all that… lockup the mirror — if you have an DSLR… Canon buries the mirror lock setting in its Function Mode…
If your Camera has a live view,  the mirror is already locked up.  

Just one more thing
Use the timer function to trip the shutter.  If you lockup the mirror and use the timer release, you’ll minimize “camera shake” caused by the slap of the mirror and the delicate touch of your finger on the shutter.

Have patience and have fun!