Photoshop and PhotoShop Elements
Content aware fill, the Spot Healing Brush and the Patch Tool
RULE:
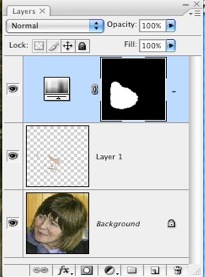
When editing in PS or PSE, Always Create a Blank Layer and do the edits in the blank layer.
Here’s a short tutorial that uses “Edit Layers Below”
How to make a “layer” when using The “patch” Tool

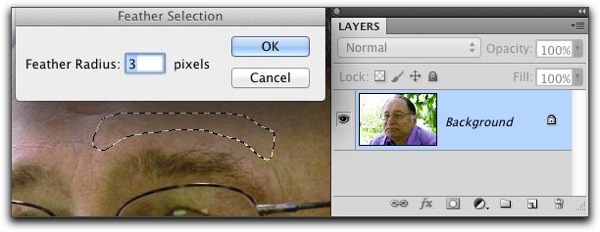
When you make a selection with the patch tool, draw a contour that follows the upper shape of the eyebrow.
When you make a selection with the patch tool, draw a contour that follows the upper shape of the eyebrow.
NEXT: Use the Menu item:
Select > Modify > Feather...
Or Keyboard short cut Shift + F6 (PC and Mac)
Then Choose 3 - 5 pixels
This will make a soft edge around your selection.

Notice that you now have a blank layer with your selection… Now select the Move tool
Tool Bar keyboard shortcut The letter v
Move the selection with the mouse down to cover the “rough” edges at the top of the eye brow…
You might have to use the eraser or other tool to clean up the selection… and you might need to lower the transparency of the layer. You mileage will vary. Experiment
I turned on the transform controls for the move tool so you can see the “selection”…
Remember: Symmetry Rules! Even in "Particle Physics and the Big Bang Theory"
If you need to make more edits! Like work on the "other" eyebrow You'll need to make a flattened copy of the visible layers...
RULE: Make a Flattened copy of the visible layers , If you can only directly edit pixels.
Mac (Command + Option + Shift + E)
PC (Control + Alt + Shift + E)
This is also useful if you want to use the Menu HDR Toning
Image > Adjustments > Shadow/Highlight…or any other "Adjustment" that do not have an "Adjustment layer".
Except...
(Note Well) The adjustment HDR Toning…
Menu: Image > Adjustments > HDR Toning…
Automatically flattens all layers. So, if you want to preserve layers before you use this adjustment, save the file first as a .PSD and then do the HDR Toning…as it flattens all layers to make a "single" image!
To Flatten Selected layers Keyboard Short cut
Mac (Command + Option + Shift + E)
PC (Control + Alt + Shift + E)
and apply the Adjustment to the flattened copy of the all the layers…
To re-edit the Shadow/Highlights… you’ll need to delete the layer and repeat the process…
Enjoy! As Always ’holler (send an email) if you have a question or comment.


No comments:
Post a Comment