Tuesday, February 25, 2014

Lightroom Part 2 --Week1 Bring YOUR Photos

Just a reminder that this week we are working on YOUR Photos This week.
Bring 2 or 3 in Raw format, Jpg is okay if that’s what you have.
Our goal is to establish a “Work Flow”

Enhance The Keeper Photos

  • Do everything you can in Lightroom
  • Only edit photos that are in a collection
  • Do Global Edits
  • Start with the Develop Basic Panel
    • Work your way down through each slider
    • Do not skip panels, especially the Tone Curves
    • TAT!
    • Other “Choices”
  • Do Selective "Local" edits
    • The adjustment Brush
    • gradients

    Polish

    • In Photoshop if Necessary

    Finish

    • Softproof
      • For Print
      • And, for the web!


See you in class!

Friday, February 21, 2014

LR-Week3 --Review

Sharpening

Every image will need sharpening
3 kinds of Sharpening
Input, SpecialEFX Output

Check out the Sharpening presets in Lightroom In the Develop Module Left Side
Sharpenprests


Cropping

What makes a photograph compelling? The subject and its composition in the photograph.
Rule? Trust your instincts! We are all a part of the universe and the basic principals underlying its construction.  One of those rules is a simple number sequence called the Fibonacci Sequence.
Images need to be cropped to straighten horizons, remove distractions, and zoom (enlarge) the subject. If you are printing an image at an aspect ratio of 5:7 and your photograph has an aspect ratio of 3:2, you'll need to do some creative  cropping.
NewImage


An image can be cropped to ANY aspect ratio!

  Spot Removal and Content Aware Fill


Editing in Photoshop

Some Lightroom edits are Global only… In the following example, the HSL Panel is a global tool. When you change Hue, Saturation, and Luminance in an image the edit applies across the entire image.

To apply two different Global edits you need to send your Photograph to Photoshop.  In this example we will export the image to Photoshop as a “Smart Object”
In the case where you want to combine two images, you can send both images to Photoshop in Layers… Here’s an example using a technique in Photoshop to make a mask by selecting colors
http://uofgts.com/PS-P2Site/selectionbycolor.html

#2: Printing...

Always Soft Proof and choose the right ppi for the printer of your choice!
In the Printing Module’s Print Job Panel, uncheck Print Resolution. You should see the native ppi of the print, if you don’t you need to turn on “Dimensions”  in the Print Module.
Dimensions
printppi
Check the Print Resolution box and let Lightroom UP Res the photo for printing.
  • If Image ppi is less than 360 up-sample Epson to 360 ppi
  • If Image ppi is less than 300 upsample Canon to 300 ppi
  • If image ppi is less than 720 but bigger than 360 upsample Epson to 720 ppi
  • If image ppi is less than 600 but bigger than 300 upsample Canon to 600 ppi
Print-upres

Tuesday, February 18, 2014

LightRoom --Week 2 Review

Loading a catalogue

To load a catalogue directly into Lightroom, locate the .lrcat ICON. In this example the catalogue is named “LR-CatDemo” A double click opens the LR-CatDemo.lrcat icon in Lightroom.  Lightroom can only load one catalogue at a time, so if you are using a different catalogue a requester will pop up asking if you want to switch catalogues.

Layout001 3 07 08 PM

To see how to EXPORT a catalogue like the one we Imported into Lightroom read this calls blog article  How to export a catalogue

You can use this export method to bring to class photos you are working on in Lightroom, or if you need to work on metadata on a different computer, say your laptop you can use this export technique.

If you want to bring some photos to class this would be one way to do so…

Below is a Bonus, Yet another way to import images into Lightroom


Adding & Syncing Metadata

See details here on the web page 

Adding and syncing metadata in Lightroom


Another Import Method:  Auto Import

To setup Auto Import you can find the menu at: 

File > Auto Import > Auto Import Settings… But before you do that make a folder on the desktop that you will use for Import You can use the finder to make a folder.  I named mine “LR-Ingest"

Layout003png

  1. This is your destination for the pictures on the hard drive,  choose it using the Finder… If you know which folder you want the images imported to, select that. Or make a Misc or a temp folder and then move the images from inside Lightroom.
  2. Choose however you want the image file(s) renamed
  3. Apply a preset if you wish
  4. Add Metadata
  5. And Key Words
  6. Choose how previews are handled.

This is a handy import method to use if you want to do a quick import into a current catalogue.


The Develop Module

  • Preliminary viewing and selection procedure…

    • Rough Editing (did that shot work?)
    • Quick Edits, no need to be precise, yet!
    • Select images Round 1
      • Put the rated images in a collection
      • Use Star * Ratings
      • Just use the #1 - #5 keys
      • In the first round, just use the #1 key, a single star rating.
      • Add additional Key words
      • Add IPTC Data
    • Rate images again in a second Round of viewing
    • Take a break, and come back and go over all your images one more time… (You may have missed something)

    Enhance The Rated Keeper Photos

    Only enhance photos that are in a collection!!

 Enhancing Photos in Lightroom 5: A Case Study

See the details on the following web pages

An over view of the Develop Module Panels includes shortcuts and an insight to what the various panels do…

http://www.uofgts.com//PS-P2Site/CRNotes/DevelopModule.html

Notes about Histograms

http://uofgts.com/Lightroom/DevelopModule/index.html

Photo Analysis Process 2010 vs 2012

http://uofgts.com/Lightroom/DevelopModule/part2.html

Working with White Balance

http://uofgts.com/Lightroom/DevelopModule/part3.html

Finding White, Mid-Gray and Black

http://uofgts.com/Lightroom/DevelopModule/part4.html

The Tone Curves

http://uofgts.com/Lightroom/DevelopModule/tonecurves.html


 Exporting Photographs to your Mail client (program)

Exporting Photos to your  Mac or PC mail client (Mac Mail or Outlook, Outlook Express, etc… )

Since there is a detailed “how to on line" an excerpt from Scott Kelby's Lightroom Book

Rather than reinvent the wheel…

http://www.peachpit.com/articles/article.aspx?p=717555&seqNum=13


Also check Adobe’s Lightroom Exchange for e-mail export plug-ins…


Looking for a good reference book?

Check out the links under  the reference tab

That out to do it for now

Got a question? ‘Holler 


Monday, February 3, 2014

Lightroom -Class#1 Review

Howdy!

Welcome to the Clark College Lightroom Class.

This is an outline of Week one's class discussion with web links.

Generally the Lightroom Primer website has detailed notes covering class material and discussions. If details need to be added you will find them in these class blog notes, or I will update the website.  

If you have questions contact me via e-mail, garry@uofgts.com or leave a comment

The Lightroom Primer website is http://uofgts.com/Lightroom/index.html

You can find these same  notes under the tab “Things to do First” at the above link

But, first a note…

Adobe has extended their Offer for Lightroom and Photoshop at $9.99 /Mo

This offer is available to anyone until March 31, 2014. There are no previous product ownership requirements. Learn more ›

And, enjoy!!!


Things you Need to Do Before You begin using Lightroom

1. Calibrate your Monitor


At the bare minimum you should make sure that you set the Brightness and Contrast of your monitor.

On the Mac go through these steps …

In System Preferences choose

Hardware > Displays > Color > Calibrate

and Follow the steps…

On the PC 

If you have Windows 7 or 8, You'll find calibration software in the Control Panel

To start Display Color Calibration

  1. Open Display Color Calibration by clicking the Start button Picture of the Start button, and then clickingControl Panel. In the search box, type calibrate display, and then clickCalibrate display color.‌ Administrator permission required If you're prompted for an administrator password or confirmation, type the password or provide confirmation.

  2. In Display Color Calibration, click Next to continue.

For more details go to this web page Calibrating Your Monitor


2. Establish a plan to ingest AND backup your Photographs
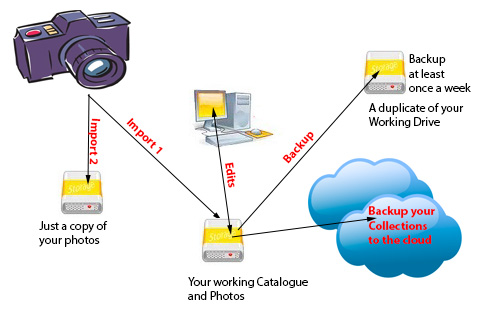
Backup Scheme

BakupDrive

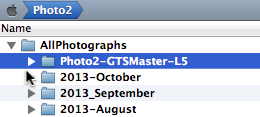
The Structure of your Main Photo hard drive and the backup hard drive should look like this, Your backup drive would have a different name

The folders are at the "root" of the Hard drive. 

If the Drive with the Working Catalogue fails… You just need to disconnect the failed drive, rename the backup drive with the name of the working drive… In this case Photo2, when you startup Lightroom, it will immediately find your catalogue and photos!!!

This method also allows the easy transport of All your photos and the Lightroom Catalogue!

3. Fill out and save your IPTC Metadata Preset

In Lightroom

Menu item:

Metadata > Edit Metadata Presets…

If you want to learn more about IPTC (International Press Communications Council) Metadata check out their website

4. Extra:  Here are two excellent videos 

How Lightroom works… A video by George Jardine (This should be required viewing for ALL Lightroom users. URL to the video is 

http://tv.adobe.com/embed/33/358/ 


And here is a video on how to use the Filter bar  http://mulita.com/training/sample-lib4/, A Free sample Movie by George Jardine

It's a really REALLY good tutorial on how to use the Filter Bar.


Whew! That should do it for now… If you have a question… 'holler


Adobe Improves and Extends Photoshop/Lightroom Offer

This offer is available to anyone until March 31, 2014. There are no previous product ownership requirements. Learn more ›

And, enjoy!!!