Tuesday, October 21, 2014

Importing iPhoto and Aperture photographs into Lightroom.

Way back when, Lightroom 3 used to be able to directly import photos from Apple’s iPhoto and Aperture’s convoluted storage method. Apple changed the structure apparently after I abandoned iPhoto (version 5 or 6/), and it suddenly became much more difficult to import photos into Lightroom.  On top of that this spring when Apple announced it was no longer going to support it’s Pro Application, Aperture there was some Panic from Aperture users about what to do.

Adobe to the Rescue. 

Adobe has released a plug-in for Lightroom that will allow you to Import BOTH Aperture and iPhoto Photographs directly into Lightroom!

The caveat is, not everything will import, but most important of all, You will gain control of YOUR images trapped in Aperture or iPhoto!

Here are the details, directly from Adobe’s Lightroom Blog

Aperture import plugin now available (It also works with iPhoto!)

Wednesday, September 17, 2014

Celebrating the Autumnal Equinox

Celebrating The Autumnal Equinox By Garry T. Stasiuk
An Equinox occurs when the Sun is directly over Earth’s Equator. Even though an equinox occurs at Precise Moment in Time — 2:29 AM Universal Time on September 23, of this year. The time that event occurs around the world varies, depending upon what time zone you located in on the Earth!
For the west coast of North America, the time of the Autumnal equinox is September 22, 7:29 PM PDT.
If you live in Edmonton, Calgary or Denver the time will be September 22, 8:29 PM MDT
Chicago is in the Central Time zone so the time the equinox happens will be September 22, 9:29 PM CDT, For New York it’s September 22, 10:29 PM EDT
For other locations around the world the time is:
For London, September 23, 03:29 AM BST -British Summer Time
For Dubai, September 23, 06:29 AM
For Tokyo, September 23, 11:29 AM
For Melbourne, Australia Tuesday, September 23 at 12:29 PM —which is actually the First Day of Spring in the southern hemisphere.
Take A GeoChron Selfie
So, what can we do to celebrate the Autumnal Equinox? Take a selfie with your GeoChron in the background at the moment of equinox! And, send it to us via Facebook! Post the picture here,
https://www.facebook.com/GeochronUSA

If you need to look up the time of the equinox for your city, the “Time and Date” Website, has a handy chart
 http://www.timeanddate.com/worldclock/fixedtime.html?iso=20140923T0229&msg=Sep- tember%20Equinox%202014

A Sunset or Sunrise Photograph (selfie)!
Image1 15If you really want to celebrate the Equinox you can also take a photo (or a selfie) of a sunset on the 22nd or a sunrise on the 23rd. On those days the sun will rise directly out of the east and set directly in the west! Because the sun is at or near the Celestial Equator, the Earth’s Equator drawn in the sky... The sun will be really close the the East and West cardinal points for 3 or 4 days. So, if the weather isn’t coop- erating you have a three or four day window to take the photograph. This is a way for you to fix in your mind, the direction of East and West for your location. We’d love to see those pictures too!


Places to Visit for the ultimate Sunrise selfie!

Other Solar Observatories around the world include, The Pyramids in Egypt, Teotihuacan in Mexico... the list is quite impressive. You can learn
more at this NASA websiteThe day of the Equinoxes was so important to our all ancient cultures, they builtsolar observatories to mark the date when the sun rose directly out of the east. The most famous monument is Stonehenge in England. In North America there are Medicine Wheels at Big Horn Mountain, Wyoming, Cahokia in Clair County, Illinois, and the Moose Mountain Medicine Wheel in Saskatchewan, Canada.
http://sunearthday.nasa.gov/ 2005/locations/gaocheng.htm

Post your photos at GeoChron’s Facebook Page https://www.facebook.com/GeochronUSA

Other Celebrations?
Eat moon cakes. The Chinese celebrate the autumn harvest and one of the popular “Foods” is the Moon cake, usually filled with fruit, duck eggs, Lotus and sesame seeds. !
If you live in Japan, The day of the Autumnal Equinox is a holiday to celebrate their ancestors having reached the other shore, nirvana. The celebration is called Higan or Higan-e, and is part of the Buddhist tradition is to visit, clean and decorate your ancestors grave site.
The Autumnal Equinox In Mythology

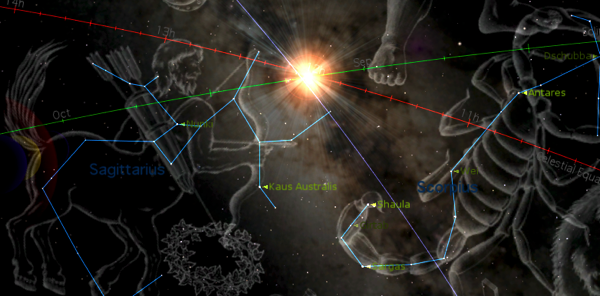
Image1 17In 2014, behind the Sun, with the aid of a Planetarium Program (Starry Night Pro), we can see that the Sun and the Celestial Equator is located between the constellations of Leo and Aquarius. No where near the Milky Way.


If we go far enough back in time, to around 4400 BC, (image below created by Starry Night Pro V 6), we see the Sun, the Celestial Equator (Earth) and the Milky Way aligned at an Autumnal Equinox. Many cultures including the Greeks, the Polynesian, the Sumo of Nicaragua and Honduras, the Pawnee and Cherokee, and yes the Egyptians and the Mayan all spoke of a time when our ancestors souls could cross 

Image2 19
from the mythical Earth into Heaven, the Milky Way. Perhaps this alignment was the first celebrated Autumnal Equinox so long ago! 

Monday, June 9, 2014

It's Your Turn

The Oil Trains

This is my rendition of the “Oil Train” 

The Challenge: Use Lightroom to “Develop” your version of the image.

\NewImage

You can download the image by clicking or right clicking and save as… Oil Train

The Link is a 36 megapixel NEF File.  Have Fun!

Friday, May 30, 2014

Slideshows, Movies, Music and Books

Homework

In the June 9th class we’ll focus on making a Book/Slideshow ( a requested topic) 

If you actually want to work along in class with your own images, You’ll need to do some prep work! Homework!

OUTPUT Prep:  Things you need to do First

    1. In the Library Module
      1. Put all your book/slideshow etc image files into a collection.
    2. At a bare Minimum, fill in he Metadata  information for each image with: Title, Caption, and Headline.
    3. This is the IPTC definitions for:
  • IPTC Core Content section

    Headline

    A headline is a brief publishable synopsis or summary of the contents of the photograph. Like a news story, the Headline should grab attention, and telegraph the content of the image to the audience. Headlines need to be succinct. Leave the supporting narrative for the Description field. Do not, however, confuse the Headline term with the Title term.

    IPTC Core Status section

    Title

    This field can be used as a shorthand reference for the image or “photograph” — primarily for identification. The title of an image should be a short, human-readable name — text and/or numeric reference —and may take several forms; for photographers this might be the filename of their original scan or digital camera file, for news organizations it might be the name of the story for which it’s to be used. (Note that there are new terms in the IPTC Extension which can also be used as image ID’s, if you are concerned about this field being overwritten later in the workflow). The Title term should not be confused with the Headline term, which is a short synopsis of the content of the photograph. There is a button in the panel which can be used to add the current file name to the Title field; however this will not work with a selection of images.

    Description

    The Description field, often referred to as a “caption” is used to describe the who, what (and possibly where and when) and why of what is happening in the photograph. If there is a person or people in the image, this caption might include their names, and/or their role in the action that is taking place. If the image is of a location, then it should give information regarding the location. Don’t forget to also include this same “geographical” information in the Image panel (location, city, state/province, country) of the IPTC Core. The amount of detail you include will depend on the image and whether the image is documentary or conceptual. Typically, editorial images come with complete caption text, while advertising images may not.


  1. In the Library module Sort (drag and drop) the images in your collection in the order you want them to appear in the book or slideshow
    1. You can sort image order in the Film Strip, but it is MUCH easier to do In the Library.
When you have done the above
If just want to bring the “collection” to class, “Right (Control) click the Collection in the collection panel and choose “Export this Collection as a Catalog…” and save it to a flash drive.
NewImage

If you want to try and follow my notes go a head and  Open your collection in the Book Module, click the Book Module Button 

If you have been working on any of the “output” Modules, you can bring the work from that module as a collection.  When you click Create Saved Slideshow  or Book, Print or Web Collection, Lightroom will save your work as a  special collection: 

Bring your exported specialty module to class!
 
I’ve written out some additional notes on using the Slide show and Book Module.

The Book Module Notes

Click on the Book Tab Book Module Notes


The Slideshow Module Notes

Click on the Slideshow Tab Slideshow Module Tab

Here’s a sample slideshow saved as a video.


USE of Music in your Productions.

“Royalty Free” Music
Just do a Google search for Video production music… Most of the “Pay For” companies offer some “free” samples for your use… However, Average price for an unlimited license for a single tune is generally $9.00 or less… 

Music with “Creative Commons” Licensing
It’s music that is “Royalty Free” and at no cost, because the Artist wants to share their music with you, it’s a way for them to get some “exposure” with a wider audience. The music is protected with a  “Creative Commons” License or a similar type of agreement, which spells out how you can use the composition.

Free Music Archive
Music ranges from Classical to just plain weird.

http://freemusicarchive.org

The music in video/slideshow in this article is from the website MP3 2000
http://www.mp3-2000.net/song/canton-136-71-1-schvisen-633988


See you in class! 

Wednesday, May 28, 2014

Importing and Merging catalogues in Lightroom

Importing and Merging catalogues in Lightroom

The Menu item is:

File  > Import From Another Catalogue…

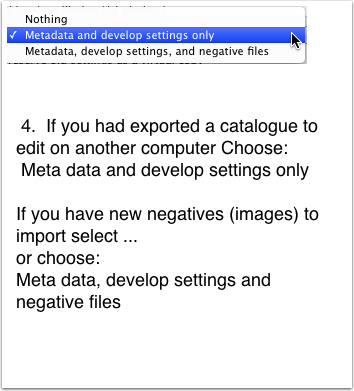
How you Import and Sync Images and Metadata from different catalogues will depend on your “setup”.

  • A:  Merging catalogues on your system or external drive(s)
  • B: Importing from another computer, either a laptop or desktop (e.g.: when shooting in the field)

Here are the main steps to do an import from another catalogue…

Step A:  

Determine the location of the catalogues on the COMPUTER(s).  

PC default Location        c:\users\my pictures\Lightroom\

Mac Default Location:      //Users/[user name]/Pictures/Lightroom/

This just helps you find them for the next step…

Step 1.

Start Lightroom loading your Master or Main Catalogue.    

(Hold down the alt/option key when you startup Lightroom) Note that, Lightroom defaults to loading the last loaded catalogue…

LR CatLoadpng

Step 2: 

The Menu item is:

File  > Importing From Another Catalogue.Use

Use the Mac’s Finder or the PC’s Windows Explorer to locate the “Other” catalogue.

Lightroom002

A double click on the .lrcat file will open the dialogue box below…

Step 3:

Check √ the Show Preview box lower left to see the thumbnails in the Import Catalogue.

Layout002png

Number 1 in image above…  

The 3 bars and the exclamation point indicates that there is “new” data

Number 2 in image above…  

If you want, you may choose to preserve “Old” setting in your CURRENT catalogue, LR will make a virtual copy for you.

Lightroom002png

Number 3 in image above…  

Choice #1:
Add New Photos to Catalogue without moving…

Use this option if you are happy with where the files are located, and you just want to tell LR where they are…


Choice #2:
Copy new photos to a new location and import… 

Your photos are on a Laptop or another computer, or you are adding or consolidating your photos into a single catalogue…

Choice #3:
Don’t Import new photos, You just want the metadata

Number 4 in Image Above… Replace:
LR 02png


Step 4  Click Import…

Other Hints… (Working in the field)

If you are using a second copy of LR on a Laptop and you are using LR’s default location to store the photos, when you get back to your desktop you will have to do the following.

1. Using your laptop, plug-in an external drive.

2.  Export your “Shoot" as a Catalogue to the external Drive.  

Menu:

File > Export as Catalogue…  To the External Drive.

3.  Eject the External drive from the laptop and plug it into your desktop

4. Load your master Catalogue in LR and use the Menu:

File > Import from another Catalogue

Follow the above import steps…


Wednesday, May 21, 2014

Tuesday, May 20, 2014

Keyboard Shortcut on-line app for Lightroom

Learning Aid 

by Waldo  Bronchart
http://www.waldobronchart.be

He only asks for a "donation" via GitHub

For Lightroom, Photoshop and Blender… available for Windows, Apple and Linux keyboards

It’ s interactive and online keyboard shortcut app! Try it out at 

http://waldobronchart.github.io/ShortcutMapper/

Application Shortcut Mapper

A visual shortcuts explorer for popular applications. This is a work in progress. More applications can be added by contributing on GitHub.


Lr keyboard

Wednesday, May 7, 2014

Perfect Effects 8 Offer – onOne Software

Perfect Effects 8 Offer – onOne Software: For FREE! Offer Ends May 12th

Perfect Effects 8 is a plug-in for Lightroom, and other Image editing Software.

Catch? There are seven other modules that they want you to purchase. OnOne Software is located in Portland.

The other plug-in that I’d want is Perfect Resize…


Friday, April 11, 2014

Total Lunar Eclipse April 14-15

A Photographic Opportunity 

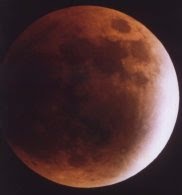
LeclipseThe photo at the left is a Total Lunar Eclipse I took with a Celestron 8, with a focal length of 2032 mm.

That eclipse was on September 6, 1979 The photo was taken Somewhere near Bull Run off of Larch Mountain Road in Oregon. Sky and Telescope editors thought the dark splotch on the left was “unusual”.

The up coming Total Lunar Eclipse on April 14-15, 2014 is well placed for a photographic opportunity in the Pacific Northwest

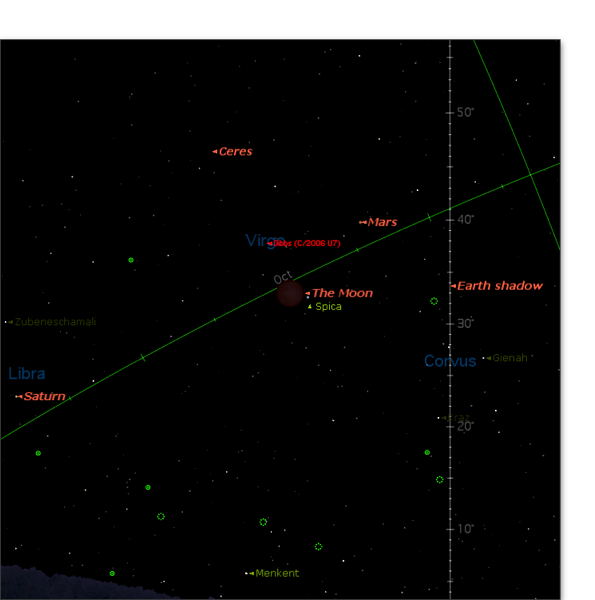
The Moon will be Almost Due South at the start of totality at 12:07am PDT.  The Moon will be 38 degrees above the Southern Horizon. Totality will end at 1:35 am PDT


This image is from “Starry Night” and shows the position of the moon at the beginning of totality as seen from Vancouver, WA…

Totality begins at 12:07 AM
Mars is just a little up and to the right of the Moon, quite bright at a magnitude of -1.5 Actually, Mars is at its closest approach to the Earth during the eclipse, the closest since 2007.  Will any one see green flashes?

Spica is very, very near, about 2 degrees from the lower limb of the moon.  Saturn is lower in the South Eastern sky.

Eclipse2014


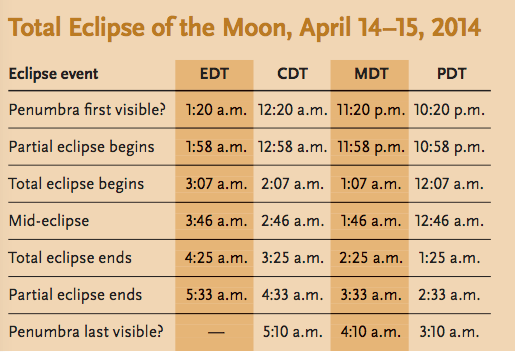
The following table of eclipse times is from The April 2014 issue of Sky and Telescope


NewImage


Lunar Eclipse, February 20, 2008

Eclipse

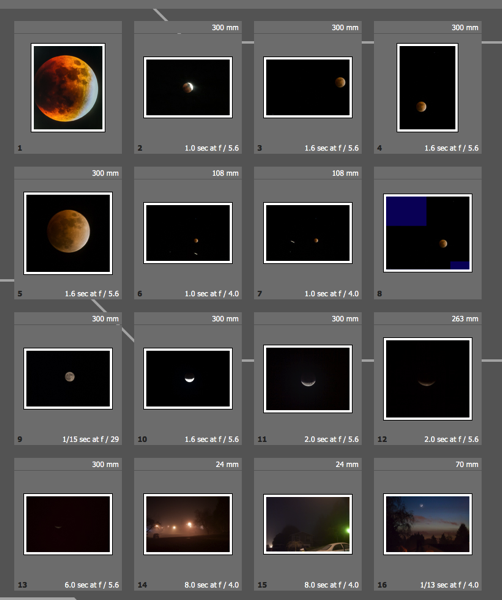
This image was taken with a Canon DSLR and a Sigma 70 - 300 mm zoom lens.

Exposure data
f/5.6 1.6 of a second, ISO 400 f.l. 300 mm

The image is well cropped…

Nice thing about a digital camera… you can see your results as you shoot…

You can see some of the 2008 and other eclipse photos  on my website with a few surprises…

Gts eclipses


The Lunar Eclipse gallery was updated on March 19  

http://www.uofgts.com/Lunareclipses/index.html

What you Need to Photograph the Eclipse!

Tripod

A digital camera capable of  a “Timed Exposure” or a Manual shooting Mode.

Set the Aperture of the lens fully open… (Smallest number… if thou has a f/2.8 to f/11 lens… use f/2.8)

Length of exposure?  You are going to have to experiment here… Time will depend on the f/stop, haze in the sky, and what ISO you are using.  For an eclipse use IS0 100.

Zoom up so the moon is a large as possible, or zoom to include part of a building or tree in the image!

If you have different lenses try them all out! You can experiment here as the eclipse lasts approximately 1 hour and 20 minutes 

Set Focus to infinity… If there is a bright street light in the distance, use that to set focus… If your camera has a “live” view, use it! In Live view mode magnify the image in the display screen to check focus… If it is slightly hazy out, you ‘ll have a Dicken’s of a time trying to focus… remember it’s not you or the equipment, it’s the Pacific NW sky!

Once you  have done all that… lockup the mirror — if you have an DSLR… Canon buries the mirror lock setting in its Function Mode…
If your Camera has a live view,  the mirror is already locked up.  

Just one more thing
Use the timer function to trip the shutter.  If you lockup the mirror and use the timer release, you’ll minimize “camera shake” caused by the slap of the mirror and the delicate touch of your finger on the shutter.

Have patience and have fun!


Monday, March 24, 2014

Lightroom -Last Class Review "Where to from here?"

Hope you enjoyed the class, and you had a wonderful Thanks giving… 

In the Last Class we worked on How to find the real picture in the photograph. using Cropping

http://uofgts.com/PS-P2Site/crop.html

So, Now what... 

Here are some other suggestions…

  • Take another class, At some point Clark will have a Photoshop for Photographers Class
Here are the links to Clark’s Registration
For
Take Better Photographs Part 1 and 2  January 10 and 24 (Saturday) All Day
 
A Photowalk February 28 (Saturday)  All Day
 
Photoshop for Photographers
Not available this winter term.
 

Garry's Favorite web sites

  1. The Luminous Landscape
    1. http://luminous-landscape.com/whatsnew/
  2. http://www.dpreview.com/
  3. http://www.imaging-resource.com/news
  4. http://www.photographyblog.com/
  5. http://theonlinephotographer.typepad.com/the_online_photographer
  1. Join a forum and lurk!

    http://www.photoshopforums.com/

    http://forums.adobe.com/community/photoshop

    At some point someone will post a question…  And you’ll be able to provide them the answer!  Pay it forward!

There are lots of videos on the Adobe TV web site

http://tv.adobe.com/

LUMINOUS LANDSCAPE  has a bunch of video tutorials that they sell. Get them and their video Journal...

http://luminous-landscape.com/videos/download-videos.shtml


And, Don’t forget the links to other reference material on the Class Lightroom Website Click the tab ‘Resources”

http://uofgts.com/Lightroom/index.html


One more thing
Don't be shy, Stay in touch and share your photographs!

and

Photograph, Photograph, Photograph!

Then in Lightroom & Photoshop

Practice! Practice! Practice!


Best  Wishes

Garry Stasiuk


Friday, March 14, 2014

Photographic Opportunity --Total Lunar Eclipse

Leclipse

The photo at the left is a Total Lunar Eclipse I took with a Celestron 8, with a focal length of 2032 mm.

That eclipse was on September 6, 1979 The photo was taken Somewhere near Bull Run off of Larch Mountain Road in Oregon. Sky and Telescope editors thought the dark splotch on the left was “unusual”.

The up coming Total Lunar Eclipse on April 14-15, 2014 is well placed for a photographic opportunity in the Pacific Northwest

The Moon will be Almost Due South at the start of totality at 12:07am PDT.  The Moon will be 38 degrees above the Southern Horizon. Totality will end at 1:35 am PDT


This image is from “Starry Night” and shows the position of the moon at the beginning of totality as seen from Vancouver, WA…

Mars and Spica are nearby and Saturn is in the South East.


NewImage


The following table of eclipse times is from The April 2014 issue of Sky and Telescope


NewImage


Eclipse


Lunar Eclipse, February 20, 2008

This was taken with a Canon DSLR and a Sigma 70 - 300mm zoom lens.

Exposure data

f/5.6 1.6 of a second, ISO 400 f.l. 300mm

The image is well cropped…

Nice thing about a digital camera… you can see your results as you shoot…

You can see some of the 2008 eclipse photos  on my website…

I updated my Lunar Eclipse gallery on March 19 and included other eclipses…


http://www.uofgts.com/Lunareclipses/index.html


New noise reduction routines in Lightroom should improve the image quality…

I’ll work on that!


Sunday, March 9, 2014

Slideshows, Movies, Music and Books, Oh Boy!

In class we’ll focus on making a Book ( a requested topic) 

If you actually want to work along in class with your own images, You’ll need to do some prep work!

OUTPUT Prep:  Things you need to do First

  1. In the Library Module
    1. Put all your book/slideshow etc image files into a collection.
  2. At a bare Minimum, fill in he Metadata for each image with: Title, Caption, and Headline information.
  3. Sort (drag and drop) the images in the order you want them to appear in the book or slideshow
    1. You can sort image order in the Film Strip, but it is MUCH easier to do In the Library.
When you have done the above
If just want to bring the “collection” to class, “Right (Control) click the Collection in the collection panel and choose “Export this Collection as a Catalog…” and save it to a flash drive.

If you want to try and follow my notes go a head and  Open your collection in the Book Module, click the Book Module Button 

Book catalogue


If you have been working on any of the “output” Modules, you can bring the work from that module as a collection.  When you click Create Saved Slideshow  or Book, Lightroom will save your work as a  special collection:  Book, Slideshow, Print or Web Collection!
You can export that specialty module and bring IT to class…


I’ve written out some notes on using the Slide show and Book Module.

The Book Module Notes 

Click on the Book Tab Book Module Notes


The Slideshow Module Notes

Click on the Slideshow Tab Slideshow Module Tab

Here’s a sample slideshow saved as a video.


USE of Music…

You can purchase “Royalty Free” Music or you can use music that is “Royalty Free” because they are being shared by the Artist for your use.

 The music is usually protected with a  “Creative Commons” Licensing or a similar type of agreement.

Try this web site

Free Music Archive

http://freemusicarchive.org

Music ranges from Classical to just plain weird.

The music in the video below is from the website MP3 2000

http://www.mp3-2000.net/song/canton-136-71-1-schvisen-633988


If you have time to burn, just do a Google search for Video production music… Most of the “Pay For” companies offer some “free” samples for your use… Average price for an unlimited license for a single tune is $9.00 or less…

See you in class! 

Compositing in Photoshop/Elements

Howdy

Sometimes you have a photograph of an individual, but the background is really distracting… So, you want to eliminate the background and add “something”.

The only way to do that is to make a composite image in Photoshop, PSElements or a Photoshop wanna  be program.

Below are some examples with links to detailed instructions on how to complete the project.

Sample 1: An e-card

Composited in Photoshop Elements, Using the Magic Extractor in Photoshop Elements

Quick Final


Sample #2: The Pen is mightier than the sword

For the following technique you’ll need to learn how to use Photoshop’s Pen Tool

and you’ll get results like this…

Making selections with the Pen Tool and refining the edges in Photoshop

SavanafinalLayermask


Yep, learning Photoshop is whole other class!


Thursday, March 6, 2014

Develop Module, Soft Proofing, Importing Presets, Using Presets, Work Flow From Camera to Catalogue, To Photoshop And Back. More on Workflow, Exporting Images, emphasis on Size. Tone Curves: Parametric Vs Point Curves, Point Curves: Linear, Medium Contrast, Strong Contrast…

Exporting your Photographs

The question to ask yourself here is what are you going to do with the image file, where do you want to send your image files, and in which format (as a .jpg, .tiff, .png, .psd., raw enhanced, raw original)?

Export To:

Export1Where?  To an email, to a folder on a hard/flash drive, to a DVD/CD.
You make your choice in the Export To:  Drop Down Menus.  The Export to DNG and For Email (Hard Drive) menu choices give you some extra options.

In the example image I have added some “other” plug-ins to Lightroom, they are listed below the 3 standard Choices

You can find Export Plug-ins at the Adobe exchange (some are free some are Commercial), or just search the internet for Lightroom Export Plug-ins.


In the Preset Window you can choose default settings for:

  • Full Sized jpg’s,
  • for exporting as DNG files,
  • for email (Lightroom style) or
  • email but, also save images to a folder on a hard drive…
If you want to add a new setting, choose a preset, “single click” to highlight it, and click Add, name the new preset and click Create…
 
When you change the settings, right click on the newly created preset and choose “Update with current settings” 
as shown below… Be careful in filling out the values in a “box” if you press the return key the Export will immediately startup…

ExportSettings

.


See you in class…

There are other ways of “Exporting” your images.  You can make slideshows, books, Web Pages, and make prints.

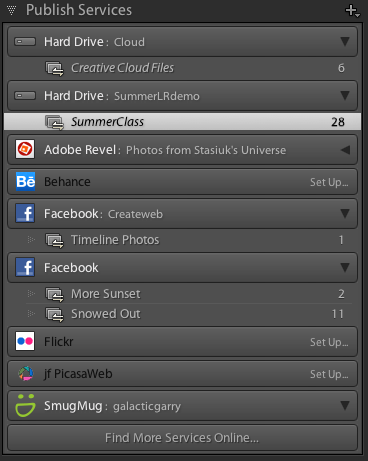
You can also publish your images to other services

NewImage


Tuesday, March 4, 2014

Where do I put 3rd Party Presets?

This is actually trickier than it seems…
You have 2 choices…

By default, Lightroom will store Presets in a folder on your System Drive.  If your catalogue is NOT a default catalogue, but on a separate hard drive, AND If you start up your catalogue on another computer, the presets will NOT be available!
So, the second choice is to store you presets √ Store presets with “this” catalogue! “This” = to an external Hard drive (location).

Choice 1 : The Default…

Go to Lightroom: Preferences > Preset Tab


Clicking on the Show Lightroom Presets folder opens the above on a Mac
 and looks like this in Lightroom…
Defaultpresets


Choice 2: √ Store Presets with This Catalogue…

√ Check Store presets with This Catalogue


You will notice That to get to the Develop Presets folder I had to open Lightroom Settings folder, and then look for the Develop Prefs folder
ExternalFolder


In Lightroom the presets look like this…
Externalpresets


Most downloadable presets come with installation docs
You know what to do, If all else fails?!!!


Question: What should I cover in class?

In no particular order this is the response:

Develop Module, Soft Proofing, Importing Presets, Using Presets, Work Flow From Camera to Catalogue, To Photoshop And Back. More on Workflow, Exporting Images, emphasis on Size. Tone Curves: Parametric Vs Point Curves, Point Curves: Linear, Medium Contrast, Strong Contrast…

Presets

There are lots of presets available for free, or purchase. 

Free Presets for Adobe® Lightroom® – onOne Software

100 Free Lightroom Presets (And How to Make Your Own) - Tuts+ Photography Article

8 Sites for Free Adobe Lightroom Presets - Digital Photography School

Don’t know what to do, to make your Photo “better”?  (#4 from Top 10 TYNTK  (Things you need to know (about Lightroom)… )

Is there a color in the scene/portrait that you "remember" photographing? Color of the flower, skin, sky, grass, leaves, trees... Make changes to make those colors appear on your monitor.Color doesn't work? Make a virtual copy and try a "Black & White" or spit tone the Photograph

Still Don’t know what to do?  Try a Lightroom Preset.
Lightroom is “Preset Happy”!  And come with some “Built-in” Presets…
Caveat:
Be careful when using presets…  

If you are trying out different presets, always remove/delete the preset, before applying a different one.  If you don’t more than likely you’ll wind up with “settings” being added from the previous preset. And you won’t get what was intended by the preset… 

  • Use Undo Keyboard Shortcut
  • Control + z (PC)
  • Command + z (Mac)

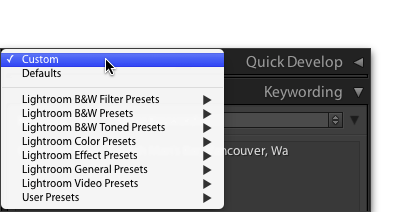
Presets are available in:

  • Importing and The Quick Develop panels
Importing… In the Apply During Import Panel 
Quick Develop… 
If the Quick Develop panel is closed The Presets are available in the Panel’s top bar…
PanelClosedPanelopen


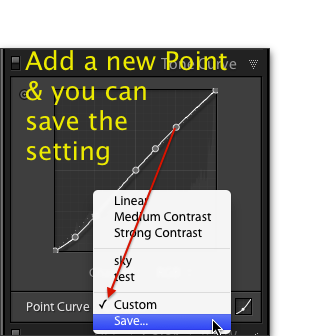
  • Tone Curve —-The POINT Tone Curve Panel
You can save a preset anytime you add a new point to the graph… But, remember the curves are unique to the image, especially if you are using TAT (Targeted Adjustment Tool)
 
PointCurve


  • Tool Bar - The Adjustment Brush
DropDown


ToolBar AdjBrush


  • Export
To make a preset for Exporting your images, You need to choose Export To:  Email, Hard drive, or CD/DVD 
 
Then Choose an existing Lightroom Preset… 
Fill out the Dialogue Box   BUT!!!
 
BUT, Before you click the export button Click “Add” at the bottom of the Preset: Panel…
 
Export


  • Also templates for Printing, Web pages, (Web Templates and Galleries) 
Printing:  Lot’s available on the internet…
 
http://laurashoe.com/2013/06/24/great-lightroom-print-templates-for-free/
 
Web Template/Galleries
 
Here’s a free set from “The Turning Gate”
 
and, this is what one of the free HTML Galleries Looks Like…
 
Webpage


Tuesday, February 25, 2014

Lightroom Part 2 --Week1 Bring YOUR Photos

Just a reminder that this week we are working on YOUR Photos This week.
Bring 2 or 3 in Raw format, Jpg is okay if that’s what you have.
Our goal is to establish a “Work Flow”

Enhance The Keeper Photos

  • Do everything you can in Lightroom
  • Only edit photos that are in a collection
  • Do Global Edits
  • Start with the Develop Basic Panel
    • Work your way down through each slider
    • Do not skip panels, especially the Tone Curves
    • TAT!
    • Other “Choices”
  • Do Selective "Local" edits
    • The adjustment Brush
    • gradients

    Polish

    • In Photoshop if Necessary

    Finish

    • Softproof
      • For Print
      • And, for the web!


See you in class!

Friday, February 21, 2014

LR-Week3 --Review

Sharpening

Every image will need sharpening
3 kinds of Sharpening
Input, SpecialEFX Output

Check out the Sharpening presets in Lightroom In the Develop Module Left Side
Sharpenprests


Cropping

What makes a photograph compelling? The subject and its composition in the photograph.
Rule? Trust your instincts! We are all a part of the universe and the basic principals underlying its construction.  One of those rules is a simple number sequence called the Fibonacci Sequence.
Images need to be cropped to straighten horizons, remove distractions, and zoom (enlarge) the subject. If you are printing an image at an aspect ratio of 5:7 and your photograph has an aspect ratio of 3:2, you'll need to do some creative  cropping.
NewImage


An image can be cropped to ANY aspect ratio!

  Spot Removal and Content Aware Fill


Editing in Photoshop

Some Lightroom edits are Global only… In the following example, the HSL Panel is a global tool. When you change Hue, Saturation, and Luminance in an image the edit applies across the entire image.

To apply two different Global edits you need to send your Photograph to Photoshop.  In this example we will export the image to Photoshop as a “Smart Object”
In the case where you want to combine two images, you can send both images to Photoshop in Layers… Here’s an example using a technique in Photoshop to make a mask by selecting colors
http://uofgts.com/PS-P2Site/selectionbycolor.html

#2: Printing...

Always Soft Proof and choose the right ppi for the printer of your choice!
In the Printing Module’s Print Job Panel, uncheck Print Resolution. You should see the native ppi of the print, if you don’t you need to turn on “Dimensions”  in the Print Module.
Dimensions
printppi
Check the Print Resolution box and let Lightroom UP Res the photo for printing.
  • If Image ppi is less than 360 up-sample Epson to 360 ppi
  • If Image ppi is less than 300 upsample Canon to 300 ppi
  • If image ppi is less than 720 but bigger than 360 upsample Epson to 720 ppi
  • If image ppi is less than 600 but bigger than 300 upsample Canon to 600 ppi
Print-upres