Wednesday, November 27, 2013

Slideshows, Movies, Music and Books

Oh! Boy!

I’ve written out some notes on using the Slide show and Book Module.  

The Slideshow Module

Click on the Slideshow Tab Slideshow


Music…

You can purchase “Royalty Free” Music or you can use music that is “Royalty Free” because they are being shared by the Artist for your use.

 The music is usually protected with a  “Creative Commons” Licensing or a similar type of agreement.

Try this web site

Free Music Archive

http://freemusicarchive.org

Music ranges from Classical to just plain weird.

The music in the video below is from the website MP3 2000

http://www.mp3-2000.net/song/canton-136-71-1-schvisen-633988


If you have time to burn, just do a Google search for Video production music… Most of the “Pay For” companies offer some “free” samples for your use… Average price for an unlimited license for a single tune is $9.00 or less…


The Book Module

Click on the Book Tab  Book


Thursday, November 21, 2013

Adobe Extends Photoshop/Lightroom offer to all Photographers

For a limited time (Until Dec 2nd)

117729 mm adobehi res story general template v2 1

Initially launched in September, Adobe's Photoshop Photography Program aimed to support the workflow needs of photographers who use Creative Suite 3 or later. Adobe has announced a limited-time extension of its program to all photographers. Offering access to Photoshop CC and Lightroom 5, 20 GB of cloud storage and Behance ProSite, users can access all software content through Adobe Creative Cloud with a $10 per month annual subscription. This extended offer began today, running until December 2, 2013 a 11:59 PST, and upon expiration, the Photoshop Photography Program will continue to be available to those who own a previous version of Photoshop, Photoshop Extended, or Creative Suite 3 or later, until December 31, 2013.


Monday, November 18, 2013

Editing a Photoshop Action

Editing Actions...

In summary here’s what you need to know to edit GTS.atn in the LR-Week5 folder

Step1

Send an image to Photoshop (In Lightroom, Rightclick on an image and Edit In  > Photoshop

Or Startup Photoshop and Load a large photo at least 3000 x 2000 pixels and then Open the Action Panel

Menu:
Window > Actions

Step 2
Load the action you want to edit or locate it in the Action List.

We want to make a copy of it, but first we need to make a folder for the action.

NewAction


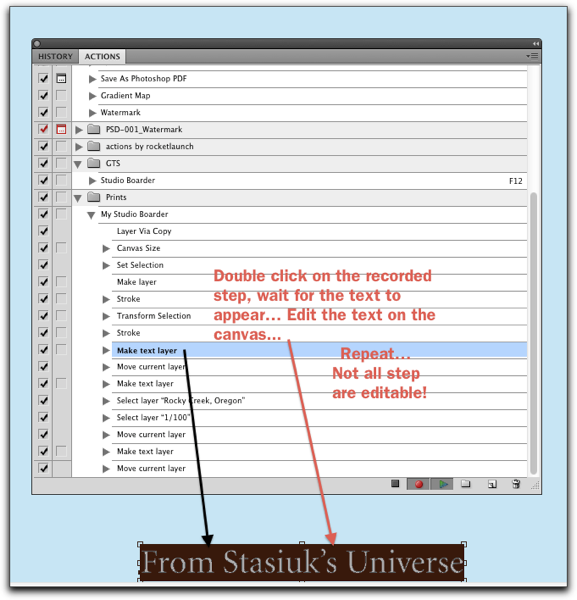
 Most steps in an action can be edited… In the GTS.atn  (Studio Print Action) You’ll want to edit the text, maybe the stroke…

Just double click the step… wait a bit… either a requester will popup or you can make edits right on the canvas. See the Text Tool Example below.

Editactions


But, what if a step isn't editable?  Just delete the step and re-record it!


Or, just make yourself a new action… Practice what you want to do… write the steps down...


and Camera! Lights! Action!


Part 2  You can do these steps in Photoshop Elements, or any image editor…

Here's the steps I recorded  for the Studio Print


Step 1.
Duplicate your picture
(pc) (Control + J) (Mac) (Command + J)

Optional Step
Select an Adjustment layer like "Levels" or "Hue & Saturation or "Black and White" to change the photo an arty Sepia, duotone or Black and White!

Step 2.
Add white space around the photo.
PhotoShop: Menu: Image > Canvas Size
PSE: Menu: Image > Resize > Canvas...

Choose relative and 2 inches, 2 inches
Click OKAY

Step 3.

In the duplicate layer on the thumbnail of the photo
Press the (PC) Control key + click (left) mouse once
Press the (Mac) Command key + click the mouse once
this will put a selection around the photograph.

Step 4.
Create a new blank layer

Step 5.
Go to the Menu: Edit > stroke
choose 1 pixel (I like at least 4 pixels) and set the color (Black)(I like mid-gray) in the color swatch button
location, choose center.

Step 6.
Click Okay (You can change opacity if you wish)

Step 7.
Go to
menu

Select > Transform
In the tool bar change 100% width to 102% and 100% height to 103% Click the check mark

Step 8.
Go to
Menu: Edit > Stroke
Choose 1 pixel (I like 4 pixels) and change the color to black (I like a mid - gray) Click Okay

Step 9.
Use the type tool (Tool Bar), use at least a 36 pt fancy font Script like Minion or Trajan for the title “Yourname Studio”

N.B.
If you run this "action" and if you don't have any of the indicated fonts, Photoshop will substitute the "default" font.

Step 10.
use a written font like Hand Writing Dakota for the Number of the print (1 / 100) at the bottom left and your name at bottom right

NewImage

Have fun!


Watermarking and Digitally Signing your prints.

Part 2 Watermarking and Digitally Signing your prints. 

 Is there a right way to do this?

Placing a copyright notice on the images you post on the internet and signing your prints (digitally, or not) are two different issues!

Copyright
One places a watermark on an image to tell the world that the image is copyrighted, and in order to use the image in any kind of publication, the publisher must have the copyright holders permission.

Only in the United States of America
A photograph is copyrighted the moment you take the photograph, but in the US of A, if you need to take legal action you must have first registered the photograph with the US Copyright Office! Here's a link to the eCO online registration system. The registration allows you to obtain punitive and compensatory damage in a court of law if your image has been used without YOUR permission. Download the necessary form here.

Since 1989 and the Berne Convention you no longer need the © Copyright symbol, you can type the symbol on a Mac it's:

Keyboard Option G (Mac), on the PC it's  Alt plus the numeric keypad sequence 0169

You also do not need the Phrase "All Rights Reserved" for foreign country copyright protection.

However, the © symbol is so engrained that seeing it automatically tells one that the image is copyrighted.

Watermarking a photograph
Do you really need to? Generally the images you place on the internet are too small (Around 800 pixels or so) to make decent prints. It's my opinion that a watermark really distracts from the image.

N.B.
If you do watermark the image, don't make it hard for whom ever is viewing the image to contact you!

In Photoshop

Step1:
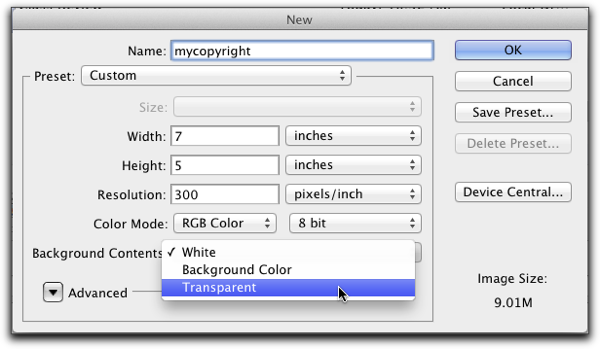
Start with a new blank page with a transparent background. The Photoshop default size for a new page will work just fine, but set the background to transparent. You can name the new page mycopyright
NewImage


Step 2:
Choosing a font, and size… If you have a favorite font or one that you have chosen to use on your website or with your stationary, use that.
You can always change your choice later. I'm using Myriad Pro. In the Text Tool Bar also choose "smoothing" in the ant-alias method drop down menu.

NewImage


Step3:

Type the following

  1. Include the copyright symbol: ©

    Keyboard Option G (Mac), on the PC it's  Alt plus the numeric keypad sequence 0169

  2. Include the year, or more precisely the date of your photo's publication

  3. Include your professional photography business name and add "All rights reserved" on a separate line

    Example

    © 2011 Garry Stasiuk                        (If I'm shooting "professionally" It's © Copyright  2011 Stasiuk Enterprises)
    All rights reserved

Step 4

Crop to only include the text you typed…

I used:

Tool Bar > Rectangular Marquee

Then:

Menu Image > Crop

Mycopyright


Step 5:

Control D (PC), Command  D (Mac) to deselect the "marching ants"
NewImage

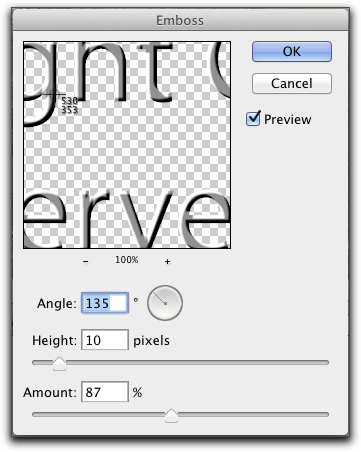
Emboss the text…

Menu: Filter > Convert For Smart Filter

Menu: Filter > Stylize > Emboss...

Because it's a smart object, if you want to change the embossing effect, you may do so...

Save as a .psd file. my copyright.psd

If you are saving for use in Lightroom or some program other than Photoshop save the file as mycopyright.png

(The .png file format allows transparency)


Step 6:
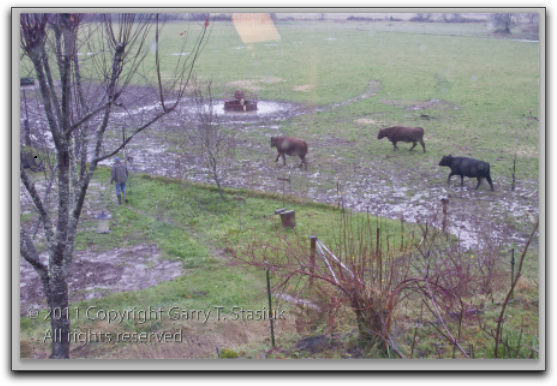
Open an image that you want to apply the copyright notice.
Drag and drop the image "my copyright" on the new photo and place it with the move tool at the location you want on the image.
NewImage

Step 6…
Nice for one image, but what if you have 1,000's you want to watermark!!!

1. If you use Lightroom to output Web Pages, you'll discover that most of web page "engines" have a watermark feature built in, that automatically paces your watermark on the images. You'll need to use the .png file "mywatermark.png" that you saved earlier.

2. In Photoshop you can make an action, and batch the action so that it'll be applied to as many images as there are in the folder...

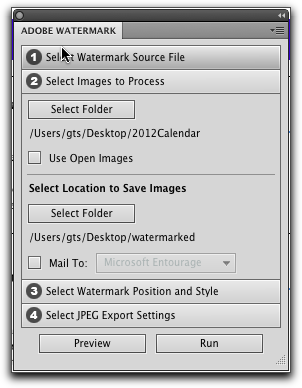
But,  better still you can install a Russell Brown Adobe Extension for Photoshop that does it all for you!
NewImageSee… Making a “Digital Signature" for your Prints!


Signing Your Prints Digitally

Part 1 Making the Signature...

Why Sign Your Prints?

This blog article, says it all… It's on a web site named Epic Edits, a resource and community for photography enthusiasts.

Making Fine Art Prints: Signing!

Here's how to add your signature to a print.

1. Use the Studio Print Action. The action adds a blank space around the image, fakes a matt and adds an electronic version of your signature.

2. You can leave the signature area blank and actually sign the print in the blank area. Many photographers use a pencil do do this! Some photographers mount the photograph on a mat and sign the mat after the print has been mounted and matted. If you choose this method… Practice! Your signature, Practice writing on a mat, Practice first!

3. Some folks buying a print prefer to have the actual print signed!  If you are buying a print, don't be afraid to ask the photographer to sign it the way you want!… I purchased a print from Michael Reichmann, and since it was a photo he took in China, I asked him to sign it with his "chop." He did! Nice!

Here's how to do it electronically!

Step 1: On a good piece of white paper, write your signature with a good pen!

Step 2: Scan it at the highest resolution possible. If your scanner has the setting "Line Art" choose that and save it as a .tif file

Step 3: Load the scan into photoshop and paste the signature onto a blank layer.

NewImage


Step 4: Use the color selection tool to select the white background. Click okay.

Step 5: Invert the selection

Menu

Select > Inverse

Step 6. Copy the selection to a new blank layer

Command + J (Mac)

Control + J (PC)


Step 7: Delete the layer with the white background

NewImage

Step 8.

BTW Crop the signature as small as possible...

Then save the file as a .psd file for the next step, and save the signature as a .png file to paste as a "watermark" on your "signed" photos.


A Fancy Electronic Signature

If you have a logo, or a symbol or your own "chop", you can use that...

I'll use my chop...

Step 1: Scan the chop, make the background transparent and arrange the chop and signature on a new blank layer

NewImage


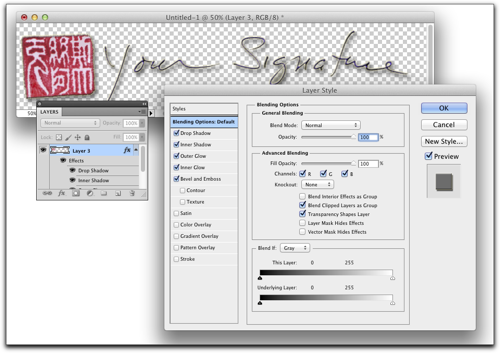
Step 2: Merge the layers and select fx at the bottom of the Layers Panel and choose "Blending Options"


NewImage


Step 3: Play, fiddle until you get something nice...

Step 4: Save a PSD version for future editing and save a .png version for Digitally Signing your prints!


NewImage


Sunday, November 10, 2013

Lightroom Week 4 Review

Howdy

Edit as a smart object…

In class we learned how to send a raw file to Photoshop as a smart object, and used the fact that saved snapshot settings travel with a raw file.  (They are embedded in the raw file) We used the TAT (Targeted Adjustment Tool) in The HSL panel to make 2 different global edits 

We saved the setting with makeup first and then one without makeup, saving each as a Snapshot setting…
We sent the image to Photoshop as a smart object and used layers in Photoshop… 

Before andAfter

You will find the details on how this was achieved on the web page Editing as a Smart Object in Photoshop

 The Adjustment Brush

We also looked at Editing Locally using the Adjustment Brush in the Tool Bar in the Develop Module

Tool Bar


With the Adjustment Brush you can apply Local Edits, edits that are confined to a part of the entire image… 


NewImage  You can find the details on how this is done on the web page The Adjustment Brush


Spot  Removal

We also learned how to remove Spots caused by “dust on the sensor…” 

Lightroom003

 and apply the dusting out to a series of photos…

Lightroom004

Select Only Spot Removal and click the synchronize button..

Lightroom005

The dust removal is applied to ALL SELECTED PHOTOS…

Reminder, there is NO Class November 11th

See you all on November 18th


Friday, November 8, 2013

Catching up.

Reminder, There is No class on Monday, November 11th  Veteran’s Day. (Remembrance Day in Canada)

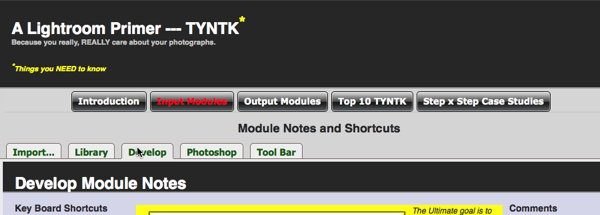
I have revised the class Lightroom website to make it easier to find the following:

  • Notes about each Module in Lightroom is divided into “Input” and “Output”
    • The Module tabs under Input and Output contains keyboard shortcuts and a brief synopsis (notes) about that module…
  • The Button Link Top 10 TYNTK are things that you NEED to know about Lightroom
  • The Button Link  Step x Step Case Studies takes you to a portal with all the material, or Case Studies (Tutorials) covered in class… 

Safari001


Week 3 Catchup… The Tone Curve Panel

The key in the Tone Curve panel in either the Point Curve or the Parametric Curve panel is “TAT” The Targeted Adjustment Tool…

The Tone Curves “Fine Tune” Contrast settings and can “sharpen” an image

Do NOT just use the Tone Curve panel to “tone” your photographs, use the Basic Panel First!

Contrast increases or decreases image contrast, mainly affecting mid-tones. When you increase contrast, the middle-to-dark image areas become darker, and the middle-to-light image areas become lighter. Generally, you use the Contrast property to adjust the contrast of the mid tones after setting the Exposure, HighlIghts, White and Black values.

The Tone Curve Panels 

ToneCurevwpng

In the Point Curves Panel you can add points by directly clicking on the curve

  • you can also modify (Brighten darken colors in each color channel (R,G,B)
  • RGB Curves are very effective for removing color casts
  • Point curves do not affect the Parametric curves

 There are two really good videos about using the Tone Curves…

One is at the Adobe Web Site http://tv.adobe.com/watch/learn-lightroom-5/adjustments-with-tone-curve/

The other is by George Jardine…

Tone Curves http://topdownvideos.com/training/sample-dev4/


Enjoy!!!


Saturday, November 2, 2013

Need an External Drive?, Black Friday is coming!

I use the kind of internal drives that are used in workstation desk tops, except that I use them externally!

My recommendation as to the kind of drives are:

  • Seagate Barracuda ST2000DM001 
  • You can get them in 1, 2 or 3 terabytes sizes
  • Or 
  • Western Digital WD Black, Red or Green and they
  • also comes in 1, 2 or 3 terabyte sizes


You’ll need some kind of an enclosure or case for the hard drive:

  • I use a Rosewill RX-DU300 2.5" & 3.5" USB 3.0 Hard Drive Docking Bay
  • Or  you can get a 
  • Thermaltake BlacX ST0005U 

But, there is a wide variety of enclosures available.  I like the docking variety as there is no assembly required and it is easy to swap drives!  They connect via USB, Get one that uses USB 3.0

Just make sure the enclosure can hold a 3.5 inch esata drive and can handle the terabyte capacity of the drive … most enclosures can handle up to 2 terabytes… 

Here is a bunch of enclosures listed as available at newegg.com
http://www.newegg.com/External-Enclosures/SubCategory/ID-92

The next step up is to get and use a “RAID” 

  • RAID
    •  (Redundant Array of Independent Disks), a system of multiple hard drives for sharing or replicating data

Search for these on Google or the search engine of your choice…Black Friday is coming… prices should drop in the next few weeks…


Enjoy!!!