Free Public Beta Photoshop CS 6

- Auto and background save options.
- Content-Aware Patch and Move tools,
- Additional photographic blur filters,
- Increased video editing capability
- Adobe Camera Raw 7.
Enjoy!!!

Enjoy!!!
I'm often asked… now that the classes are over, what do we do now?
Here are some suggestions...
Take another class, CS 6 will be out soon!
Visit Websites, go to the library…
… This is a Collection of Photoshop Websites, it's a bunch of Links to most visited/popular blogs
http://photoshop.alltop.com/
A Collection of LightRoom Websites
http://lightroom.alltop.com/
Photoshop Tutorials from Layers Magazine
http://layersmagazine.com/category/photoshop/page/8
National Association of Photoshop Users
http://www.photoshopuser.com/
The best Photoshop Magazine in my opinion is PhotoShop Creative
http://www.photoshopcreative.co.uk/
Garry's Favorite web sites
Join a forum and lurk!
http://www.photoshopforums.com/
http://forums.adobe.com/community/photoshop
At some point someone will post a question… Give them the answer!
There are lots of videos on the Adobe TV web site
LUMINOUS LANDSCAPE has a bunch of video tutorials that they sell. Get them and their video Journal...
http://luminous-landscape.com/videos/download-videos.shtml
George Jardine has a terrrifics web site a a series of video
One more thing
Don't be shy, Stay in touch!
and
Practice! Practice! Practice!
Photograph, Photograph, Photograph!
Best Wishes
Garry Stasiuk
Howdy
Just a reminder… Saturday’s agenda
Bring some portrait photos and landscapes to class! As, usual I will have a few demo pics for you to work with if you don’t have any of your own…
Up Coming Classes
How Do I Take Better Digital Photographs: 2 classes one March 24 and the other April 7 (9-4 PM)
Photo Walk April 14 (9 - 4 pm)
Create Your Own Web Site May 9th - (6 weeks)
In the summer I'll do a Photoshop Projects class for Beginners (It's Valeri's Basic Photoshop Class, except we work on actual projects) First week in July (date tentative)
Also
Adobe Lightroom Thursday 7/5 6-9:30pm


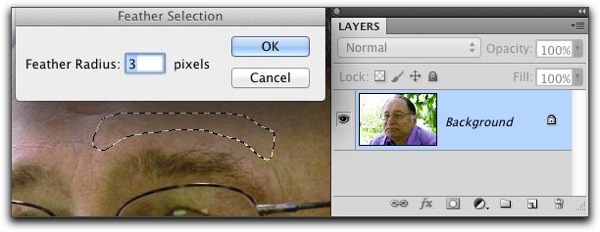
 When you make a selection with the patch tool, draw a contour that follows the upper shape of the eyebrow.


Just a reminder for you to
Bring your own broken or just plain difficult to "enhance" photos to class...
We'll put our collective resources together and figure out how to make 'em better!
Links to Class Web Pages
Here's a faq page about the Java Script we used in class
The Golden Crop THe ultimate solution for Photoshop
http://goldencrop.sourceforge.net/faq.html
Rule:
Crop to remove distractions from the subject of the photo. The crop can be square, round, or a rectangle, or ???
Also note: It is helpful to know what the aspect ratio is of the images your camera saves...
35mm film has an aspect ratio of 3 to 2 (Most DSLR's adhere to that ratio)
There are some cameras that use a 4 to 3 ratio (same as the Old tube TV's and monitors)
Some Cameras use the wide screen TV format of 16 to 9
And! Some camera use a 1 to 1 aspect ratio (A Square) and others 5 to 4
And, yes some digital cameras will yet you choose! 3 : 2 or 4 : 3 or 5 to 4 or 16 : 9 and even 1 : 1
NOTE:
If you change the images aspect ratio to make a print with a different aspect ratio, say, 5 x 7 or 8 x 10
You WILL LOOSE part of the image! There is no way around it… Crop creatively!
I found a really excellent video on Black and White conversion using Lightroom on the Luminous Landscape web site. The Video features Michael Reichmann and Jeff Schewe. It is an excerpt from their video tutorial sequence Camera to Print and Screen.
Michael takes us from his original photo through to the black and white conversion in this video step by step. To detail his process of how he arrived at the final image Michael uses Lightroom "History". With History in Lightroom he shows us what he did... step by step (Quite innovative!) Watch the video full screen! I really found the video refreshing and inspiring. http://www.luminous-landscape.com/tutorials/bw_workflow_in_lightroom.shtml. The whole series is outstanding!
Enjoy!!!
Create a "Black & White" or "Split Toned" Photoshopped Master piece!
Post your "Photoshopped Photo" to the Class blog
Price dropped from $299 to $149 for the FULL version
Upgrade price is now just $79.00
If you purchase Photoshop CS 5.5 or the Creative Suite CS 5.5 you can get Lightroom for $99
details
http://www.adobe.com/products/photoshop-lightroom.html
ENJOY!!!!